What’s New in Nero Screen Recorder 2026?

The 2026 update for Nero Screen Recorder is here, bringing smarter and smoother recording tools to make your content creation more dynamic than ever. Whether you’re recording tutorials, gameplay, or presentations, these new features are designed to help you work faster and deliver more professional results.


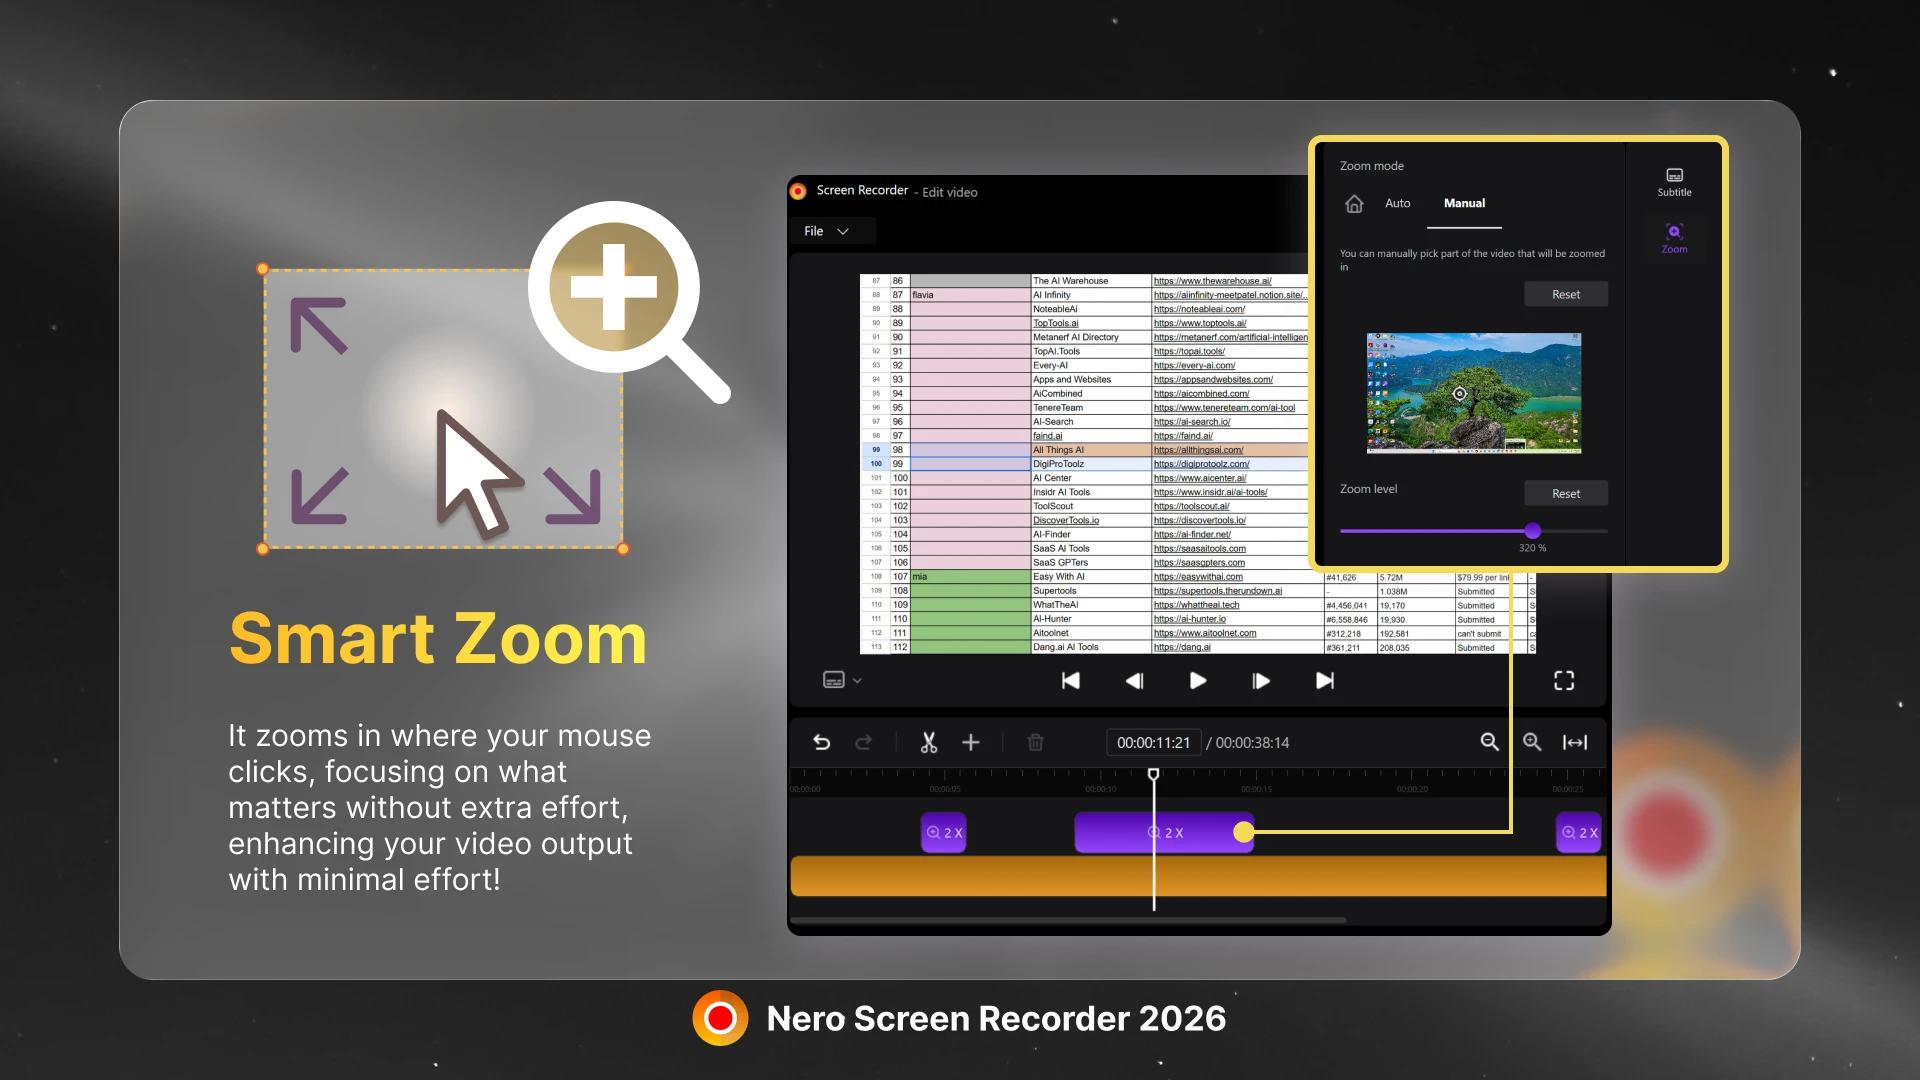
🔍 Auto Zoom on Mouse Clicks

One of the most exciting additions is the new Auto Zoom feature. After recording is complete, the built-in editor will automatically zoom in on the area where you clicked your mouse. This makes it easier than ever to highlight actions, explain processes, and guide viewers’ attention without needing manual editing. Perfect for software tutorials, training videos, or walkthroughs where clarity is key.


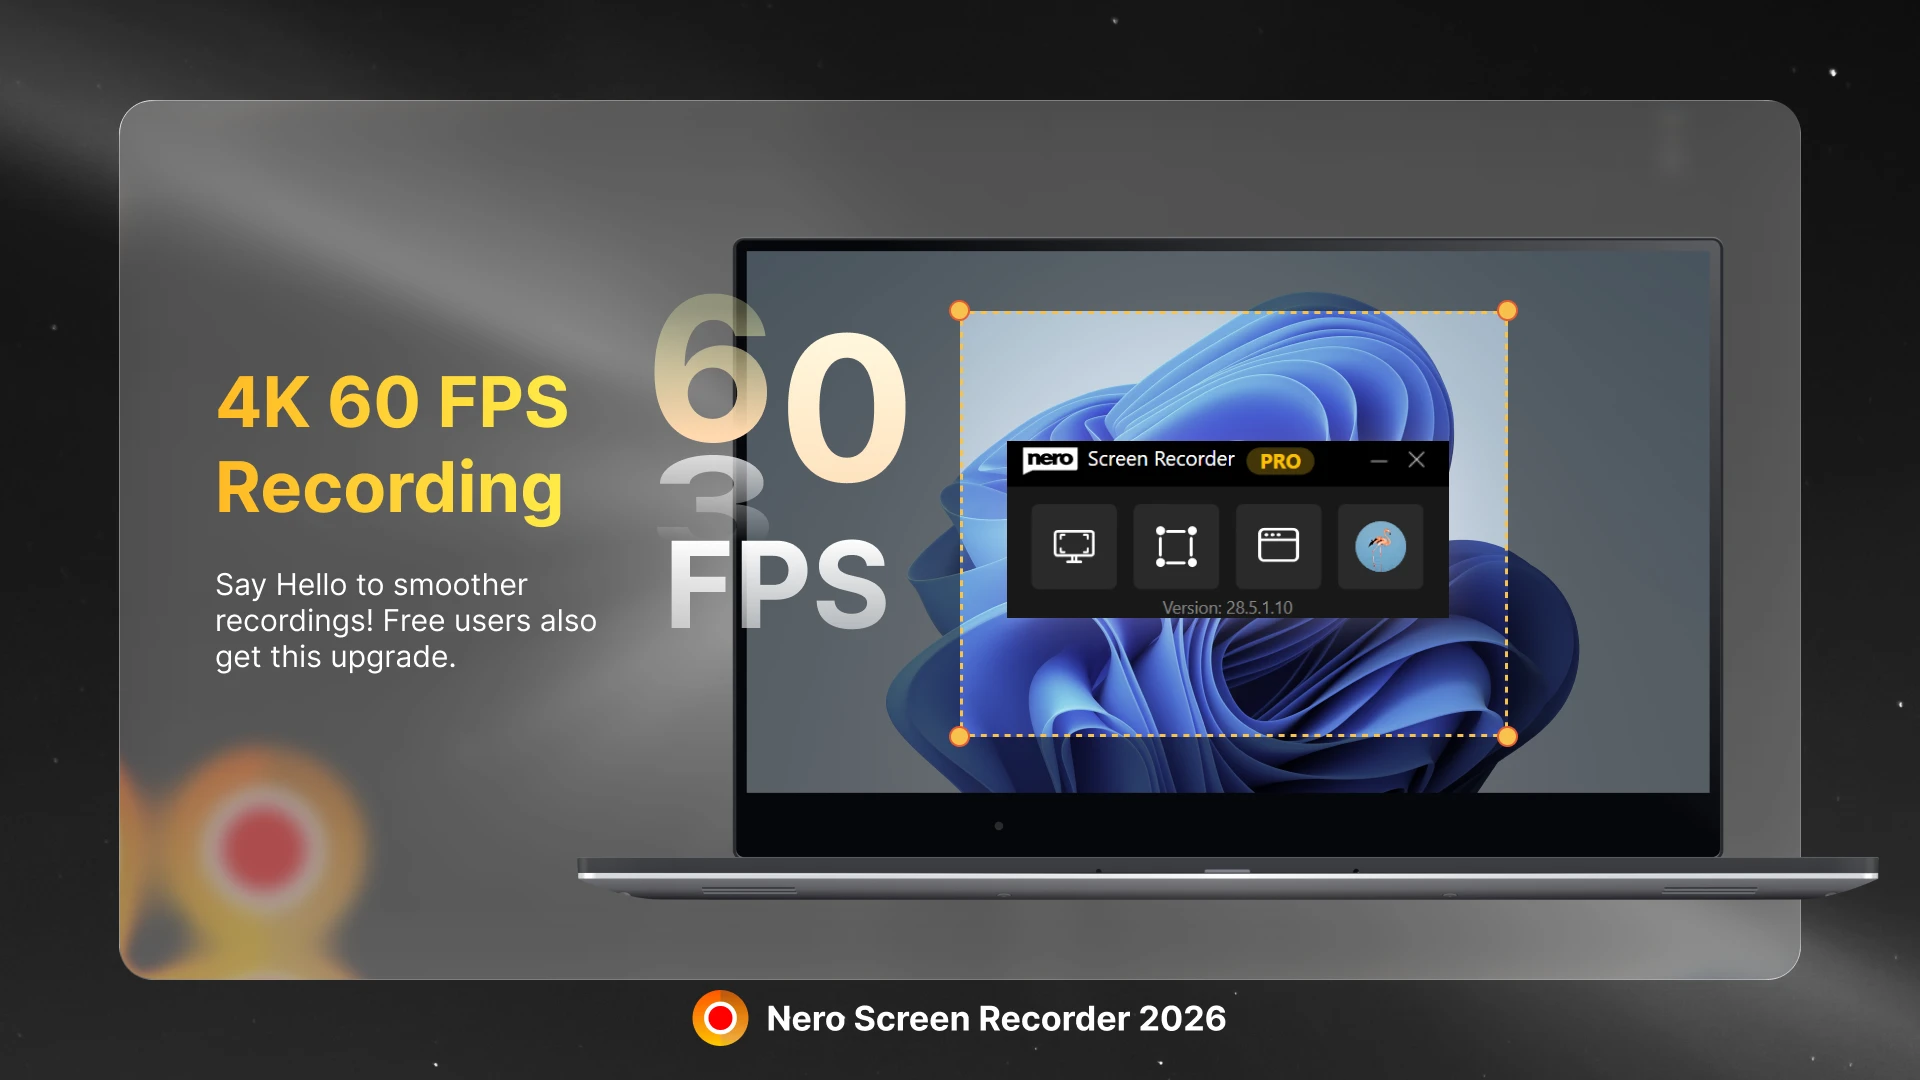
🎥 Smooth 60 FPS Recording

High-quality video recording gets an upgrade with support for 60 FPS. Enjoy smoother motion and crisp detail, whether you’re capturing fast-paced gameplay or professional presentations. With 60 FPS, your videos will feel more fluid and engaging, making them stand out to viewers on any platform.


🚀 Designed for Modern Creators

With these new features, Nero Screen Recorder 2026 helps you:

  • Save time in editing with automatic mouse-click zooms.
  • Deliver higher-quality recordings with smoother frame rates.
  • Create content that looks polished and professional right from the start.

✅ Available with Subscription

The new features in Nero Screen Recorder 2026 are available exclusively with a subscription. If you’re already a subscriber, simply update to the latest version and start using Auto Zoom and 60 FPS recording today.

👉 Upgrade your workflow with Nero Screen Recorder 2026 and take your screen recordings to the next level.

Upgrade Now 🛒

How to Clean Your Duplicate Video and Audio Files with Nero DuplicateManager

Duplicate videos and audio files can quickly pile up across your computer, external drives, or media folders — taking up precious storage space and making your libraries cluttered. If you’ve noticed duplicate movies, songs, or recordings, it’s time to tidy up your collection.

With Nero DuplicateManager, you can easily detect and remove duplicate media files in just a few clicks — safely and efficiently.

Follow these simple steps to get your library organized and your storage back!


🔄 Step 1: Update to the Latest Version

Before you start, make sure you’re using the latest Nero DuplicateManager 365 or 2026.
Updating ensures you have the newest features, faster scanning, and the most accurate detection for video and audio duplicates.

How to check for updates:

  1. Open Nero Start.
  2. Go to Updates.
  3. Install the latest version of Nero DuplicateManager if available.

Keeping your software up to date guarantees the best cleanup experience.


🎵 Step 2: Check the Detection Options for Audio and Video


Nero DuplicateManager doesn’t just compare file names — it analyzes file content, metadata, and format characteristics to find real duplicates, even when the names differ.

To make sure your media files are included in the scan:

  1. Launch Nero DuplicateManager.
  2. Check the Detection Options.
  3. Enable the checkboxes for Audio and Video.

This ensures that both music and video files are thoroughly analyzed and detected.


📁 Step 3: Select the Folders You Want to Clean

Next, choose where Nero DuplicateManager should look for duplicates.

To select folders:

  1. Select the folders that contain your music and videos — for example, Music, Videos, Movies, or External Drive folders.
  2. Click the Add button to add the folders to the right column.
  3. Add multiple folders if needed for a full-library scan.

When you’re ready, click the Next button to start scan and let Nero DuplicateManager find all your duplicate media files automatically.


🗑️ Step 4: Review and Delete Duplicate Files

After scanning, you’ll see a clear overview of all detected duplicates.

You can:

  • Preview videos and listen to audio directly within the app.
  • Let the software auto-mark duplicates for safe deletion (keeping one original).
  • Or manually select which copies to delete or keep.

Once reviewed, click Remove button to remove duplicates and instantly reclaim valuable disk space.


⚡ Why Choose Nero DuplicateManager?

  • 🔍 Smart Detection: Finds real duplicates based on content, not just names.
  • 🎬 Supports All Major Media Formats: MP4, AVI, MOV, MP3, FLAC, WAV, and more.
  • 🧠 Safe Cleanup: Automatically keeps at least one original copy.
  • 🚀 Fast and Reliable: Optimized for large media collections and quick results.

Whether you’re managing your personal music collection or cleaning up old project folders, Nero DuplicateManager gives you complete control — with safety, speed, and precision.

Upgrade Now 🛒

Nero Video 2026 Update Brings Dark Mode for a Sleeker Editing Experience

We’re excited to announce the 2026 update for Nero Video, and one of the most requested features has finally arrived: Dark Mode.

A Fresh Look for Modern Creators

Dark Mode transforms the Nero Video interface into a sleek, modern workspace that’s easier on the eyes, especially during long editing sessions or when working in low-light environments. With a darker color scheme and carefully optimized contrast, your videos stand out while the UI stays subtle in the background.

Why Dark Mode?

Many of you have asked for it, and here’s why it makes a difference:

  • 🌙 Comfortable for the eyes – Reduce eye strain during extended editing hours.

  • 🎬 Focus on your content – The darker UI ensures your video footage remains the star of the screen.

  • Modern aesthetic – A fresh, professional look that aligns with today’s creative software standards.

Flexible & Easy to Switch

We know editors like to have options. That’s why Dark Mode in Nero Video 2026 is easy to toggle. Switch between Light Mode and Dark Mode anytime in the settings, so you can adapt your workspace to your personal style and environment.

Available Now

The new Dark Mode is available with the Nero Video 2026 update, free for all existing Nero Video subscribers and included in the latest Nero Platinum Suite.

How to Enable Nero BuringROM and NeroExpress Logging Events to Windows Logs

Note: This feature is only available in Nero Volume License products.

  1. Open Nero BurnRights on your PC.
  2. Click Nero Burning ROM or Nero Express in left panel, check the option ‘Enable logging events to Windows Logs’.

This option is applied for both Nero Burning ROM and Nero Express for the same time.
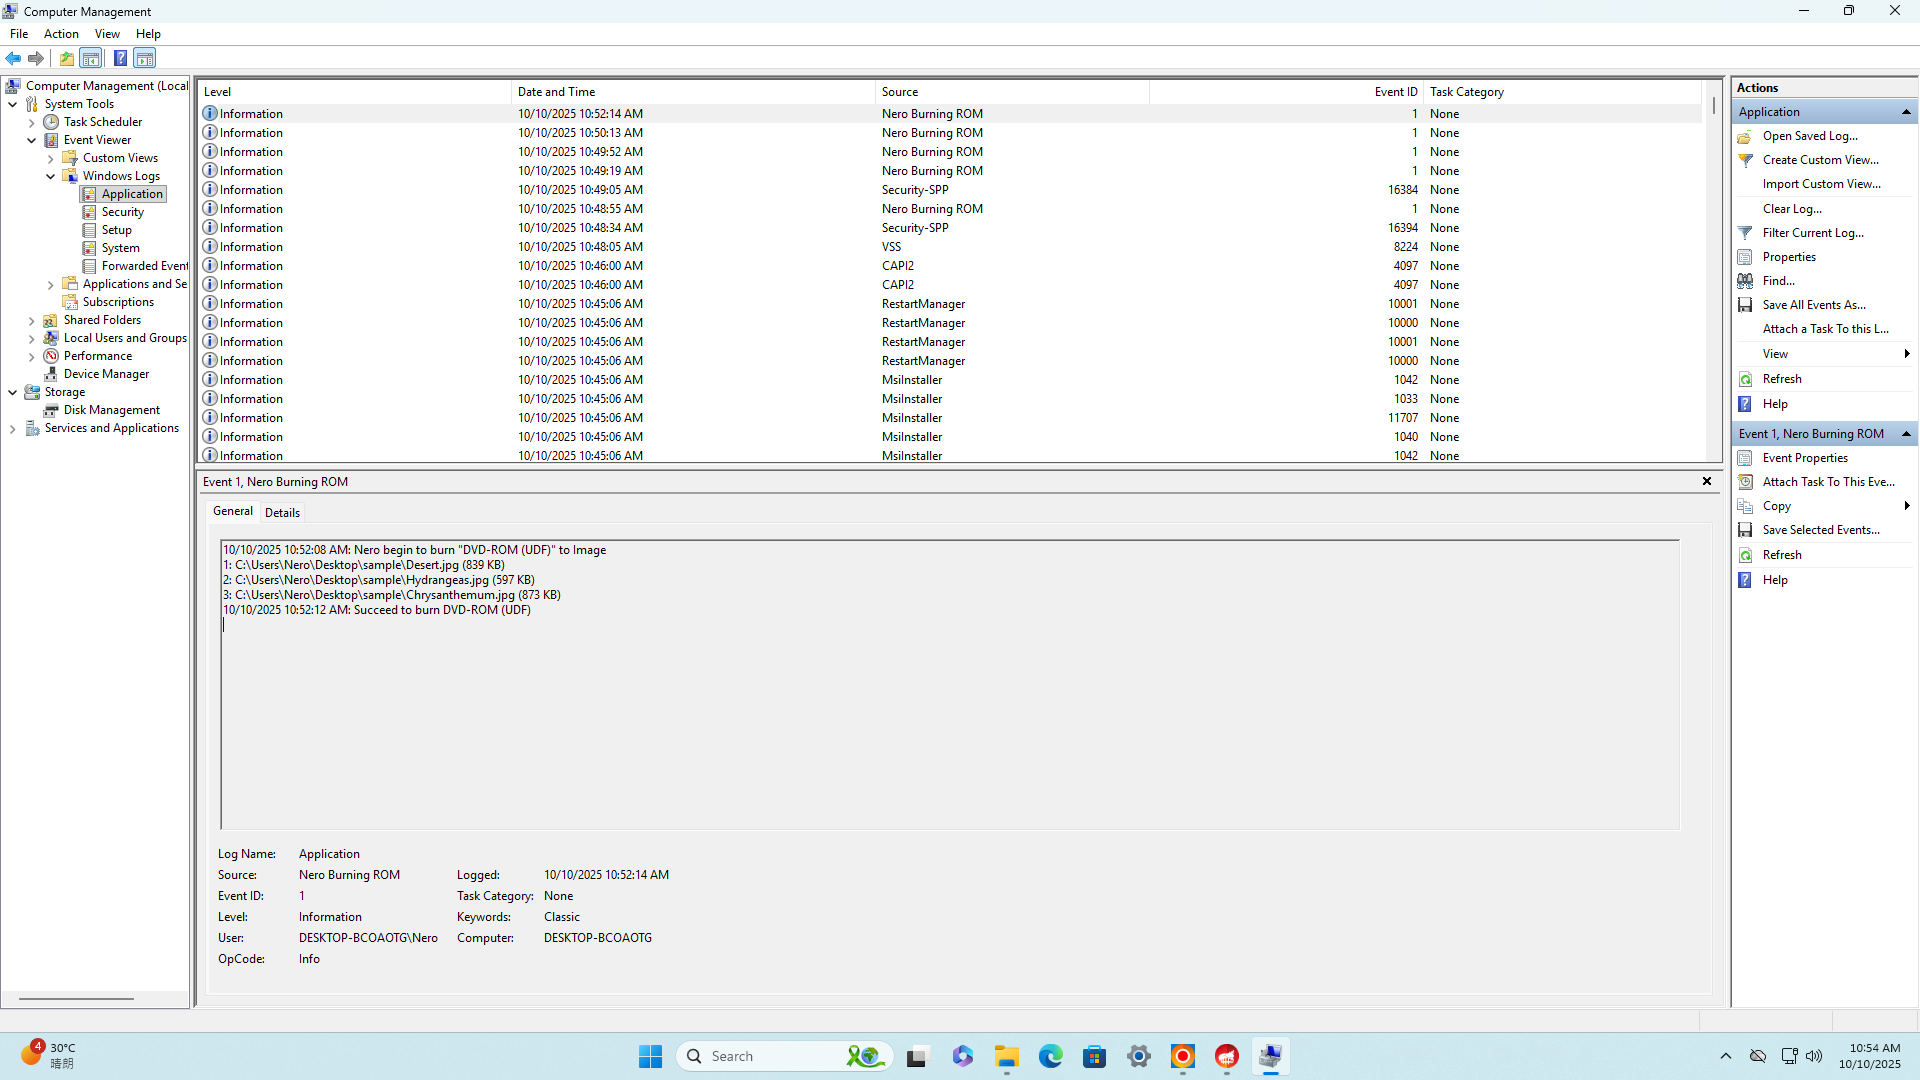
After disc is burned, check the Windows log from the following position in the Computer Management program:

  • Event Viewer → Windows Logs → Application

FAQ – Saving Time When the Processing Takes Too Long

1. Which AI model should I choose for faster processing?

Use the Fast model whenever possible—it’s explicitly designed for quicker upscaling, offering a good compromise between speed and quality.


2. How can I avoid upscaling more than necessary?

  • Use Clip Selection to upscale only specific portions of a video instead of the entire file. This greatly reduces processing time.
  • Always run a Preview on a short segment (1–3 seconds) to fine-tune settings before processing the full video.

3. Can I queue multiple videos to process them efficiently?

Yes—use Batch Processing to queue several videos. You can let the software run in the background, or even overnight, to save active work time.


4. How can I improve hardware utilization to speed things up?

  • Ensure your system meets or exceeds the recommended hardware specs, especially a modern GPU with sufficient VRAM (e.g., NVIDIA RTX 3060 or AMD RX 6700 XT with 12 GB VRAM for 4K–8K upscaling).
  • Close all unnecessary apps to free up memory and reduce system load. Pro-tip: Restart your PC before launching a large upscaling job.
  • Confirm your GPU drivers and DirectX 11 (or higher) support are up to date to avoid bottlenecks.
  • Enable hardware (GPU) acceleration if supported—users note significant speed increases with compatible NVIDIA/AMD cards.

5. How should I structure my workflow for the fastest turnaround?

  1. Import your video.
  2. Use Clip Selection to isolate the relevant section.
  3. Pick the Fast AI model.
  4. Set desired output resolution.
  5. Run a Preview to confirm your choices.
  6. Add to Batch Queue and process when idle.

Quick Summary Table

Strategy What to Do
Choose Fast model Prioritize speed if high-detail isn’t necessary
Use Clip Selection Upscale only needed parts, not whole video
Run a Preview Test settings on a short segment before full processing
Utilize Batch Processing Queue up jobs and let them run in the background
Maximize Hardware Enable GPU acceleration, use recommended hardware specs, close other apps