When creating software tutorials, product demonstrations, or training videos, small details can make a big difference. A clearly visible mouse cursor helps viewers follow your actions, while balanced audio makes your recording easier to understand.
Nero Screen Recorder 2027 introduces new post-recording controls that let you customize the mouse cursor and adjust audio levels directly in the built-in editor. You can personalize the cursor’s appearance, highlight mouse clicks, and fine-tune the balance between system sound and microphone audio without switching to another editing application.
In this guide, we’ll show you how to use these features to polish your screen recordings.
1. Customize the Mouse Cursor After Recording
The mouse cursor is often the main guide in a screen recording. Whether you’re demonstrating software settings, explaining a workflow, or presenting an online tool, a clearly visible cursor helps viewers understand exactly where to look.
With Nero Screen Recorder, you can adjust the cursor’s appearance and size after recording.
Step 1: Configure Mouse Cursor Recording
Before recording, open Settings and locate the Mouse Cursor Recording section under General.
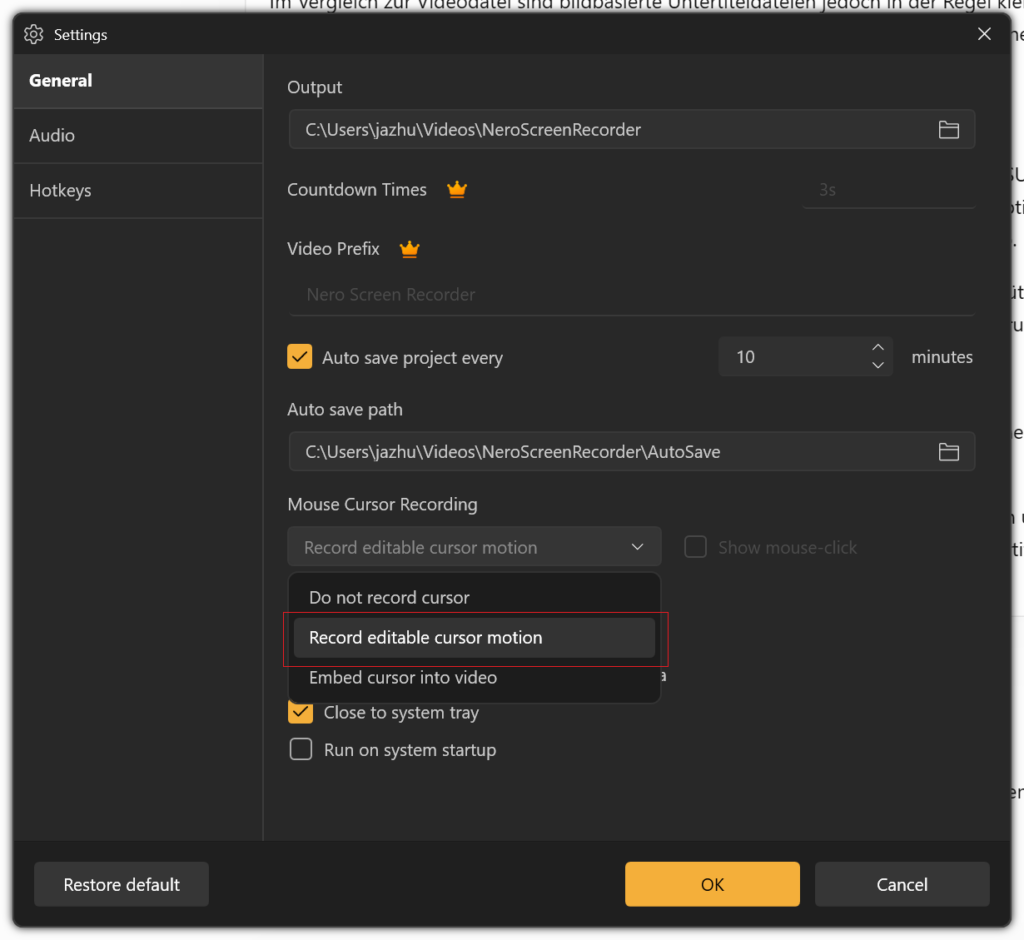
Choose one of the available recording modes:
- Do not record cursor: Excludes the mouse cursor from the recording.
- Record editable cursor motion: Records the cursor movement separately so you can customize its appearance during post-production.
- Embed cursor into video: Includes the cursor directly in the recorded video.
If you want to customize the cursor after recording, select Record editable cursor motion.
This option is especially useful for tutorials and demonstrations because it gives you more flexibility when editing the cursor’s appearance.
Step 2: Open the Appearance Panel
After recording, open your video in the built-in editor and select Appearance in the right-hand panel.
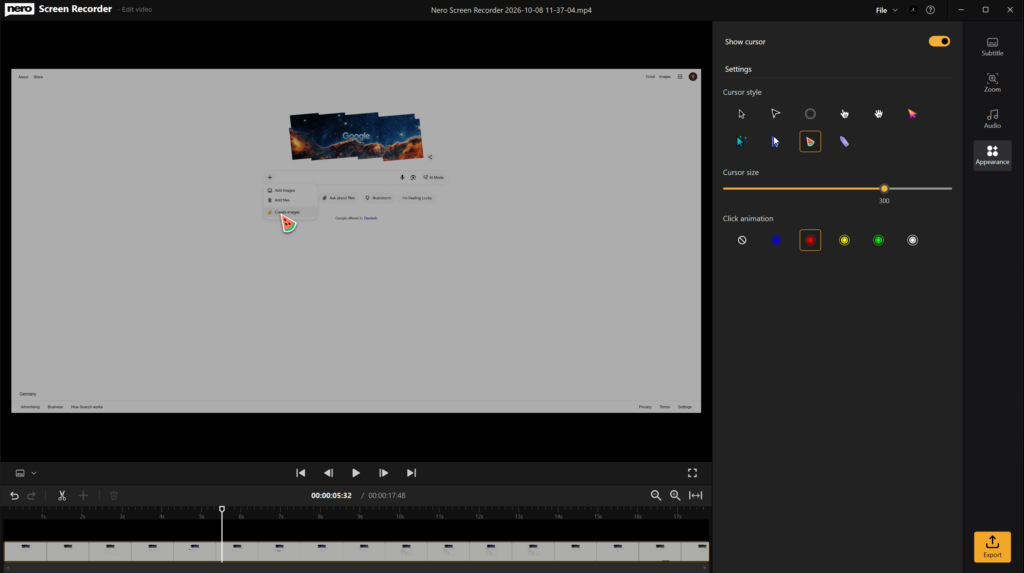
Enable Show cursor to display the cursor in the preview.
You can then customize its appearance using the available controls.
Step 3: Choose a Cursor Style
Under Cursor style, select the design that best fits your video.
Depending on the available options, you can choose from different pointer shapes and visual styles, including standard pointers, hand-shaped pointers, circular highlights, and colorful cursor designs.
Consider your audience and recording background when choosing a style:
- Use a standard pointer for a clean, professional look.
- Choose a larger or more distinctive pointer when recording detailed software tutorials.
- Use a colorful cursor to make important actions easier to spot in visually complex recordings.
A consistent cursor style helps viewers follow your demonstrations without unnecessary distractions.
Step 4: Adjust the Cursor Size
Use the Cursor size slider to make the cursor larger or smaller.
A larger cursor is helpful when demonstrating small interface elements, menu options, or detailed settings. A smaller cursor may be more appropriate when you want to keep the screen uncluttered.
Preview the result and choose a size that remains easy to see without covering important interface elements.
Step 5: Add Click Animations
Nero Screen Recorder also lets you customize the visual effect shown when you click the mouse.
Under Click animation, choose the effect that best suits your recording. Available options include different colored rings and a setting that disables the click animation.
Click animations can help viewers identify important actions, especially when you are explaining a sequence of steps or demonstrating where to select a button.
For example, a colored ring around a click can draw attention to a menu selection without requiring additional annotations.
Tip: Use click animations selectively. A clear cursor and occasional click highlights usually work better than effects that distract from the content.
2. Adjust Audio Balance in the Built-in Editor
Clear visuals are only half of a good screen recording. If your system audio is too loud or your microphone narration is difficult to hear, viewers may struggle to follow your explanation.
Nero Screen Recorder 2027 lets you adjust audio levels in the built-in editor, helping you balance system sound and microphone audio after recording.
Step 1: Open the Audio Panel
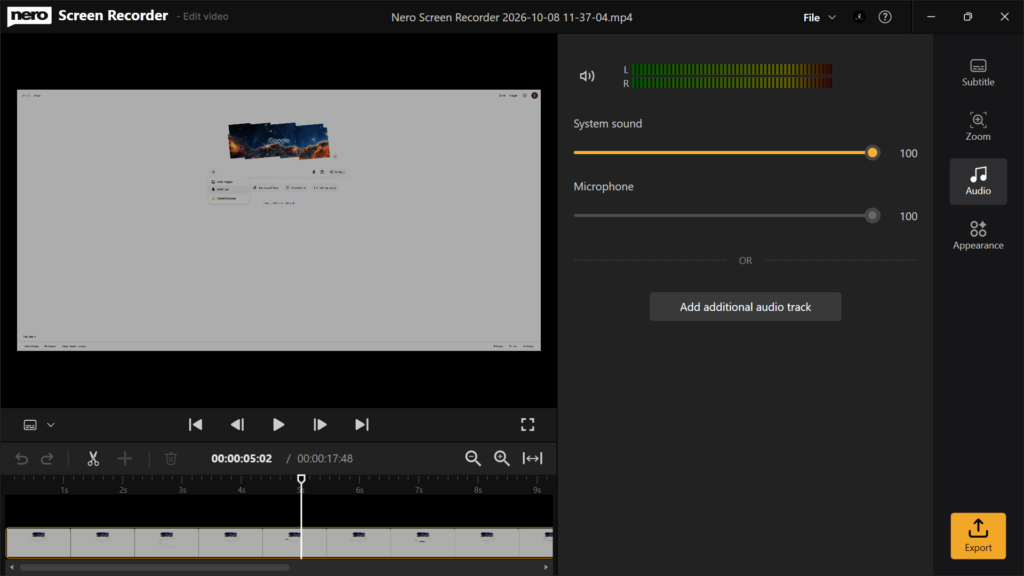
Open your recording in the editor and select Audio in the right-hand panel.
The panel displays separate controls for:
- System sound: Controls the level of audio captured from your computer, such as application sounds, website audio, and other system playback.
- Microphone: Controls the level of your recorded voice or other microphone input.
The level sliders let you adjust these sources independently.
Step 2: Adjust the System Sound Level
Use the System sound slider to increase or decrease the volume of your computer’s audio.
For example, if a tutorial includes background music or application sounds that overpower your narration, lower the system sound level.
If the computer audio is too quiet to hear important notifications or demonstrations, increase it as needed.
Step 3: Adjust the Microphone Level
Use the Microphone slider to control the volume of your recorded narration.
If your voice sounds too quiet compared with the system audio, increase the microphone level. If your narration is too prominent, reduce it.
The goal is to make speech easy to understand while keeping other sounds at an appropriate level.
Step 4: Find a Suitable Balance
Play the recording and listen to both audio sources together.
A useful starting point for a narrated software tutorial is to make the voice the primary audio source while keeping system sounds audible but secondary.
Adjust the two sliders until the narration and system audio work well together. The ideal settings depend on the original recording levels and the type of content.
Important: Changing a volume slider adjusts the playback level of its corresponding audio source. It does not necessarily remove background noise, repair distortion, or recover audio that was never captured.
Step 5: Add an Additional Audio Track if Needed
The Audio panel also includes an Add additional audio track option.
Use this option when you want to add another audio source to your editing workflow, such as supplementary audio for your video.
After adding a track, review the available controls and listen to the combined result to ensure the audio remains clear and balanced.
Step 6: Export Your Edited Video
Once you are satisfied with the cursor appearance and audio balance, click Export to produce your finished video.
Review the exported file to confirm that the cursor is visible as intended, click animations appear correctly, and the audio levels are suitable for your audience.
3. Create More Professional Screen Recordings
Combining mouse cursor editing with audio balancing helps you create more polished screen recordings for a variety of purposes.
- Software tutorials: Make buttons, menus, and mouse clicks easier to follow.
- Training videos: Help learners focus on each action while keeping spoken instructions clear.
- Product demonstrations: Present interface interactions in a more visually engaging way.
- Online presentations: Balance narration with application sounds or other system audio.
- Instructional content: Improve accessibility and comprehension through clear visual guidance and understandable sound.
The advantage is convenience: you can refine these important details within Nero Screen Recorder’s existing editing workflow rather than relying on a separate application for every adjustment.
Frequently Asked Questions (FAQ)
1. Can I change the mouse cursor after recording?
Yes, provided you selected Record editable cursor motion in the recording settings. You can then use the editor’s Appearance panel to show or hide the cursor, choose a style, adjust its size, and configure click animations.
If you chose Embed cursor into video, the cursor is part of the recorded image and cannot be customized in the same way as a separately recorded, editable cursor.
2. What is the difference between editable cursor motion and an embedded cursor?
With editable cursor motion, the cursor is recorded separately from the screen image, allowing you to modify its appearance during post-production.
With an embedded cursor, the pointer is included directly in the video frames. Its appearance is therefore part of the image, so changing the cursor style or size independently is not available in the same way.
3. Can I hide the mouse cursor in the final video?
Yes. If your recording contains editable cursor motion, turn off Show cursor in the Appearance panel.
If the cursor was embedded directly into the video, disabling the cursor display control will not remove it from the recorded image.
4. Can I make the mouse cursor larger?
Yes. Open the Appearance panel and use the Cursor size slider to adjust the cursor size.
A larger cursor can make tutorials easier to follow, especially when viewers need to identify small buttons or interface controls.
5. What are click animations used for?
Click animations visually highlight mouse clicks so viewers can more easily identify where an action takes place.
They are particularly useful for software demonstrations and step-by-step instructions. Choose a suitable animation or disable the effect if you prefer a simpler presentation.
6. Can I adjust system sound and microphone audio separately?
Yes. In the Audio panel, the System sound and Microphone sliders control their respective audio levels independently.
This lets you reduce loud application sounds or increase quiet narration without necessarily changing the level of the other source.
7. What should I do if my voice is too quiet?
Open the Audio panel and increase the Microphone level. Then play the recording to check whether your narration is easier to hear.
If your voice was recorded at an extremely low level, increasing the volume may also make background noise more noticeable. It is best to check your microphone level before recording whenever possible.
8. Can I reduce system sounds without affecting my voice?
Yes. Lower the System sound slider while leaving the Microphone slider unchanged.
This is useful when recording tutorials that include website audio, application notifications, or other computer sounds alongside spoken explanations.
9. Does adjusting audio balance remove background noise or echo?
Not necessarily. The audio sliders adjust volume levels; they are not, by themselves, dedicated noise-removal or echo-cancellation tools.
For cleaner recordings, use a suitable microphone, minimize background noise, and check your recording environment before starting.
10. What does Add additional audio track do?
The Add additional audio track option lets you add another audio source to your editing workflow.
This can be useful when you want to supplement the original recording with additional audio. Check the controls available for the added track and preview the result before exporting.
11. Do I need a separate video editor to customize the cursor and audio levels?
For the cursor and audio adjustments described in this guide, Nero Screen Recorder provides controls in its built-in editor. You can customize an editable cursor and adjust the available audio levels before exporting your video.
More advanced editing requirements may still call for dedicated audio or video editing software.
12. Are these features available in every version of Nero Screen Recorder?
Feature availability depends on your Nero Screen Recorder edition and license. Nero Platinum Suite includes the Basic version of Nero Screen Recorder, while the Pro version is available separately. Check your edition’s feature list to confirm which tools are included.
Conclusion
Nero Screen Recorder 2027 gives you more control over two important aspects of screen recording: visual guidance and sound clarity.
With editable mouse cursor motion, customizable cursor styles, adjustable size, and click animations, you can help viewers follow your on-screen actions. With separate system sound and microphone controls, you can also create a more balanced listening experience.
Make these adjustments in the built-in editor, preview the result, and export a screen recording that is easier to watch, hear, and understand.