Our digital life is meant to make things easier but in fact it is not that easy without knowing some of the fundamental concepts behind the digital world.
This blog series deals with typical questions that may sound easy on first sight, but digging deeper into them there’s quite a lot to know and learn.
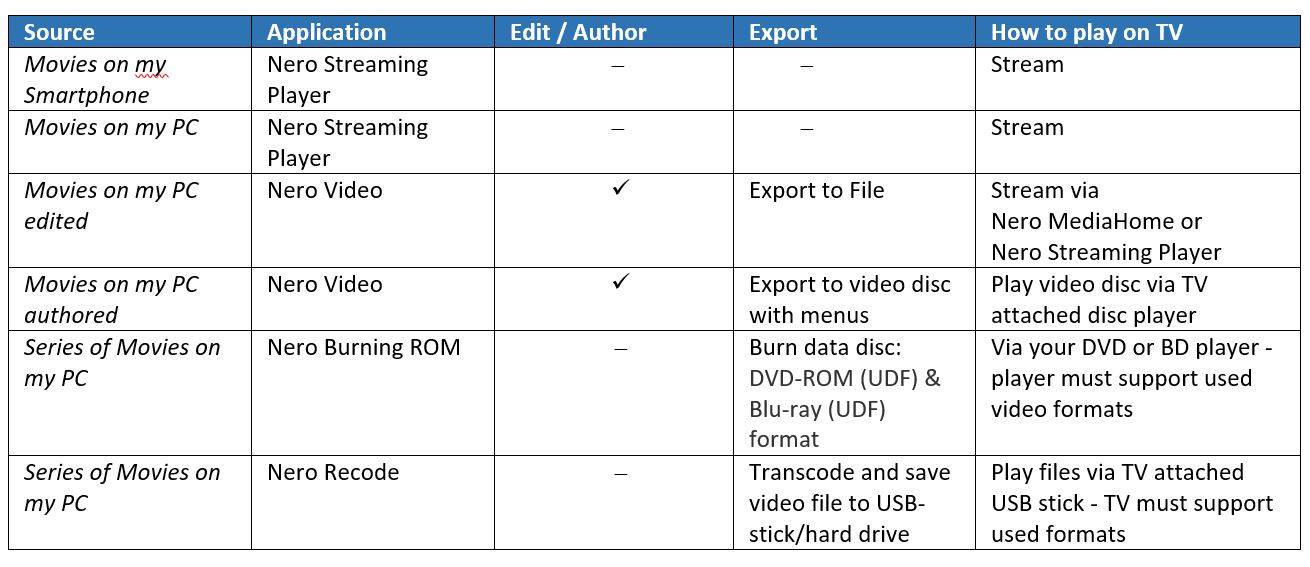
In this blog we try to answer the question: How do I get my movie on the TV?
This is in fact a good question and initially we should be clear about the fact that a digital movie is not made of celluloid. Anything we capture or play as a moving picture is just a file containing a digital video format. So answering the question, initially depends on the source of your video and the given video format. The next part of the answer depends on what you are going to do with your souce video. Do you intend to fine tune it before watching it, or do you just want to watch it on your TV straight away?
Streaming
If your source is available in a format that can be played straight to your TV set the easiest way is streaming it wirelessly. In this case Nero has options to play it directly from your smartphone and also from your PC to your TV via Nero Straming Player. If you like to play it wirelessly from your PC to your TV without using an App you can do this directly via Nero MediaHome.
Video File or Video-Disc?
If you have video clips sitting on your PC that you want to fine tune before showing on your TV the key question is: which output format are you going to select? Will it be a video file or rather a video discs (DVD, Blu-ray) with menus to play on your DVD player or Blu-ray Disc player connected to your TV set? In both cases Nero Video ist the application of your choice.
Edit Video and export as File
Simply import some clips into a video editing project, arrange them in a time sequence, trim them and apply effect filters. No matter if you are a beginner or advanced user Nero Video offers a great range of options to achieve best quality results. Pre-designed movie theme templates allow creating videos and slideshow for as a polished movie, easily, and Nero Video provides state of the art high quality export formats for you to select from.
Create a Video Disc
If you are planning to burn your video or several videos to a disc with menus you will do that in Nero Video, too. Either start in the editing mode and switch to the disc authoring module, or if you do not need to fine tune your clips but just intend putting them on a disc with menus, you can start in the content screen right away. This is the home screen for disc authoring and allows you to import your clips and arrange the order. Then just switch to the disc menu template selection before you finally burn it to disc.
Videos to Disc without a Menu
Another way of burning is adding your video files to a disc project without menus and create a data disc in DVD-ROM (UDF) and Blu-ray (UDF) format that includes just your video files. In this case the application of your choice will be Nero Burning ROM. Note that such a disc is not what you would call a video disc. It is just a disc containing video files, and in case your Blu-Ray Player may be able to read and play the formats as pure video files without menus. Essentially, this type of disc is a good choice for archiving your footage and edited clips, especially if you use a Blu-ray Disc with high capacity storage.
Videos on a USB-Stick
Last but not least you may also be looking for an option to put your videos on a USB stick or external hard disk and attach this to your TV set for playback. A great tool for encoding all of the clips you plan to load to your USB stick to a best matching format is Nero Recode. Very easy to use it provides you with dedictaed video format templates to select from. Just encode to the attched USB stick or hard disk – batch encoding and hardware acceleration via your graphics card for transcoding included.
Overview of Use Cases
Nero KnowHow 00074