1. What the batch files are for
There are customers of Nero which buy volume licenses for Nero 2018* based products. They normally automatically install the products on many systems by certain customer specific server controlled processes. To conveniently support this, Nero provides batch files which allow the customers to install or to remove Nero 2017 installers on remote client systems.
*the procedures explained here also relate to Nero 2017 and Nero 2016 respectively. For a difference in needed prerequisites for the product version in question please check the respective table as listed under 3.5 below.
The basic requirement for a remote installation is that the installation must not ask for any interactive user input, i.e. the installation should run silently without showing the EULA, the license key dialog or the feature selection tree. For this reason, the batch files allow the customers to easily pre-configure and control the installation process.
For installation, there are two batch files. The first one _install_prq.bat is for the installing prerequisites and the second one _install.bat is for installing the product itself. Both have to be executed and a reboot is required in between due to Microsoft restrictions. The batch files themselves will not trigger the reboot; this has to be done by the administrator who performs the installation. The installation result can be seen on the cmd terminal or/and checked from %ERRORLEVEL% environment variable. Please also note, that the installation won’t be continued automatically after reboot so that the administrator has to start installation script again.
2. How to use installation scripts (short summary)
1. Copy bat, _install_prq.bat, GetSystemDefaultLanguage.exe into your installer folder at the same level as setup.exe. The additional executable GetSystemDefaultLanguage.exe may be omitted only if you set the installation language by the numerical code or set it to default (see parameter neroInstallationLanguage of _install.bat)
2. Configure scripts according to your extra needs: license key, installation language, disable features – for the bat; set up alternative prerequisite folder (only if it differs from the default prerequisite folder in the installer!), disable installation of specific prerequisites – for the _install_prq.bat.
3. Start prerequisites installation by executing bat. Be sure that you start the script as administrator. Reboot your system if required. Prerequisites are mostly third party installers from Microsoft which are essentially needed to run the Nero products properly. Nero has no influence on suppressing their required reboots or the way they are installed. This is all done by the original manufacturer of those third party installers.
4. Start the installer script bat to install the Nero Product.
Note 1
The files _install.bat, _install_prq.bat, GetSystemDefaultLanguage.exe may be also copied to the folder not containing installation files. In such a case you have to provide the installer folder in the parameter neroMsiFolder of the _install.bat. You can also use the alternative prerequisite folder (only if it differs from the default prerequisite folder in the installer!). In such a case you provide the alternative prerequisite folder in the parameter neroPrqFolder of the _install_prq.bat.
Note 2
- Besides the system environment variable TEMP must be set to a folder where the batch scripts may create temporary files
- Be sure that you start the scripts as administrator
- Be sure that the scripts has access to the installer folder (especially if you use network drives on the MS Windows Vista and later. For instance, the mapping of the network drives can be different for the programs started under “run as administrator” and usual contexts (different elevations).
3. Configuration parameters of installation scripts
3.1 Configuration parameters of _install.bat
The product installation is performed by the _install.bat batch file. Note that the installation most probably will fail if _install_prq.bat requested to reboot the system and you didn’t restart the system yet.
Before starting this batch file configure it in your favorite text editor (vi, emacs or notepad). There are the following parameters
- licenseKey = none
If a license key for the product is available it must be assigned to this variable. If the license key is provided neither here nor in the installer itself, the installation will fail. If you define the key in the batch script, it will override the key encoded into the installer. - RemoveSerials = 0
Remove serial numbers after installation.
Set value to “0” to leave all serials on the system after installation (default).
Set value to “1” to remove all serials after installation (may be useful for deploying on OEM-PC’s). - RemoveStartSmartDesktopShortcut = 0
Remove StartSmart desktop shortcut after installation.
Set value to “0” to leave shortcut on the system after installation (default).
Set value to “1” to remove shortcut after installation. - neroMsiFolder = %~dp0
Set this variable to the full path of the installer folder. If the bat file is located in the installer folder, it is not necessary to change this variable’s default value. The path has to include trailing backslash and should not contain ending and starting quotes. - neroMsiFile = none
The value none is the default value of this variable. If InstallShield’s configuration file ini is present in the installation folder (which is the usual case of all installations delivered by Nero), then script will try to detect msi file from setup.ini.
In case the auto-detection fails, set this variable to just the file name of the installer’s MSI file, e.g. Nero.MultimediaSuite.msi. - neroDestinationPath = default
Assign the installation target folder path to this variable. If set to default the applications (except shared components) will be installed to %ProgramFiles%\Nero. - silentInstall = 1
Set this variable either to “1” for a completely silent installation (no UI, corresponds to /qn-parameter for msiexec).
Set this variable to “2“ if you’d like to have a progress bar shown on the target system at least (basic UI, corresponds to /qb-parameter for msiexec).
Default is value 1 which should be used for remote installations; value 2 is more useful for local installations. - neroInstallationLanguage = system
This variable defines the installation language. Although the installation is running silent, the installation language is important as shortcuts, tooltips file associations and other system texts which are created by the installer will appear in this language. Note that the applications will use the system language!
neroInstallationLanguage can be set to one of the following values: - default: no language transform is applied to the installer’s MSI file
- system: the system default UI language is used as installation language. This is the most common behavior (the system default language is also referred to as “install language”) and therefore the default of the variable. If the current system default UI language is not supported, bat silently falls back to English. If you use this value, do not forget also to copy GetSystemDefaultLanguage.exe near your script
- user: the user default UI language is used as installation language if it is supported, otherwise english. If you use this value, do not forget also to copy exe near your script
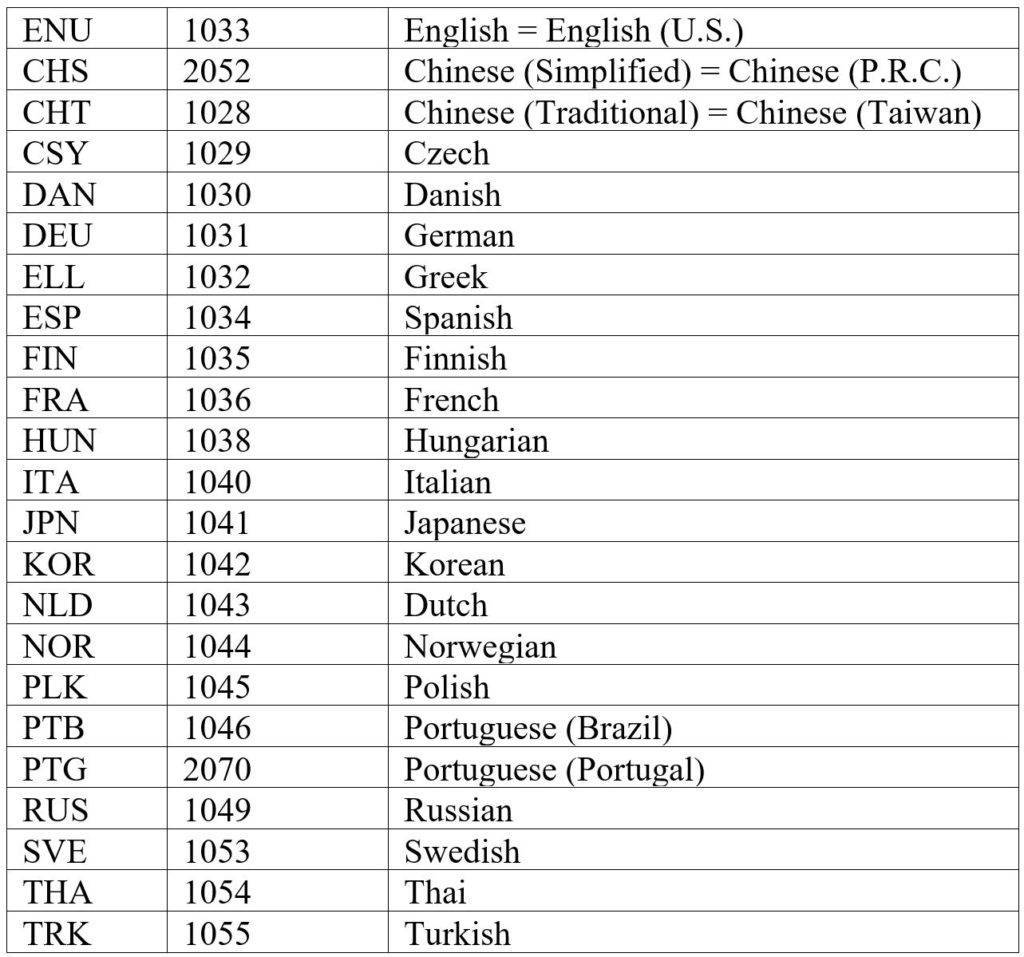
- 3-Letter language code or numeric locale identifier. The following examples will set english or german language corresponding:
neroInstallationLanguage=ENU
neroInstallationLanguage=1031
The complete list of language codes is listed in the following table
- excludeApp = [list of applications to exclude]
define here the applications which should not be installed. The value of the variable is a comma separated list of applications exactly as they appear in the applications subfolder of your superinstaller. For instance , if you want to exclude the Nero KwikMedia, Nero InfoTool and Nero DiscSpeed applications, then set the variable as follows:
set excludeApp=kwikmedia,infotool,discspeed - excludeHelp = 0
If this value is set to 1 no help files are installed. By default help files for all applications are installed that have not been excluded by the excludeApplicationName - installAutoPlay = 1
If set to 0 no Windows auto play handlers will be registered by the applications. - installFileAssociations = 1
If set to 0 no file extensions will be associated with the applications of the product. Note that this is valid for any extensions including typical Nero extensions like .nrg and others! - installDesktopShortcuts = 1
If set to 0 no desktop shortcuts will be created for the applications. - enableRepair = 1
Set this variable to value 0 if no repair button for the applications should appear in Windows’ Add- and Remove Programs panel. This is reasonable if the installer does not remain on the system because the installer files are required for repairing installations. - disableChange = 0
Set this variable to value 1 if no change button for the Nero Suite should appear in Windows’ Add- and Remove Programs panel. - neroBurnRightsRegFile = none
Set this variable to the complete file path of an exported Nero BurnRights registry file. That file defines the burn rights which should be applied by Nero BurnRights on the target system. - neroBurnRightsUsers = none
This variable specifies for which users the rights should be set. If it is set to none, Nero BurnRights will not be executed at the end of the installation process. This might be necessary to prevent the EULA from being displayed on remote target systems. Otherwise it can be set to one of the following values:- /admin
- /all
- /group=[group name]
g: /group=Customer
The return codes of _install.bat: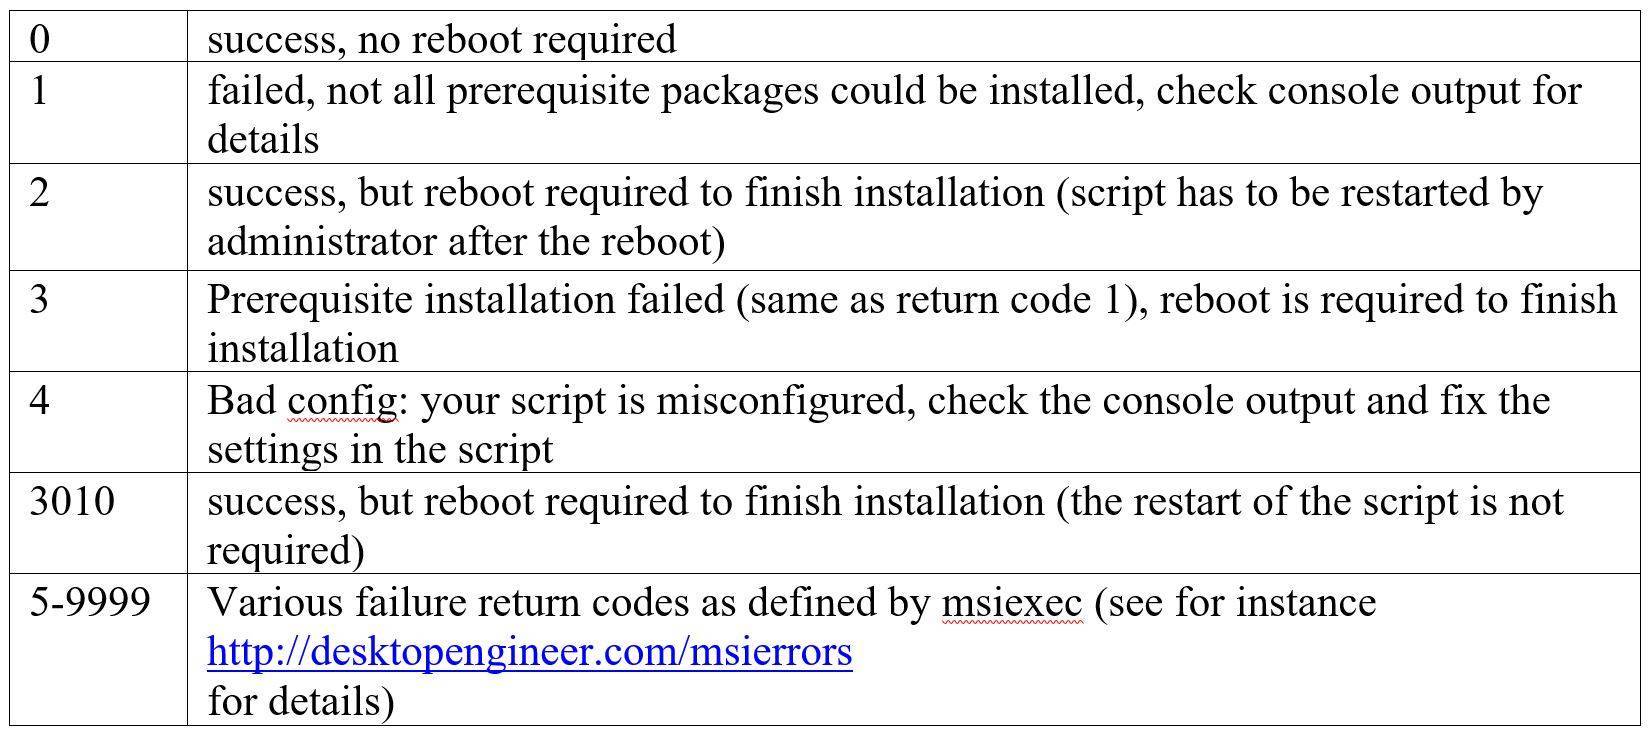
- neroUpdateCheckInterval = 0
Set this variable to one of the following values to enable the automatic update check and to set the check interval:- 86400000 (check daily)
- 604800000 (check weekly)
- 2592000000 (monthly)
3.2 Additional configuration parameters of _installFromArchive.bat
Before starting this batch file it has to be configured in a text editor. There are the following parameters
- CDID= none
Set this variable to the CD ID of your self-extracting archive. E.g. you have the archive “backitupandburn-Max_NOAT-20110322131310597-11.0.10400.nsx.exe” then the CD ID is “20110322131310597”. - extractPath= %temp%
Archive will be extracted in temp folder. Change this variable if you want to set another extraction folder. - archiveName= none
Set this variable to file name of your self-extracting archive.
3.3 Installation of Prerequisites: configuration parameters
The installation of prerequisites will be performed by the _install_prq.bat batch file. The script automatically looks up for the prerequisites in the installer folder, checks the OS-conditions, prerequisite-conditions and installs them without user interactions. The prerequisites will be installed in the following order (if available): Direct3D-prerequisites, .NET-prerequisites, Lightscribe, VC Redist-prerequisites, MSI 4.5. Ask Toolbar-prerequisite won’t be installed and is not planned so far. AdobeFlash either won’t be installed due to redistributable / license agreement limitation (user has explicitly to accept EULA)
The installation of the required prerequisites is the must-step before installing Nero-products. If your installer does not include all required prerequisites, you can contact support/OEM-group to get the prerequisites-bundle.
The installation progress can be tracked on your terminal. You will see something like message: Installing prq [SomeName]… done.
At the end of installation, you get the installation result on your terminal and as %ERRORLEVEL% variable with the return code.
Note: The installation order of prerequisites has been selected so that they should not interfere with each other. In case you encounter error 1 or 3, then we recommend to reboot the system and to start the script again. If the error didn’t “disappear”, please check the installation logs in the temp folder or consult the support.
To install your Nero product it is absolutely necessary that all required third party components are installed on the target system.
3.4. Configuration parameters of _install_prq.bat
These are the parameters which you can configure in the _install_prq.bat:
- neroPrqFolder = %~dp0
Set this variable to the full path of the installer folder (setup.exe-level) if you want to use non-default prerequisite folder. The path has to include trailing backslash and should not contain ending and starting quotes. If the bat file is located in the installer folder or _install_prq.bat was invoked by _install.bat, it is not necessary to change this variable’s default value. - PRQ_CFG_SKIP =
If you want to disable installation of some prerequisites use this variable. For instance, you may disable installation of LightScribe by commenting out the following line
::set PRQ_CFG_SKIP=%PRQ_CFG_SKIP%;LightScribe System Software - There are also predefined values to disable Direct3D-prerequisites, .NET-prerequisites, MS VS PIA, VC Redist-prerequisites, MSI4.5-prerequisite. Check for the details bat.
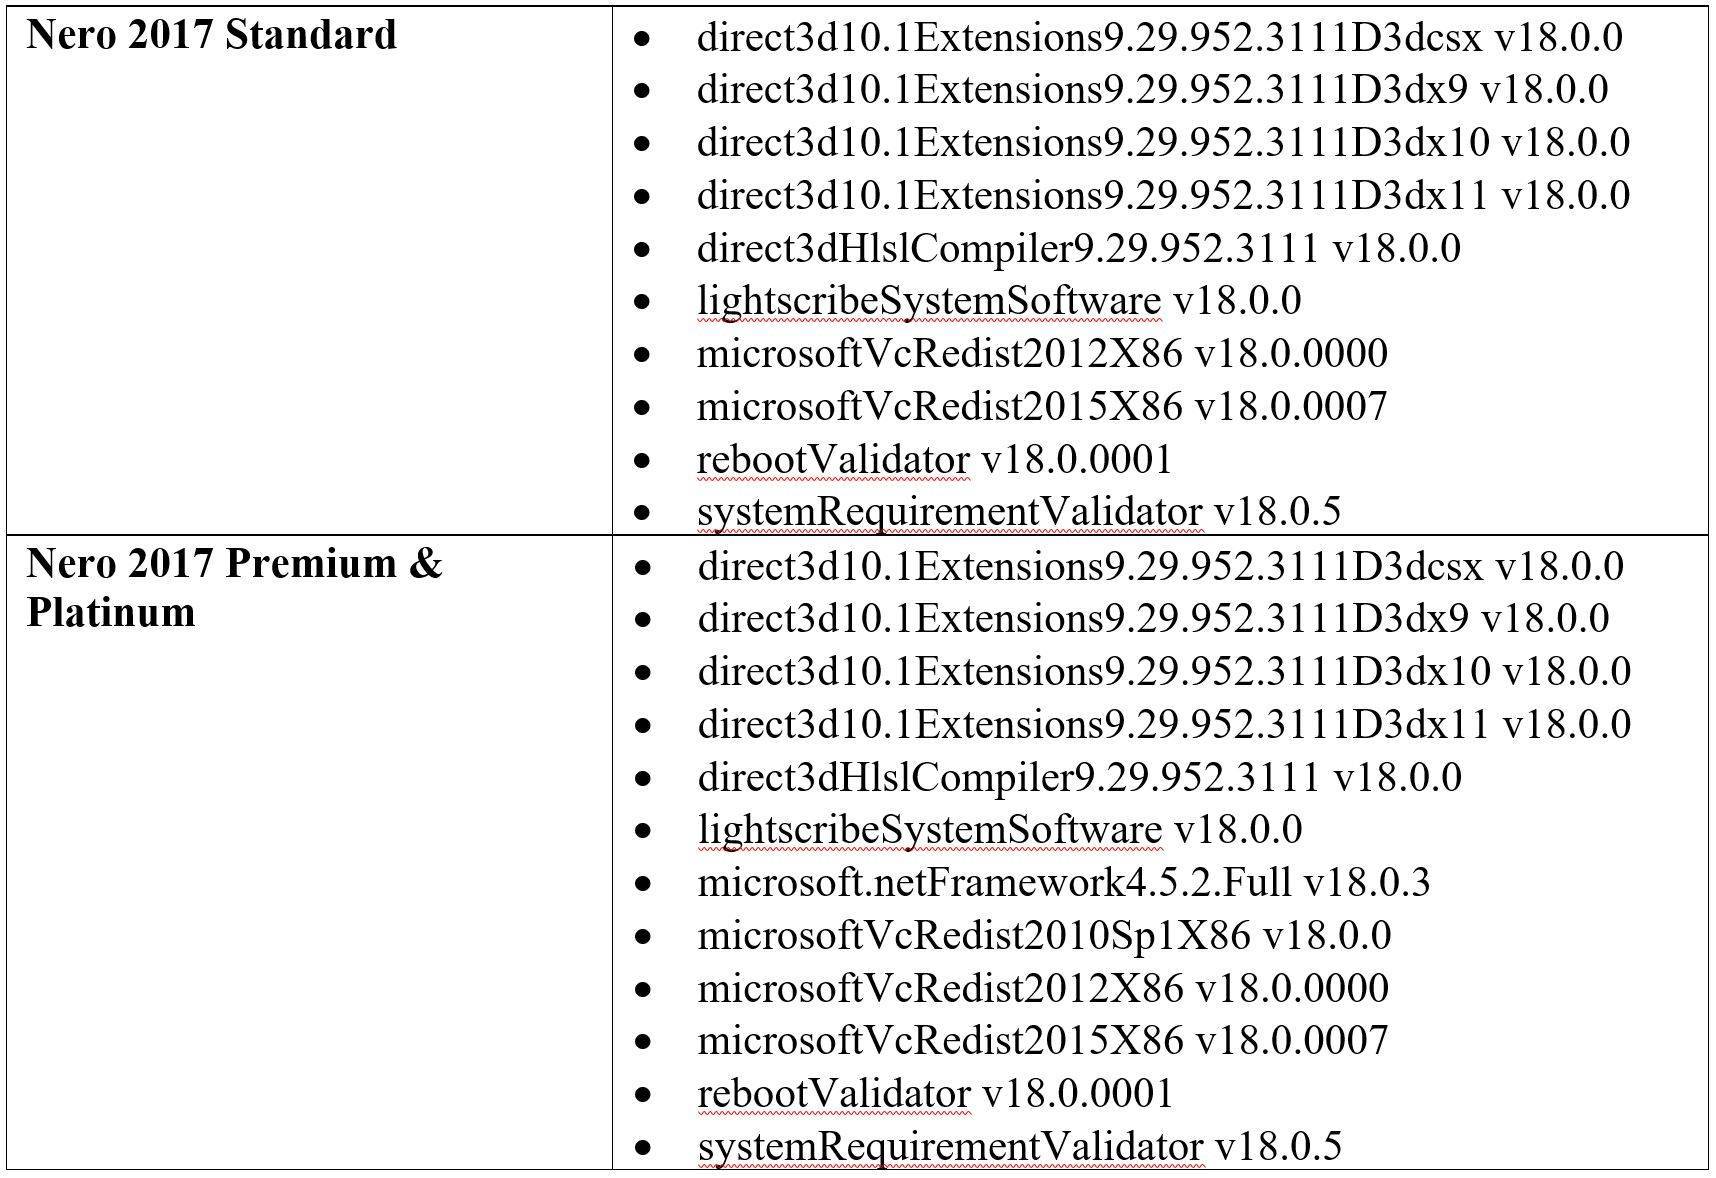
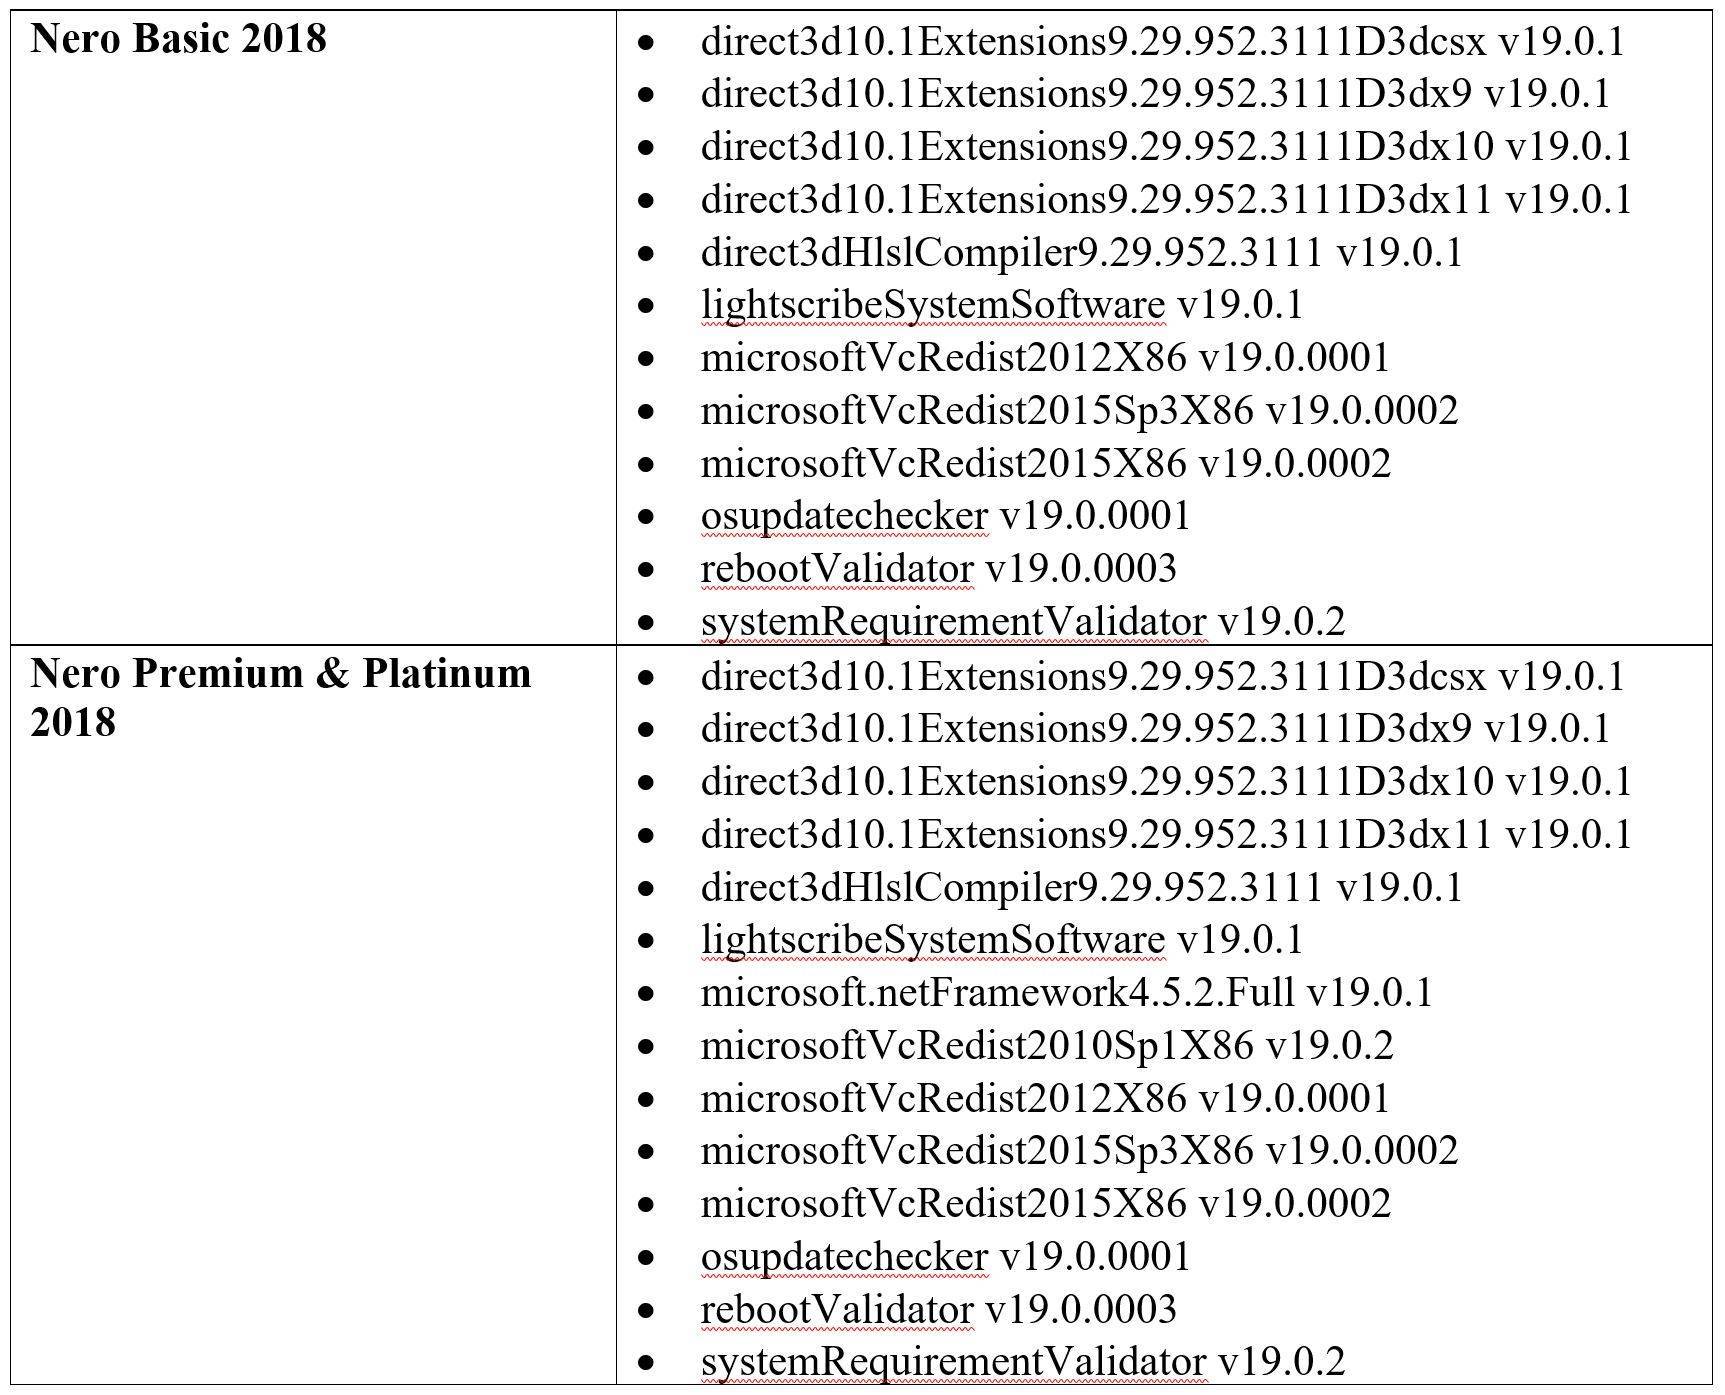
- Required prerequisites for Nero Volume License Products 2016, 2017, and 2018 can be found in the tables on page 8 following: Required Windows Prerequisites for Nero Volume License Products
The return codes of _install_prq.bat:
3.5 Required Windows Prerequisites for Nero Volume License Products

4. Removal of Product
The _uninstall.bat batch file for the removal of Nero products is rather simple. Before starting this batch file it has to be configured. So open it with a text editor and have a look at the section below the line
:: Make your settings here
In that section several variables are set. By these settings the removal can be configured. Let’s have a look at the particular variables and their meanings; default values are shown after the equality sign:
- neroMsiFolder = %~dp0
Set this variable to the full path of the installer folder. If the bat file is located in the installer folder (which is highly recommended), it is not necessary to change this variable’s default value. - neroMsiFile = none
Set this variable to just the file name of the installer’s MSI file, e.g. MultimediaSuite.msi. If none is assigned to it, the batch file will try to find the right MSI file. Note that the automatic detection works only for Nero’s standard products but not for Essential installers with different MSI file names. - silentInstall = 1
Set this variable either to 1 for a completely silent uninstall or to 2 if you’d like to have a progress bar shown on the target system at least. Default is value 1 which should be used for remote uninstallations; value 2 is more useful for local uninstallations.
5. EULA and Nero BurnRights
Installing and using Nero products requires that Nero’s EULA is accepted by either the responsible administrator or the applications’ user. Normally the EULA is displayed and has to be accepted at the beginning of the product installation but this is not possible for a silent installation. In this case at the first application start after silent installation the EULA will displayed to the user. This seems reasonable but in fact there is a problem if the installation batch file remotely runs Nero BurnRights right after installation to set the burn rights. These actions would display the EULA on the remote system.
There are two options to prevent this. One is to switch off the remote setting of burn rights in the batch files. The other is to sign the EULA when buying a volume license key. Nero BurnRights will detect such special keys and not display the EULA then. This behavior has been introduced with Nero 10.
Nero KnowHow 00108