Nero Start release notes v.29.5.9.0

What’s new in this version?

Nero Start introduces new ways to find the right tools, access your recent work, and manage your Nero products more easily.

Here’s what’s new and improved.

1. Get things done faster with Nero Quick Actions

Not sure which Nero app to use for a particular task? Nero Quick Actions helps you get started without searching through different applications.

You can start in two ways:

  • Drag and drop your files: Drop videos, photos, audio files, or other supported files into Quick Actions. Nero Start suggests relevant actions and applications.
  • Choose a task: Browse common tasks, such as burning discs, converting media, or working with AI tools, and select what you want to do.

Nero Start guides you to the appropriate application. If the required app isn’t installed or available with your current license, it can help you find installation or upgrade options.
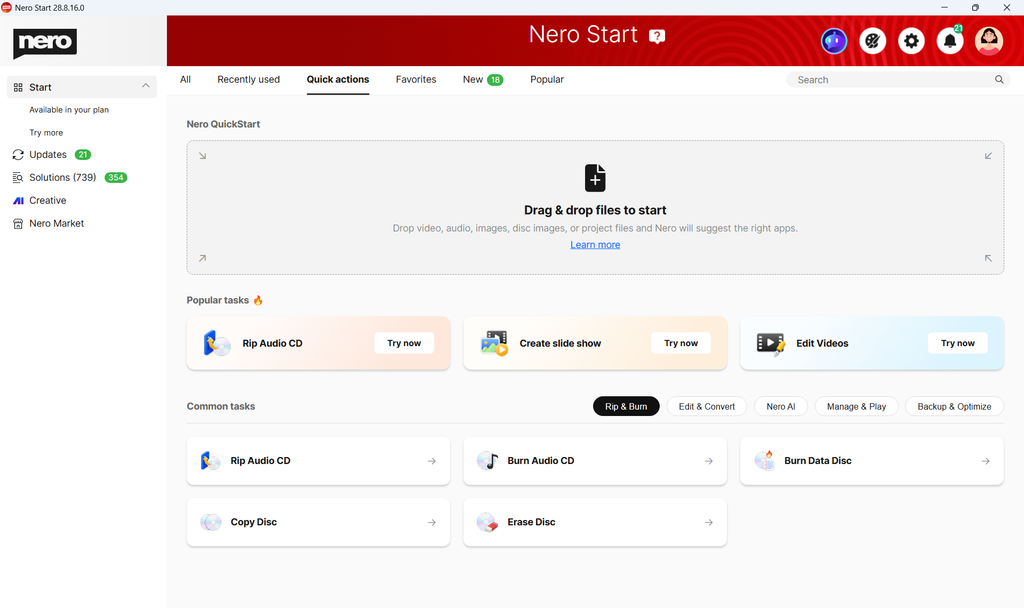
Tip: Use Quick Actions when you know what you want to do but aren’t sure which Nero application to open.

Read more

2. Find apps and services more easily with the new navigation

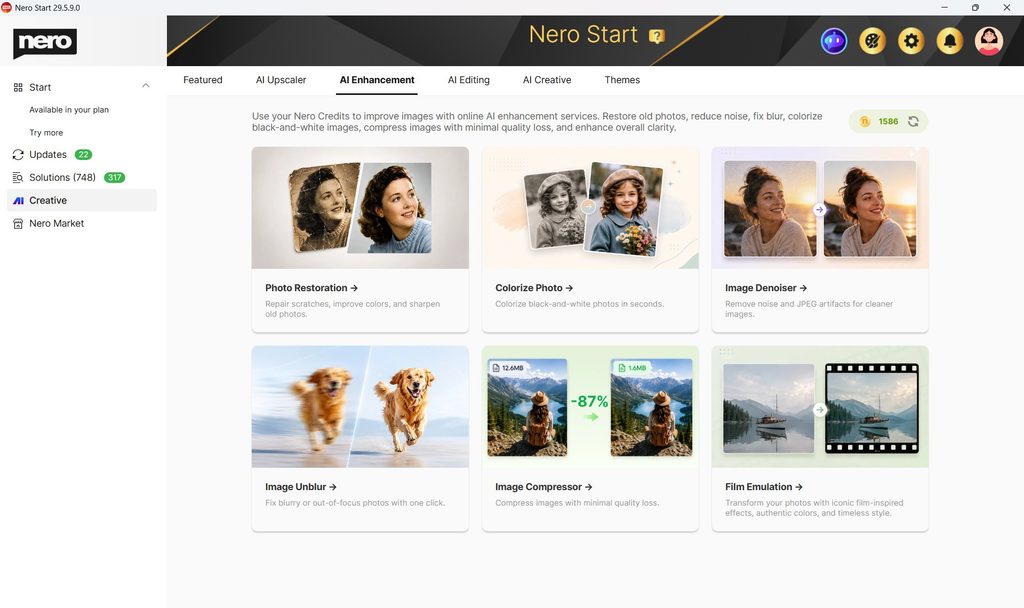
Nero Start 2027 introduces Creative and Market sections to help you explore Nero’s tools and services.

  • Creative: Discover Nero’s AI-powered creative tools and online services.
  • Market: Browse Nero applications or products on other channels, and available VIP offers.

These sections make it easier to find what you need without browsing through unrelated applications or features.
3. Continue your work with Recently used

Need to reopen a project or file you’ve worked on before?

The improved Recently used section provides quick access to your recent projects and files directly from Nero Start.

  1. Open Nero Start.
  2. Find the Recently used section.
  3. Select a recent project or file to open it in the corresponding application.
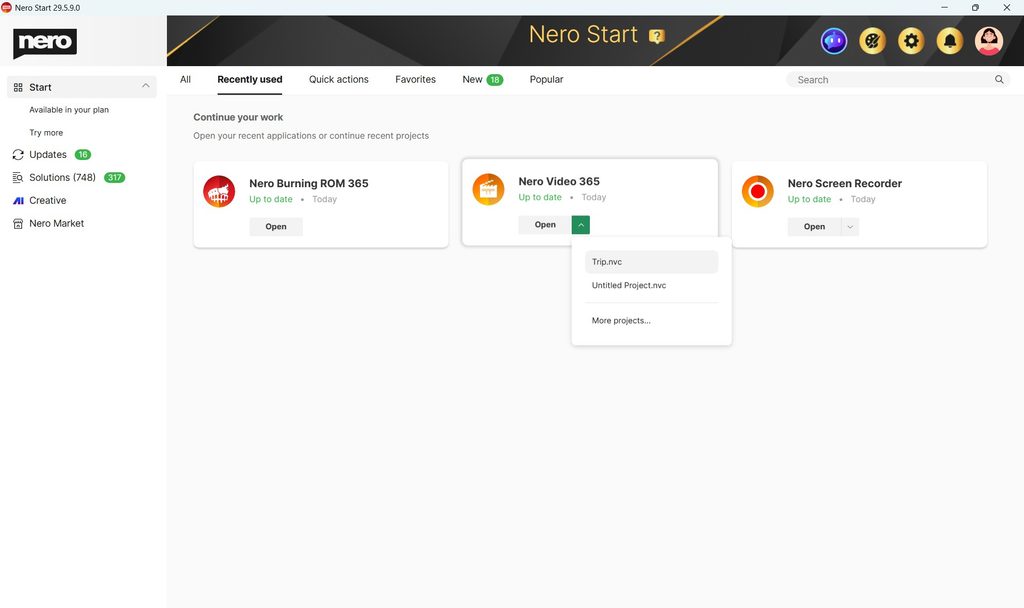
Tip: Recently used is especially helpful when you’re working on the same media project over multiple sessions.

4. Activate and extend your Nero products more smoothly

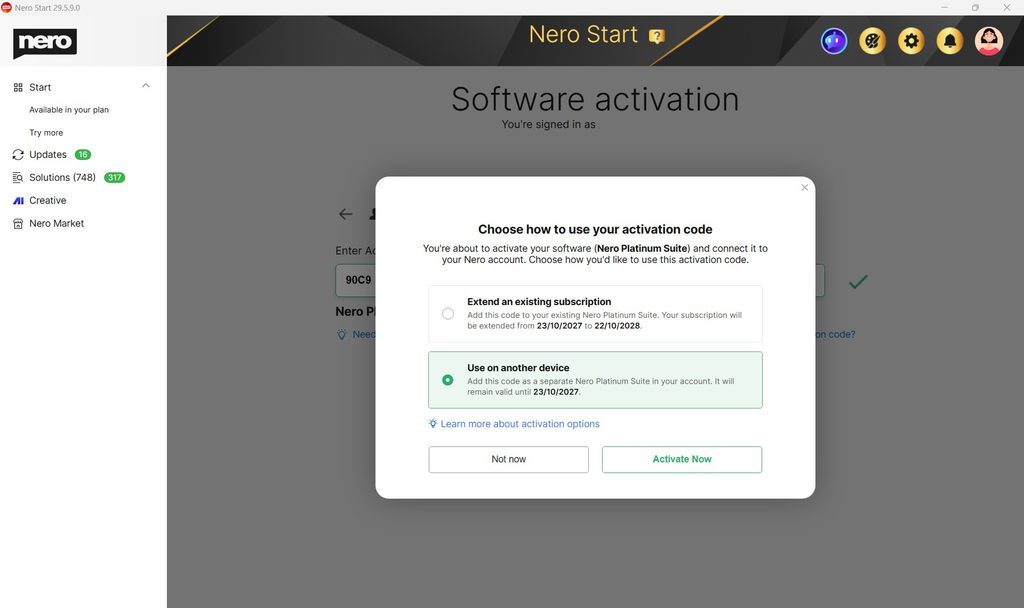
If you purchased a Nero product from an offline retailer and received an activation code, Nero Start 2027 makes activation easier, especially if your Nero Account already contains a subscription to the same product.

You can choose to activate the product for another device or extend your existing subscription. The improved process also helps you manage activation when you have multiple licenses for the same product.
Read more

5. Bug fixes and usability improvements

Nero Start 2027 also includes additional bug fixes and usability improvements for a smoother, more reliable experience.


Get started with Nero Start 2027

Explore Nero Quick Actions, check out the new Creative and Market sections, or open a recent project to try the improvements.

With Nero Start 2027, it’s easier to find the right tool and get back to what you were doing.
Browse your media your way with Folder view

What is Folder view in Nero MediaHome?

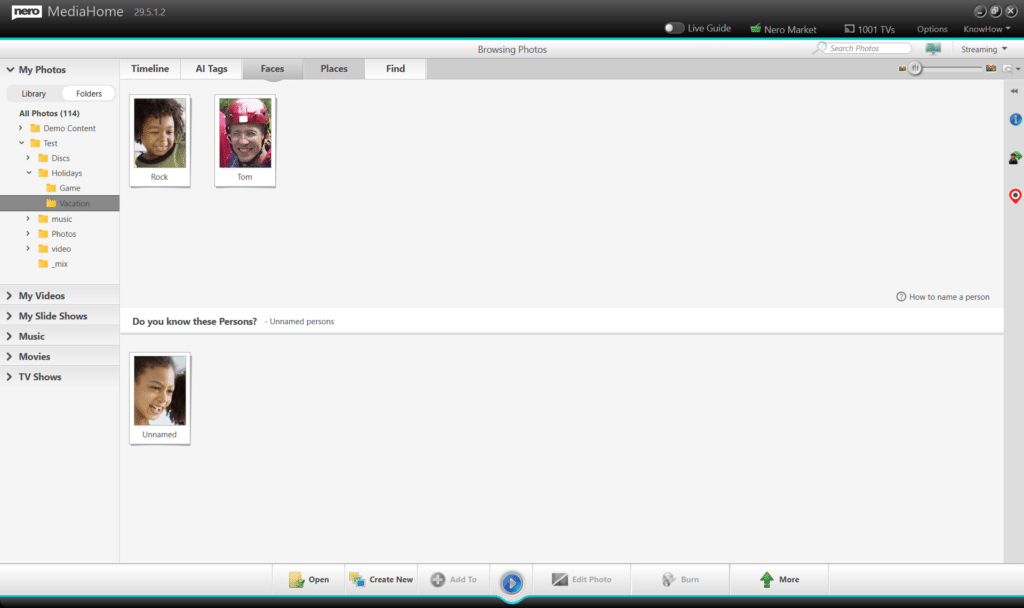
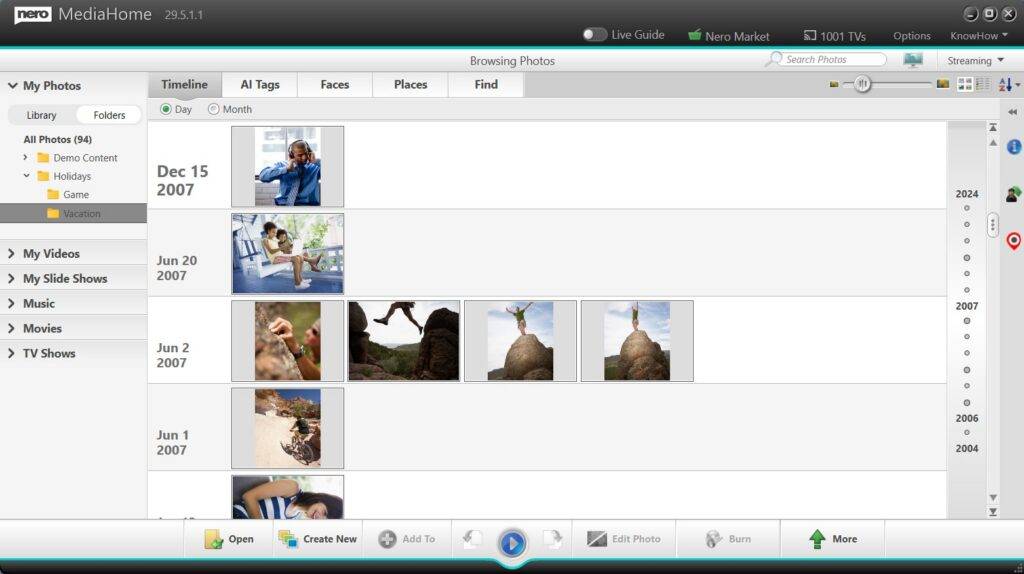
Folder view gives you another way to browse your photos and videos in Nero MediaHome.

Instead of browsing only through the MediaHome Library, you can now view your media using the folder structure you already know from Windows.

Switch between:

  • Library — browse media organized by Nero MediaHome.
  • Folders — browse media using your existing folders and subfolders.

Both views work with the same media. You can switch between them anytime depending on how you want to find your photos or videos.


Why use Folder view?

Many people already organize their photos and videos into folders such as:

Photos > 2026 > Summer Vacation
Videos > Family > Birthdays

With Folder view, you don’t need to learn a different organization just to find them in Nero MediaHome.

It helps you:

  • Find media where you expect it — browse using your familiar Windows folder structure.
  • Keep your existing organization — there is no need to reorganize or move your files.
  • Switch browsing styles anytime — use Folders when you know where a file is, or Library when you want MediaHome to help you explore your collection.
  • Combine folders with smart media information — find files by folder first, then use MediaHome information such as Faces, Places and AI tags to explore related memories.

How do I browse my media by folder?

  1. Open Nero MediaHome.
  2. Go to My Photos or My Videos.
  3. Select Folders instead of Library.
  4. Browse through your folders and subfolders just as you would in Windows.
  5. Select a folder to see the photos or videos it contains.

You can switch back to Library at any time.

Switching views does not move, rename, or reorganize your original files and folders.


How do Folders work with Faces, Places and AI Tags?

This is where Folder view becomes especially useful.

Your folder structure tells you where you stored your media, while Nero MediaHome’s smart information helps you find and explore media based on who or what is in it, and where it was taken.

For example, suppose you open:

Photos > 2026 > Summer Vacation

You can browse the photos exactly where you saved them, while Nero MediaHome can still use smart information such as:

  • Faces — find and organize photos by the people in them.
  • Places — explore photos based on where they were taken.
  • AI Tags — automatically identify content in your photos, making it easier to find images by subjects and objects.

This gives you complementary ways to find your media:

Folders: Where did I save it?
Faces: Who is in it?
Places: Where was it taken?
AI Tags: What is in it?

You don’t have to choose one way of organizing your media. Use them together depending on what you remember about the photo you’re looking for.


When should I use Library or Folders?

If you want to…Use
Browse media using your existing Windows organizationFolders
Go directly to a folder you already knowFolders
Browse your media through MediaHome’s organizationLibrary
Explore memories by people or locationFaces / Places
Find related media when you don’t remember where it is storedLibrary + Faces / Places

Quick tip

You don’t need to reorganize your media to take advantage of Nero MediaHome.

Keep the folder structure that already works for you, and use MediaHome’s Faces and Places when you want a smarter way to explore your collection.

What’s New in Nero AI Image Upscaler 2027 (Release Notes – 29.5.3.0)

Image Upscaler 2027 Released!

Release Platform:

  • Official Website (Windows Installer) — v29.5.3.0 (Jun 25, 2026)
  • Microsoft Store — v3.1.2 (Jun 4, 2026)
  • Steam — v2.1.1 (Jun 1, 2026 )
  • macOS — v2.0.16 (Jun 19, 2026)

Note: Version numbers and release timing may vary across platforms due to individual store review processes.

Bigger. Sharper. Faster.

Meet the Next Generation of AI Image Upscaler

This release delivers one of the biggest upgrades to our AI Image Upscaler yet — bringing larger upscale capabilities, smarter clarity recovery, and dramatically improved batch productivity.

Whether you’re restoring old memories, improving blurry photos, or processing large creative projects, the new generation engine is built to help you do more in less time.


🚀 New 8× Upscaling

The new 8× upscale mode allows dramatically larger image enhancement while preserving texture, edges, and natural detail.

An 4K image can now be enlarged up to 32K* resolution, making it ideal for:

  • Large-format printing
  • Posters and banners
  • Professional design assets
  • Ultra high-resolution workflows

Compared to previous versions, the new engine delivers cleaner edges, better texture reconstruction, and improved detail stability.


🖼️ Ultra Large Output Support — Up to 1024 MP

This generation also introduces support for outputs up to 1024 megapixels.

The upgraded processing pipeline is optimized for extremely large images while maintaining:

  • Stable detail reconstruction
  • Better memory handling
  • Smoother large-scale processing
  • Improved export reliability

Perfect for creators working with:

  • Large canvas artwork
  • Commercial print assets
  • High-resolution AI creations
  • Professional production workflows

✨ New AI Models: Sharpen & Unblur

Different image problems require different AI solutions.

This release introduces two specialized enhancement models focused entirely on clarity recovery.

Sharpen

Designed for soft images that already contain details but lack crispness.

Sharpen improves:

  • Texture visibility
  • Edge definition
  • Fine-detail contrast
  • Overall image clarity

Great for:

  • Landscapes
  • Product photos
  • AI-generated artwork
  • Screenshots and graphics

Unblur

Built specifically for blurry images caused by:

  • Motion blur
  • Camera shake
  • Focus issues
  • Compression artifacts

Unblur intelligently reconstructs lost structure while keeping results natural and readable.

Ideal for:

  • Old phone photos
  • Blurry portraits
  • Moving subjects
  • Low-quality scanned images

⚡ Much Larger Batch Processing

This release also delivers a major productivity upgrade for power users.

Previous versions supported processing up to 20 images per batch.

Now, the new engine supports up to 100 images in a single run — a massive 5× increase in batch capacity.

That means:

  • Fewer interruptions
  • Less repetitive setup
  • Faster project completion
  • Better workflows for large image collections

Whether you’re restoring entire albums or enhancing content libraries, batch processing is now dramatically more efficient than before.

Combined with backend optimizations and improved processing pipelines, large-scale tasks now feel smoother, faster, and more stable.


🔧 Designed for Heavy Creative Workloads

This update is focused on helping creators push further with AI image enhancement.

We improved:

  • Maximum upscale capability
  • Detail reconstruction quality
  • Blur recovery accuracy
  • Large-scale processing workflows
  • Overall engine stability and efficiency

From casual photo restoration to professional creative production, this release gives you more power across every stage of the workflow.


Available Now

Update today to experience:

  • Massive 8× image enlargement
  • Dedicated Sharpen & Unblur AI models
  • 5× larger batch processing capacity
  • Faster and smoother large-project workflows

More images. More detail. Less waiting.

Notes

* Sharpen and Unblur are currently processed using Nero Cloud GPU. Native local AI models are on our roadmap and will be available in a future update.


Get It Now 🛒


Nero Start release notes v.28.5.76.0

What’s new in this Nero Start update?

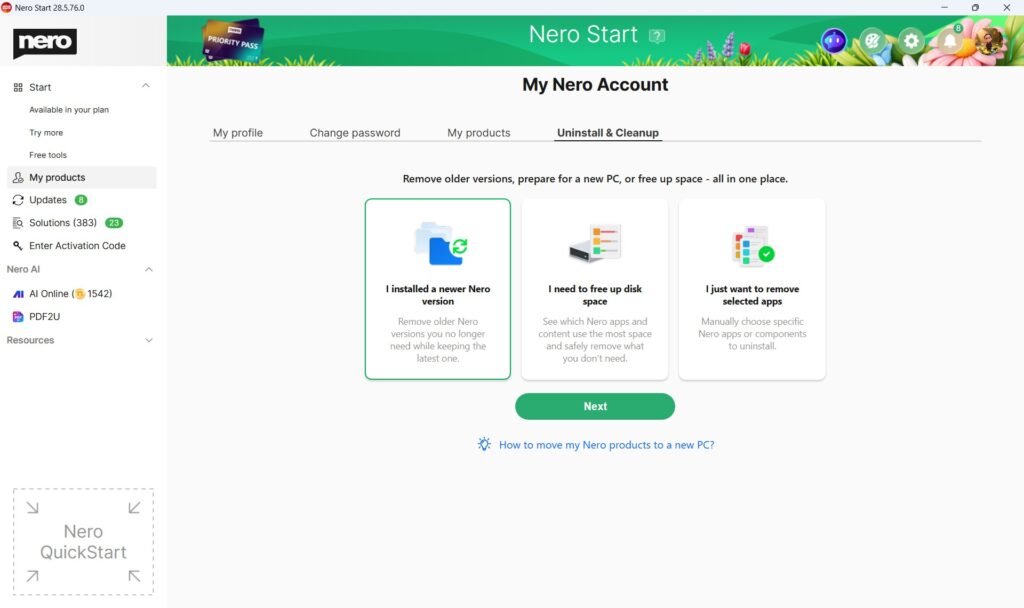
This update introduces a new Uninstall & Cleanup center inside My Nero Account. It helps you remove Nero apps faster — especially when you want to uninstall multiple apps or clean up older versions.

Nero Start: Uninstall & Cleanup Center

Where can I find “Uninstall & Cleanup”?

Open Nero Start → go to My products → select the new Uninstall & Cleanup tab.

What can Uninstall & Cleanup do?

With Uninstall & Cleanup you can:

  • Uninstall multiple Nero apps at once (batch uninstall)
  • Remove older versions in one go to keep your PC cleaner
  • Free up disk space faster by sorting apps by size and removing the ones you don’t need

Will uninstalling remove my personal files?

Uninstalling a Nero app removes the application from Windows. Your personal files (for example videos, photos, music, and documents) are not deleted.
If an app includes optional settings or cache data, those may be removed as part of the uninstall process.

What else is included in this update?

We also included usability improvements and bug fixes to make Nero Start more reliable.

How do I uninstall apps in batch?

See our How-to article: How to uninstall Nero apps in batch .

Nero Start release notes v.28.5.65.0

What’s new in this version?

  • New: Switch between Local (in-app) login and Online login anytime in Options
  • Improvements: Stability and usability updates, including smoother activation code entry

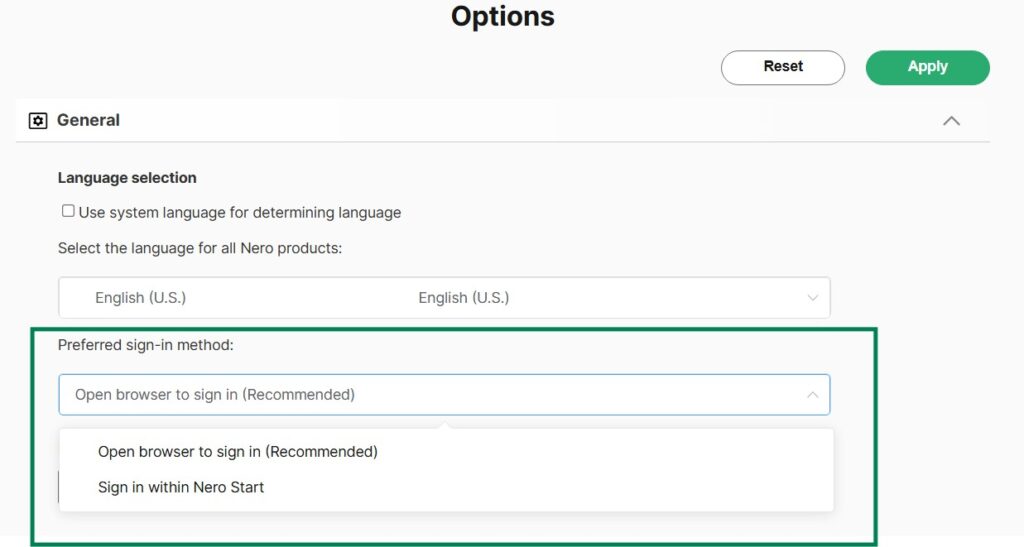
What is “Open browser to sign in” vs “Sign in within Nero Start”?

Nero Start now lets you choose how the sign-in screen opens:

  • Open browser to sign in: Sign in using your default web browser.
  • Sign in within Nero Start: Sign in directly inside Nero Start.

What’s the benefit of open browser to sign in?

When you sign in using Open browser to sign in, your sign-in status can be shared across Nero services that require account login – so you may not need to sign in again in other Nero experiences on the same device/browser environment, for example:

  • Nero Microsoft Store applications,
  • Nero’s official website,
  • Nero AI online services.

This cross-service sign-in experience is not available with Sign in within Nero Start.


How do I switch between different sign-in method?

You can switch anytime in Options, which is helpful if your preferred method works better on your system.

  1. Open Nero Start.
  2. Go to Options.
  3. Find Preferred sign-in method (or a similarly named setting).
  4. Select one option:
    • Open browser to sign in, or
    • Sign in within Nero Start
  5. Apply.