‘DriveSpan App’ on your mobile device is the central control unit for connecting sources and a target wireless to your consolidation scenario, and for executing the consolidation.
If you are making use of a PC* including attached external storage, ‘WiFi+Transfer’ is in charge of connecting and exchanging data between your PC (wireless or via LAN) to ‘DriveSpan App’ running on your mobile device.
Make sure your PC is switched on, and both your PC and your mobile device running ‘DriveSpan App’ are logged in to the same network.
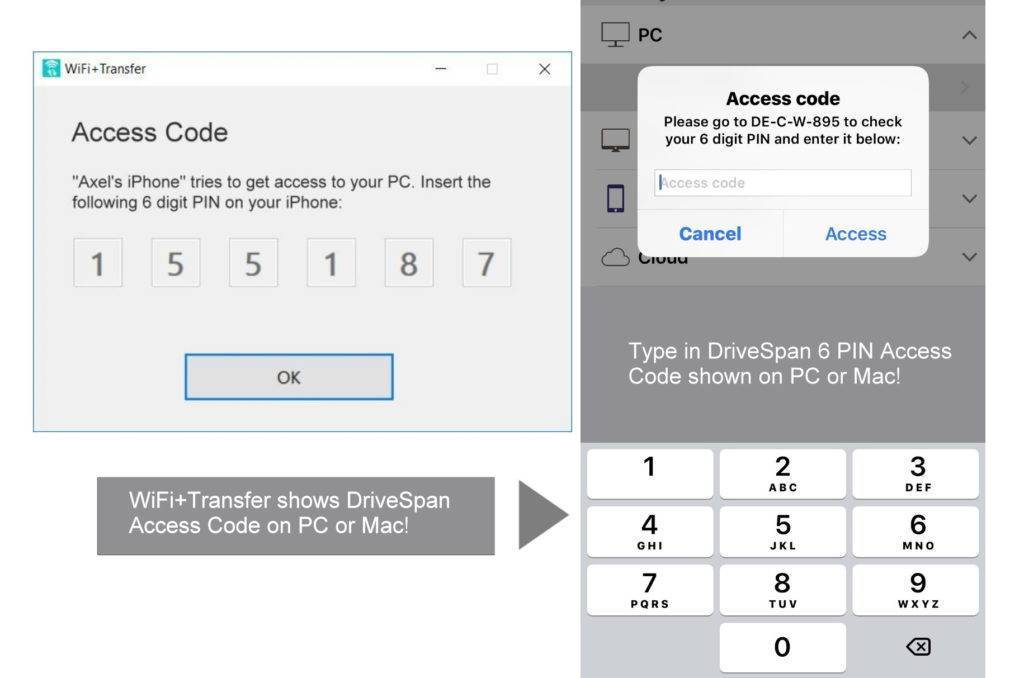
In ‘DriveSpan App’ source or target selection (also see Nero KnowHow 00144) click on the listed PC. If not set permission to this PC yet, ‘DriveSpan App’ will send a 6 digit access code to your PC. Type the given digit into the interface showing at ‘DriveSpan App’. Your PC is set for connection with ‘DriveSpan’, now, and if you are using the same PC ever so often in connection with ‘DriveSpan’ on the same mobile device, you will not have to enter the PIN again.
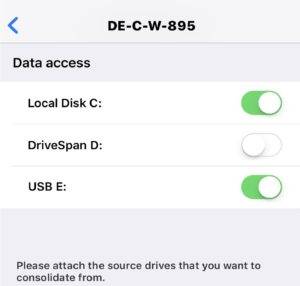
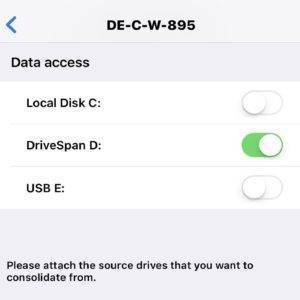
Once done, you can access all internal and external drives (connected to your PC) and set them as a source or target for consolidation.
*Note on using a PC with DriveSpan App
Integrating a PC into the consolidation requires ‘WiFi+Transfer’ installed on the respective computer. If you are using ‘Nero Platinum 2019’ or ‘Nero Standard 2019’ (or later versions), ‘WiFi+Transfer’ was already installed on your PC together with the ‘Nero Suite’ installer. So, you are set to use all ‘DriveSpan App’ features also with your PC.
Free ‘DriveSpan’ version users can buy the option to consolidate via PC or Mac. To utilize this make sure to have ‘WiFi+Transfer’ installed on the PC and/or Mac. A free PC version of ‘WiFi+Transfer’ tool is available for download at www.drivespan.net. A free Mac version of WiFi+Transfer is available via Mac App Store.
‘DriveSpan App’ on your mobile device is the central control unit for connecting sources and a target wireless to your consolidation scenario, and for executing the consolidation.
The status of added sources and the target will be shown on the ‘DriveSpan’ user interface.
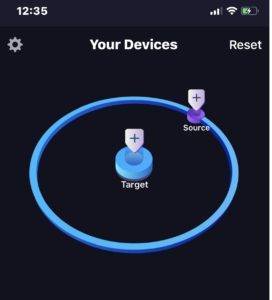
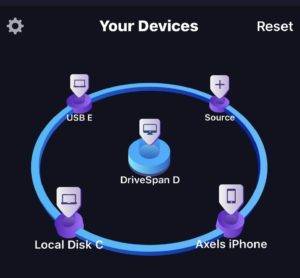
On the home screen, you find an intuitive representation for sources to be added within the outer ring and a target to add in the center.
In general you can select the following sources:
PC (and attached external devices)
Mac (and attached external devices)
Mobile devices
Cloud services
Initially, please make sure that all devices including sources and target are logged in to the same network: mobile device, PC and Mac. Also, please do not forget to connect external storage devices that you want to use as source or target physically to your PC or Mac, e.g. your USB sticks or external storage drives.
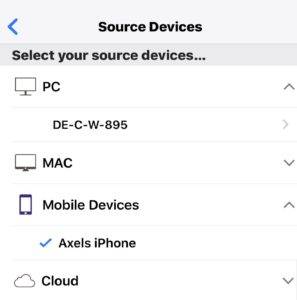
For adding a source, press the plus button. The next page will show all available sources/devices in your network that you can use for consolidation. Press on the respective source device and a selection option will open.
Selecting a PC or Mac and available external storage
Make sure your PC or Mac is switched on, your PC or Mac uses the same network as ‘DriveSpan’, and ‘WiFi+Transfer’ is installed and running on your PC or Mac (check details below). If you are a Nero Platinum(later than 2018) user, WiFi+Transfer is included in the product. Otherwise, you can download and install WiFi+Transfer from https://www.drivespan.net/.
In the window select your PC or Mac. We are using the example of a PC – a Mac will work accordingly.
Press on the PC name listed here. If the permission to connect to this PC was not set so far, ‘DriveSpan App’ will send a 6 digit access code to your PC. Type the given PIN into the interface showing at ‘DriveSpan App’ and press ‘Access’. Your PC is set for connection with ‘DriveSpan’, now. If you are using the same PC or Mac ever so often in connection with ‘DriveSpan App’ on the same mobile device, you will not have to enter the PIN again.
Once done, you can access all internal and external drives (connected to your PC or Mac) and set them as a source (or target: see further down) for consolidation.
Selecting a Mobile Device
When selecting ‘Mobile Devices’ the mobile device, on which you run ‘DriveSpan App’, will be shown by default. Press on it to select it for integration into your consolidation scenario (see device selected in above list).
Note: After the initial release version of ‘Drive Span App’, you can expect an update allowing you to add more than one mobile device to your consolidation setup (stay tuned via Nero KnowHow).
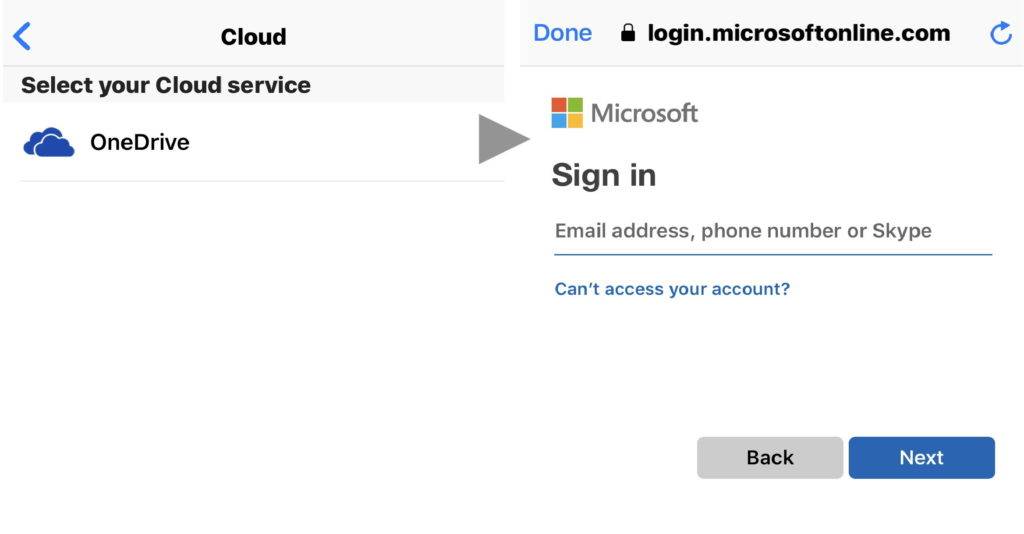
Selecting a Cloud Service
If you are using a cloud service like ‘OneDrive’ (support for further services planned), you can select it and directly log into your account via DriveSpan App.
When all your sources are set, go back to the home screen where you will find them indicated by name in the outer ring of ‘DriveSpan App’. If wanted, add more sources by pressing the ‘Source’ plus, again.
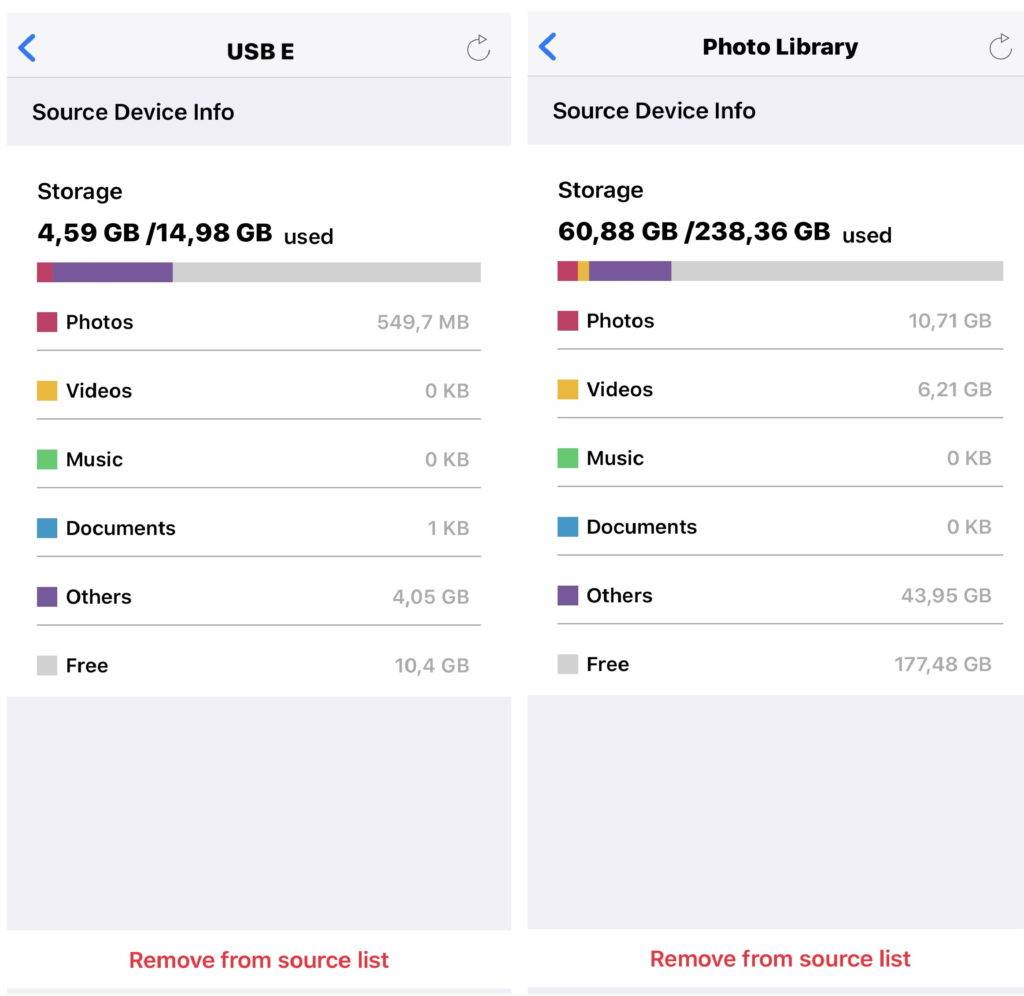
You can check the status of each source by clicking on the respective icon. At the bottom of this screen, you can also remove the source from your list of devices. The same is also possible on the home screen via long press on the respective source icon.
Setting your Target
Now, press on the target icon in the center and add one target. This can be your PC or Mac, an attached external storage, or a cloud service. You cannot consolidate to a mobile device.
In the case shown below, the target is an external PC storage drive under D:, that we have named ‘DriveSpan’ for the sake of showing it in this FAQ.
Target status control and removing behavior works exactly like with the source setup. Please make sure not to select a target device that you initially selected as a source device. This will not work.
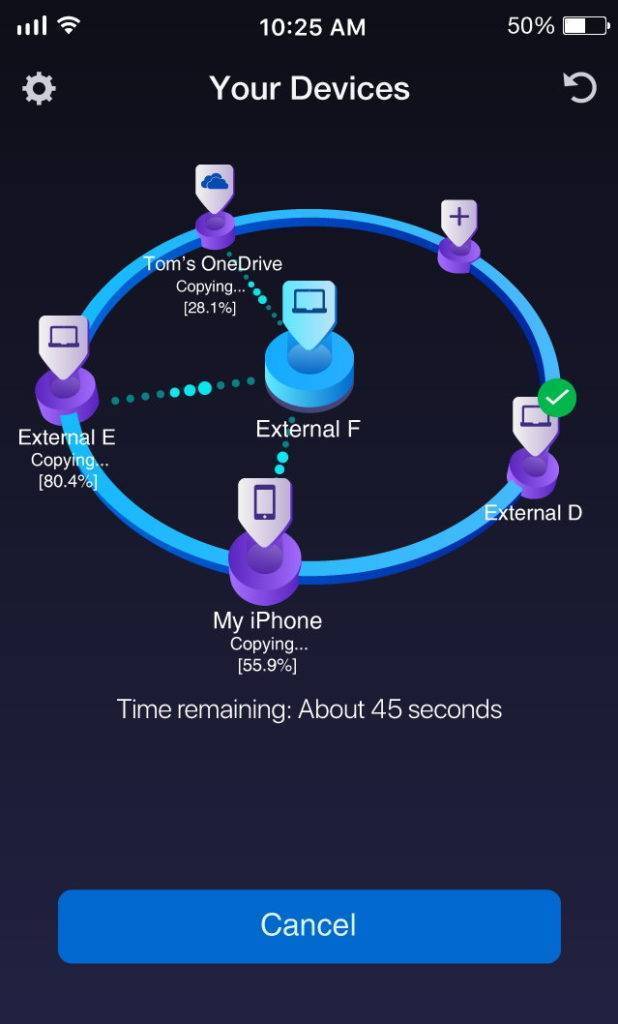
When your target has been selected, you are ready for consolidation. Press on the button ‘Consolidate now’ at the bottom of ‘DriveSpan App’ to start your consolidation.
If you want to cancel the whole source and target selection, in order to do the setup again, just press ‘Reset’ in the home screen top right.
Integrating a Mac or PC into the consolidation requires that ‘WiFi+Transfer’ is installed on the respective computer. A free PC version of ‘WiFi+Transfer’ tool is available for download at www.drivespan.net. A free Mac version of ‘WiFi+Transfer’ tool is available via Mac App Store.
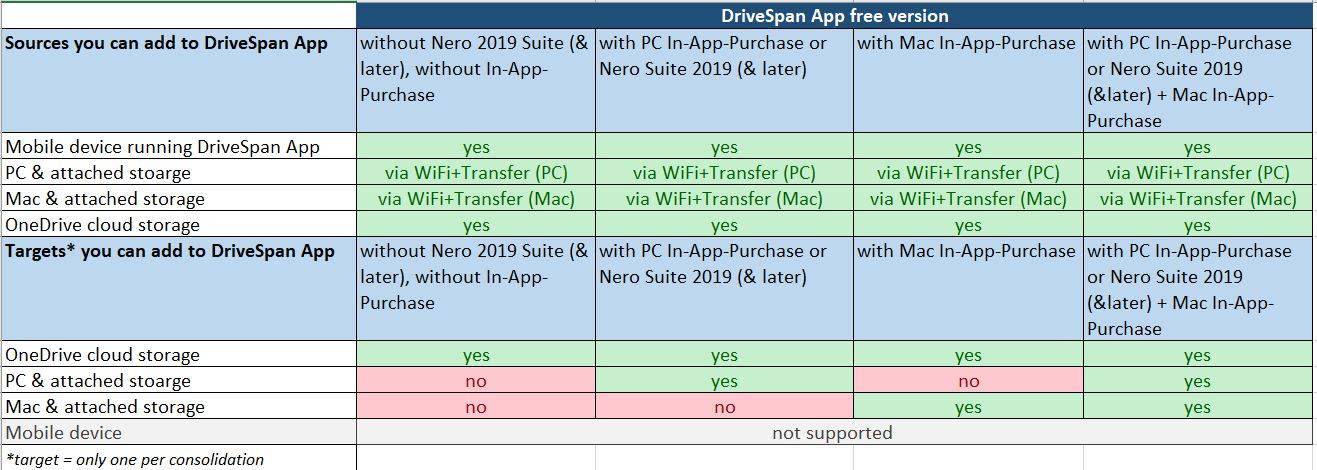
With the free version of DriveSpan App you can consolidate into your OneDrive cloud. If you want to store all your stuff on a hard disk or a NAS attached to your Mac or your PC, DriveSpan requires an In-App-Purchase.
If you are using ‘Nero Platinum 2019’ or ‘Nero Standard 2019’ (and later versions), ‘WiFi+Transfer’ tool was already installed on your PC together with the ‘Nero Suite’ installer. As an owner of Nero Suite 2019 & later the feature to use your PC as a target for consolidation will be unlocked automatically – i.e. you get the In-App-Purchase for free.
Check below table as a reference for using sources & targets.
Via ‘DriveSpan App’ in combination with your Nero Suite product (Nero Platinum 2019 or Nero Standard 2019 and later) you can easily merge and consolidate all of your media and data located on your mobile device, on your PC with internal and attached storage, or within the cloud to one central storage location, e.g. a PC, an external hard disc, or the cloud.
Via ‘DriveSpan App’ for iOS and Android you can now comfortably control and trigger the consolidation with all devices simply connected via the same WiFi network.
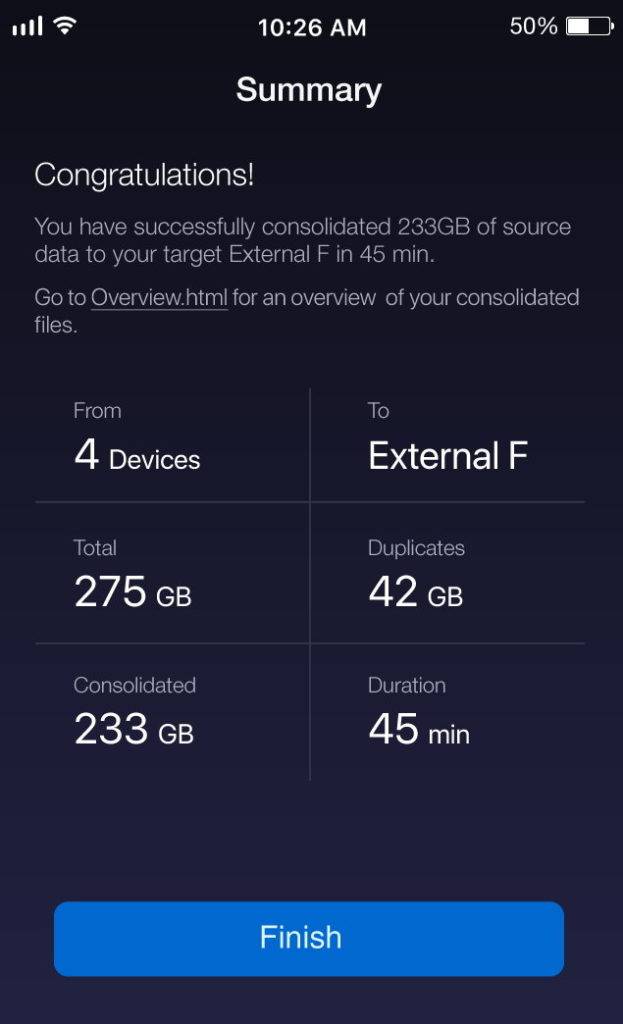
When the consolidation is finished you will find all of your data on the central storage location in a clean state, i.e. duplicate media and data are being identified within the consolidation process and will not be copied.
Nero Suite users (Platinum 2019/Standard 2019 and later) have access to the complete version of ‘DriveSpan App’ with all features enabled (except Mac access). The free version is restricted to consolidation from mobile and cloud to cloud, only.
Other users that do not own one of the Nero Suites (version 2019 and later), but want to include their PC and even their Mac into the consolidation can buy this feature via In-App-Purchase. The free ‘WiFi+Transfer’ tool needed for connecting a PC and attached storage to ‘DriveSpan App’, can be downloaded via www.drivespan.net. Mac users get the free ‘WiFi+Transfer’ tool needed to connect their Mac and attached storage to ‘DriveSpan App’ in the Mac App Store.
As a Nero Suite user (version 2019 and later), you will have the ‘WiFi+Transfer’ tool for PC consolidation already installed with your product. So once you start ‘DriveSpan App’ on your mobile device you are ready to enjoy consolidating. For more details, also see Nero KnowHow 00144.
From Nero 2019, ‘Live Guide’ is available via ‘Nero KnowHow PLUS’ in all Suite and standalone end user products.
‘Live Guide’ is available for the following applications:
Nero MediaHome
Nero DuplicateManager Photo
Nero Video
Nero Recode
Nero Express
Nero Burning ROM
Nero BackItUp
With new ‘Live Guide’, ‘Nero KnowHow PLUS’ integrates a unique and very comfortable feature for getting context sensitive tips & tricks and help from within Nero applications.
The new mode called ‘Live Guide’ directly links to related FAQs, manuals pages, and tutorials within the main Suite applications in regards to the actual use case, the application mode, or task performed inside of the application.
Let’s see some examples of how this works inside of ‘Nero Video’
Imagine you have just started using one the of the great new ‘Nero LifeThemes Pro’ in ‘Nero Video’ for creating a slideshow or movie with automated intro and outro, effects, captions, and music.
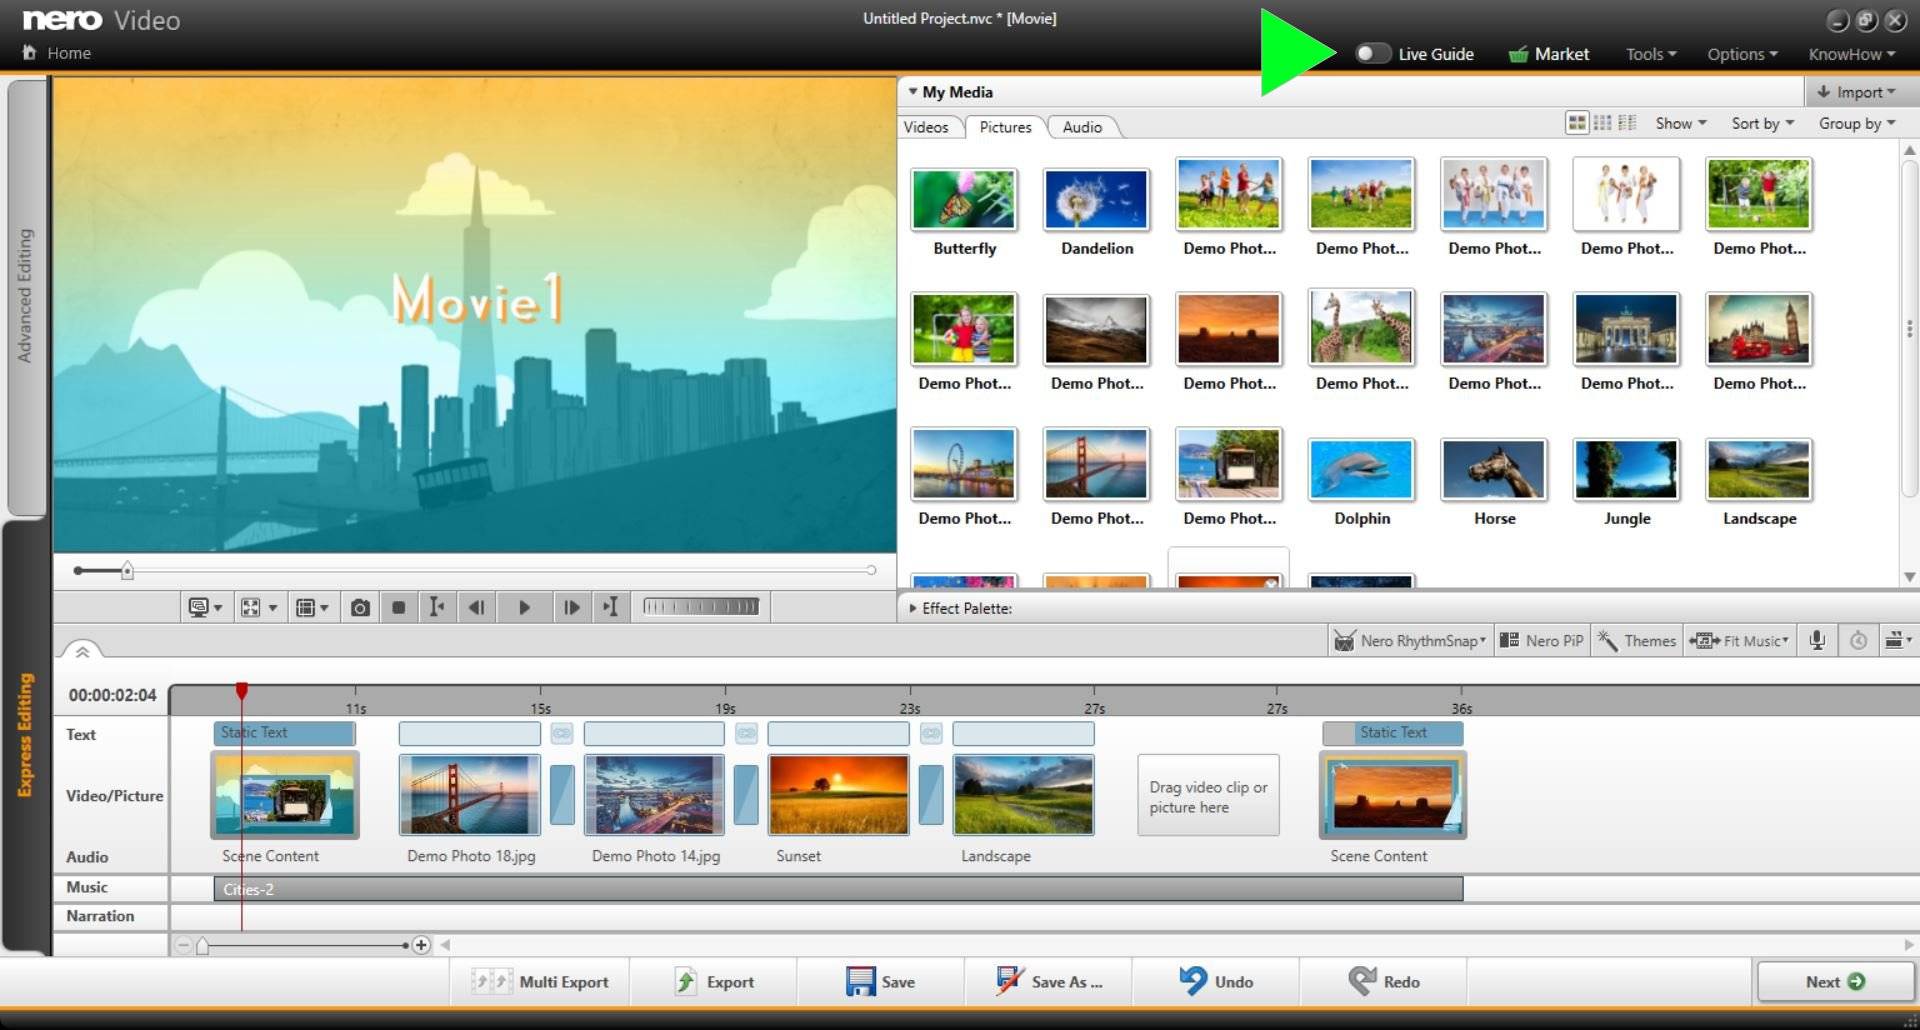
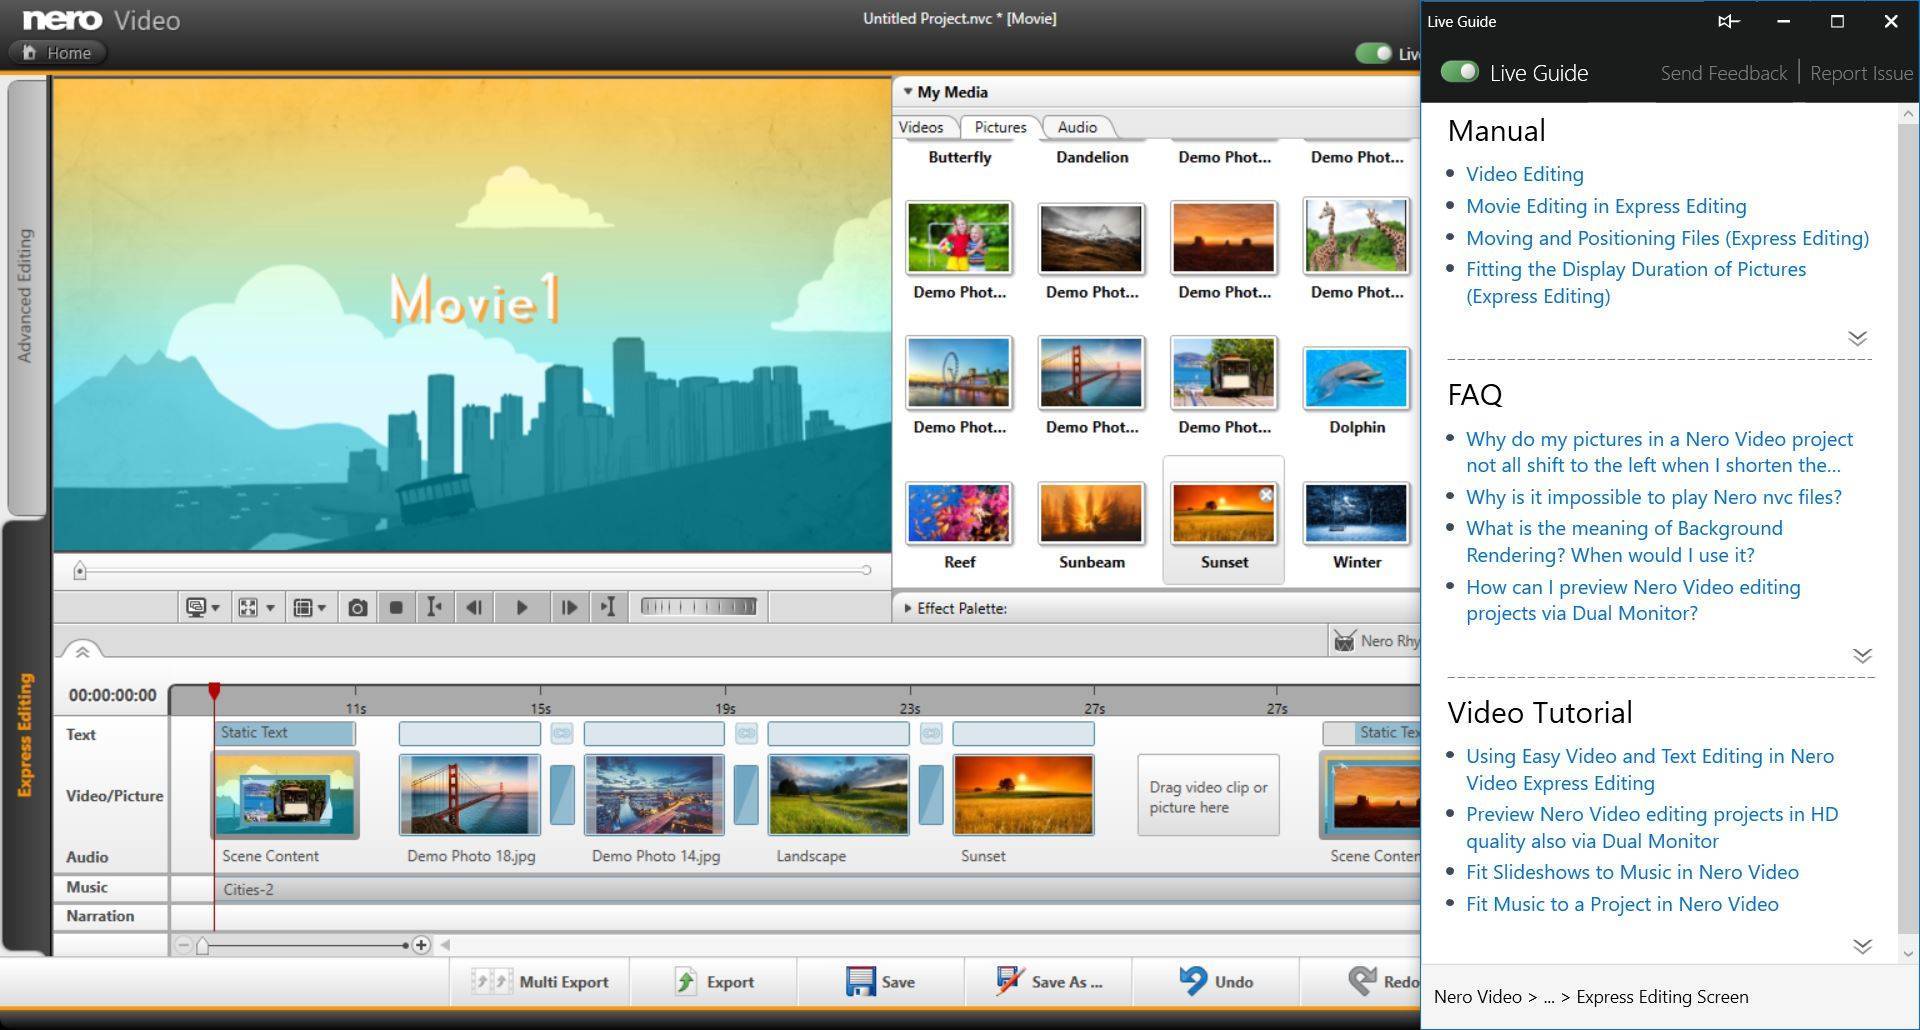
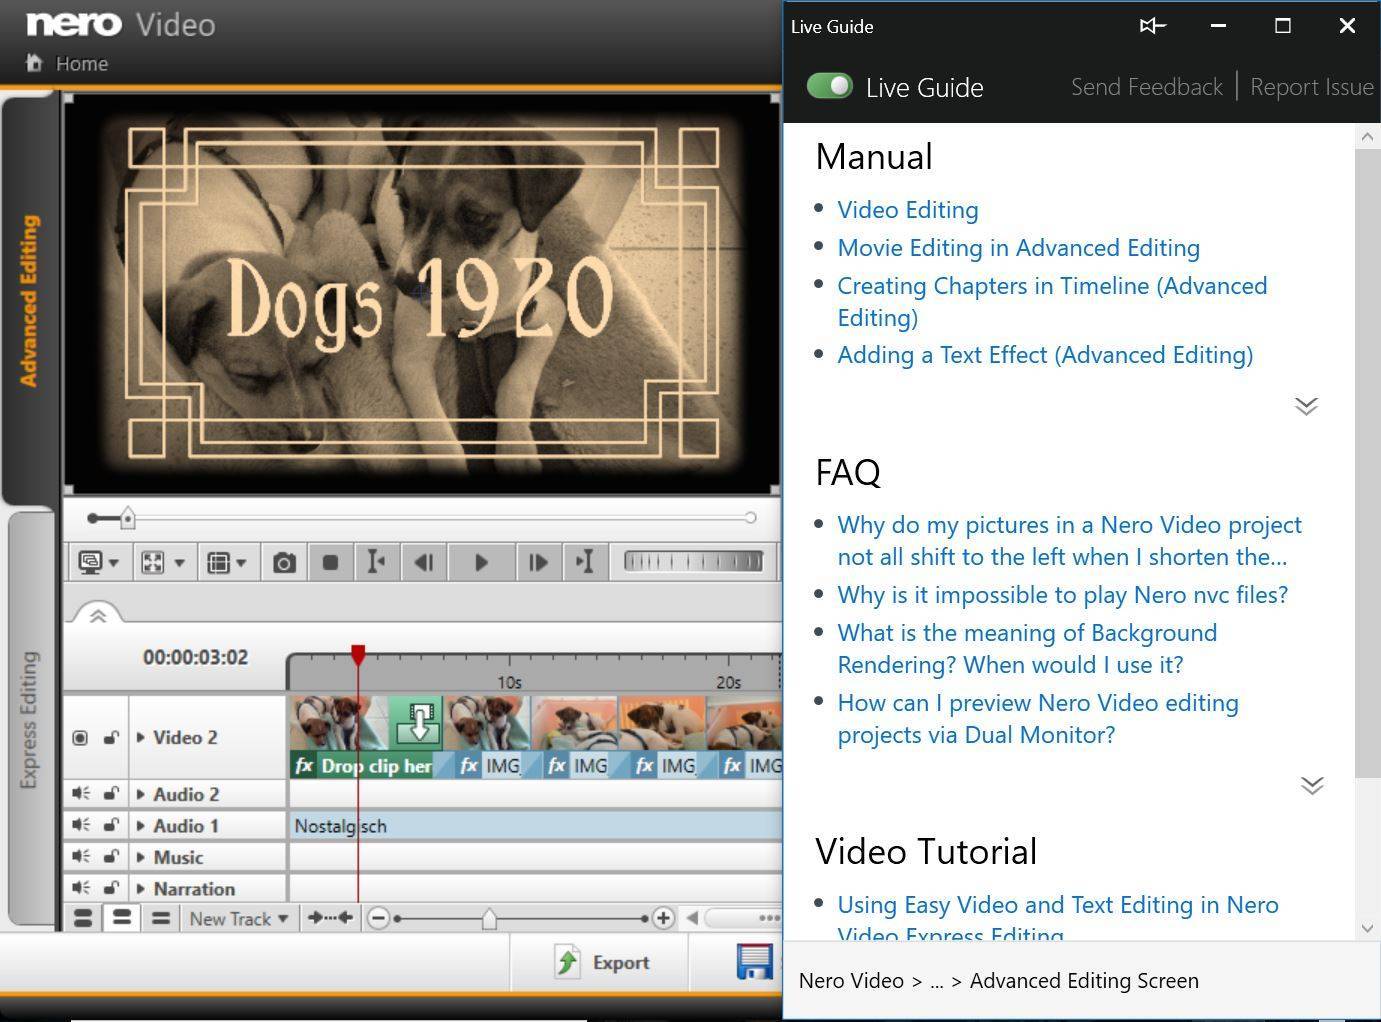
Switch on the ‘Live Guide’ toggle on the header bar of ‘Nero Video’ and ‘Live Guide’ will give you context sensitive FAQs and other information.
A context path at the bottom of ‘Live Guide’ shows you where you are in your project: ‘Nero Video >…> Express Editing’. In this case you will see all relevant information for editing in Express Mode.
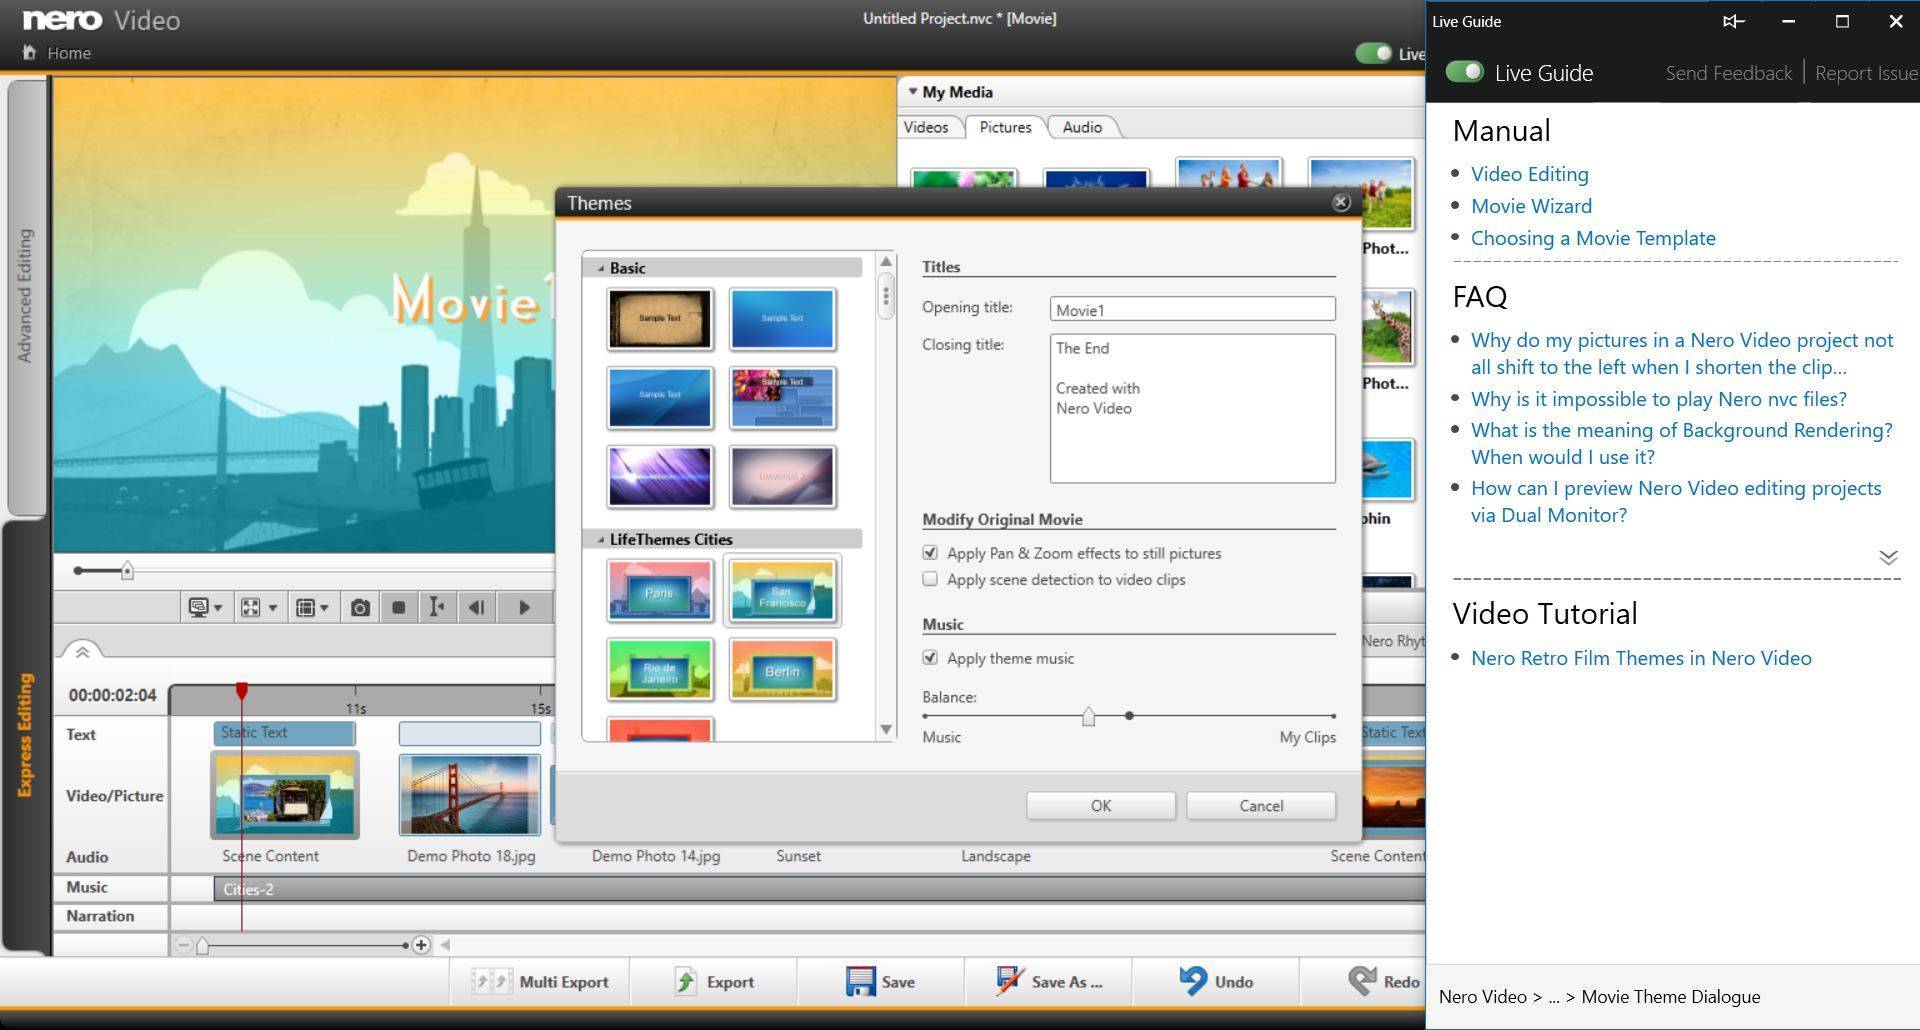
Now, when you change to open the MovieTheme template selection window, ‘Live Guide’ will automatically adapt its context to match your new task. Now, the job path at the bottom tells you: ‘Nero Video > … > Movie Theme Dialogue’. The context inside of ‘Live Guide’ has changed, accordingly.
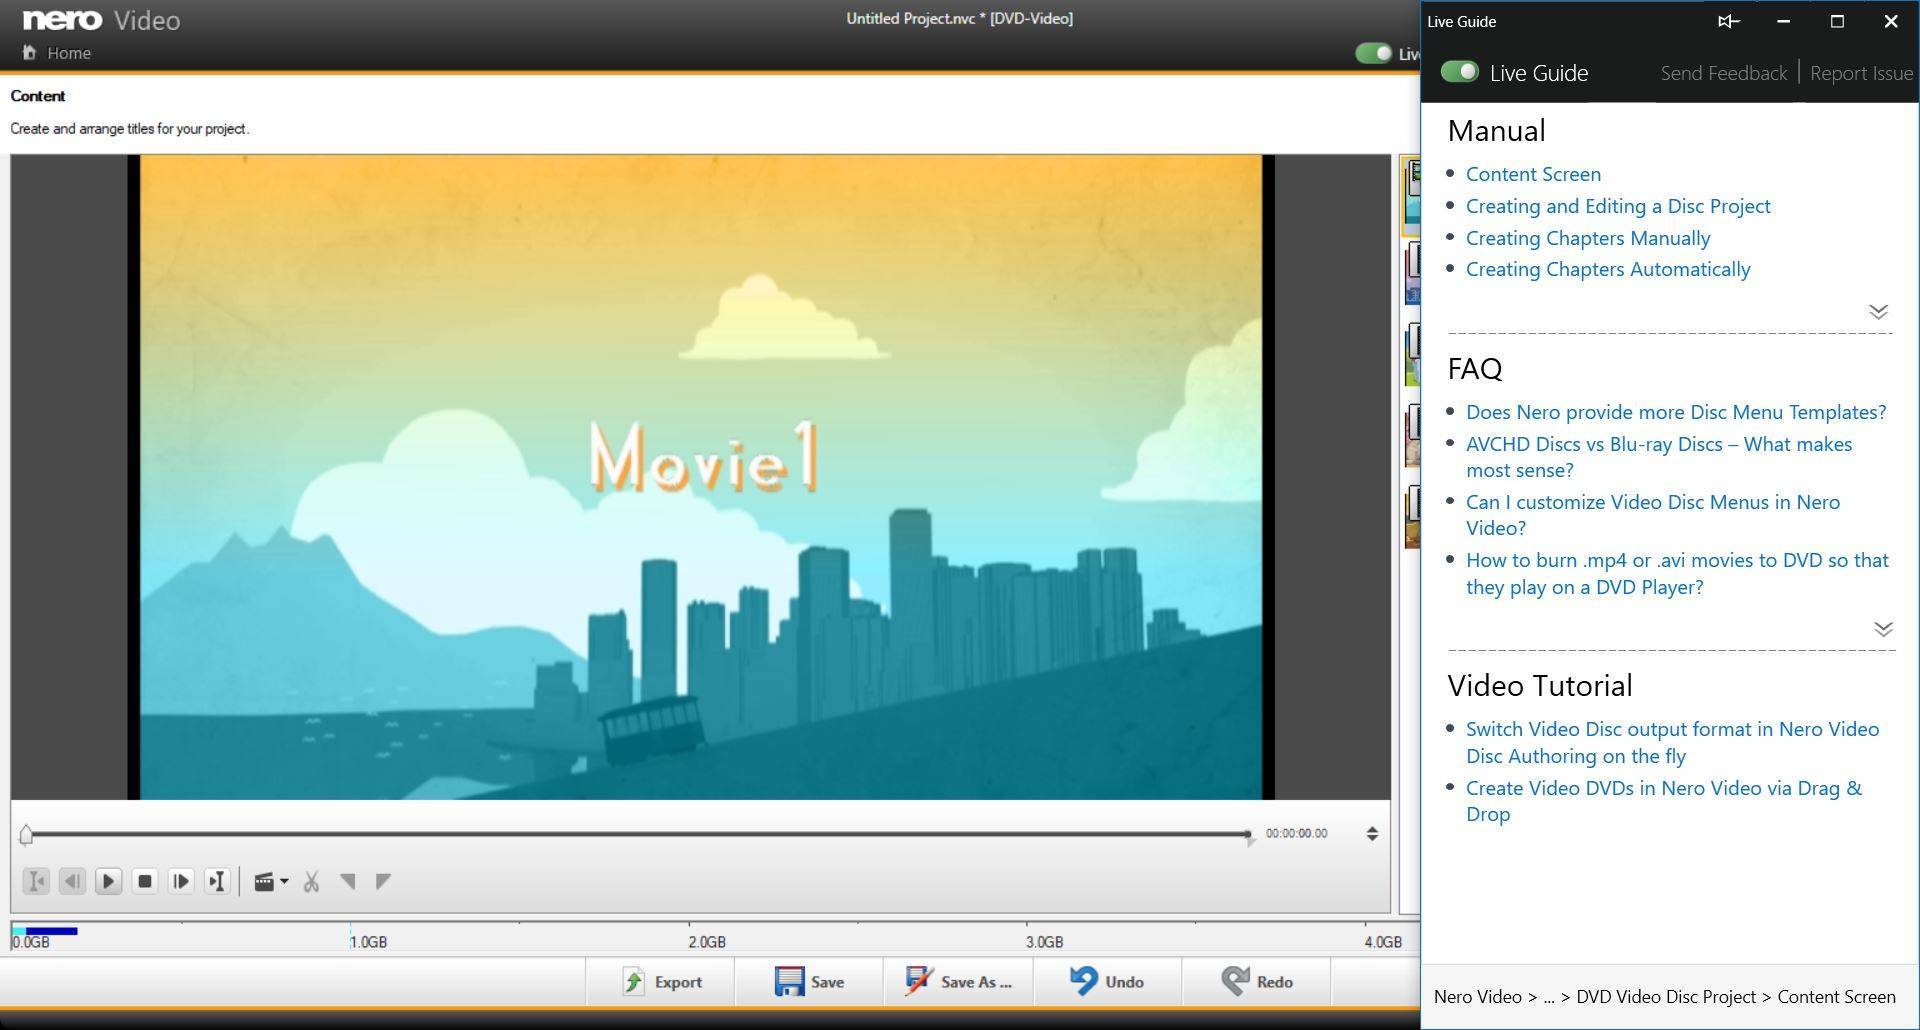
Then, when you handover your editing project to the disc authoring in ‘Nero Video’ for creating a DVD-Video, ‘Live Guide’ will update the context relevance automatically and provide all materials for the new case as you can see in below screen shot. The context path shown at the bottom for this case is: ‘Nero Video > … > DVD-Video Disc Project > Content Screen’. Again, the context inside of ‘Live Guide’ has changed, accordingly.
This way, utilizing Nero Suite becomes even more easy and intuitive. Moreover, you can also send feedback and report issues via the respective button in ‘Live Guide’.
As mentioned, this context sensitive behavior is available in Nero MediaHome, Nero DuplicateManager Photo, Nero Video, Nero Recode, Nero Express, Nero Burning ROM, and Nero BackItUp. This will give you a very comfortable time using Nero applications and growing with your projects.
Many Nero customers already know and utilize the Nero learning center ‘Nero KnowHow’. So far it was only available as a Windows 10 app (PC/mobile), as well as an iOS and Android app.
With Nero 2019, ‘Nero KnowHow’ comes as a new application with additional functionality also reflected in the new name. Now, ‘Nero KnowHow PLUS’ is a fully integrated Suite PC application and is available for all operating systems supported by Nero Suite 2019 and later products (Win 7/8/10).
A new mode called ‘Live Guide’ inside of ‘Nero KnowHow PLUS’ enables users to get context sensitive tips & tricks, including help from within Nero applications. ‘Live Guide’ directly links to related FAQs, manuals pages, and tutorials within the main Suite applications in regards to the actual use case, application mode, or task performed inside of the given application (also see Nero KnowHow 00137).
The new context sensitive window also allows sending feedback, as well as reporting issues (support tickets).
Inside of the applications, a toggle switch enables ‘Live Guide’. The ‘Nero KnowHow PLUS’ user interface including ‘Live Guide’ shows itself in a vertical window right hand side of the screen, which can be moved over the screen, enlarged, and also pinned back to the minimized right hand position.
‘Nero KnowHow PLUS’ availability in Products
From Nero 2019, all Nero Suite and standalone products will include ‘Nero KnowHow PLUS’ as a regular PC application . It will be delivered together with the Nero installer and will be available after installation of a Nero 2019 (and later) product. An Internet connection is mandatory for using ‘Nero KnowHow PLUS’.
For users of Nero 2018 and earlier versions, ‘Nero KnowHow PLUS’ is available as a PC application that does not include ‘Live Guide’, but has the function to ‘Report issues’ integrated. This way, ‘Nero KnowHow PLUS’ is a generally available PC application and support-tool for any Nero user.
Starting with the product launch of Nero 2019 products, ‘Nero KnowHow PLUS’ will replace the support section on www.nero.com. From this date, users going to report issues to Nero Support need to use ‘Nero KnowHow PLUS’.
Volume License and OEM versions do not include ‘Nero KnowHow PLUS’.
Tip for mobile App Users of ‘Nero KnowHow’
‘Nero KnowHow’ App for iOS, Android, and Windows 10 will continue to be available without modification, i.e. it will neither include ‘Live Guide’ nor the function for reporting issues, but will include any updates on content as regular.

 When all your sources are set, go back to the home screen where you will find them indicated by name in the outer ring of ‘DriveSpan App’. If wanted, add more sources by pressing the ‘Source’ plus, again.

 Nero Suite users (Platinum 2019/Standard 2019 and later) have access to the complete version of ‘DriveSpan App’ with all features enabled (except Mac access). The free version is restricted to consolidation from mobile and cloud to cloud, only.