Can I manage and playback media on ‘OneDrive’ with Nero MediaHome – even access ‘Files On-Demand’?

OneDrive is a very useful cloud service that many people use as a free version or within their Office 365 subscription. OneDrive embeds into the PC system and shows up like a regular drive in Windows Explorer. When you use Windows 10, OneDrive is auto installed, but you need to create an account and sign in to make use of it.

OneDrive Files On-Demand

With ‘Windows 10 Fall Creators Update’ in late 2017, Microsoft has embedded a very powerful feature into OneDrive that is called ‘OneDrive Files On-Demand’.

Now, you have the option to have your files only available in the cloud, as ‘online only’ – in such a case, the content will not be synced with your PC, but you can still see the folders and the content in your PC folder. With this great feature, you can save space on your PC, as you no longer need to store the content locally. Via ‘Files On-Demand’ you just make locally available, what you really need for the projects on your PC.

From Nero 2019 onwards you have this comfortable option embedded into Nero MediaHome, allowing you to access online only files in the browsing view, and download for playback or creative use cases on demand.

As Nero MediaHome library is also the basis for all of your related Nero applications via Nero MediaBrowser, you will have this feature readily available for accessing any online only content from OneDrive – be it video, photos, or music – in Nero applications. Due to the fact that Nero MediaBrowser also works with many non-Nero application you can even hand over ‘Files on Demand’ via drag & drop  into these applications, in case they can deal with photos, video, or music.

How do  ‘Files On-Demand’ work?

Initially you need to check if your OneDrive client is installed with your Windows OS. As mentioned, under Windows 10 this will be done automatically, when the new OS is installed. Make sure to have the Windows 10 Fall Creators Update or later installed on your PC to make use of ‘Files On-Demand’.

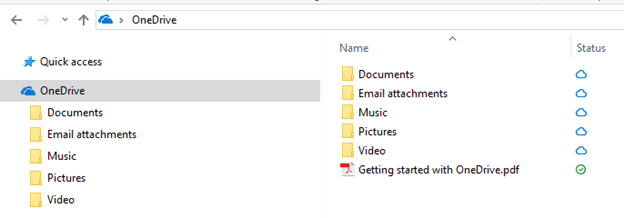
Once ready with your OneDrive client, you will see OneDrive as a drive with folders in your Windows Explorer.

OneDrive Windows Explorer

Just three easy steps

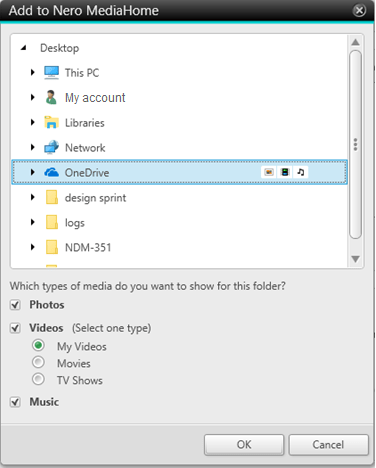
  1. Please start Nero MediaHome and add OneDrive as your watched folder. You can select either the whole drive or individual folders inside of OneDriveadd OneDrive as watch folder
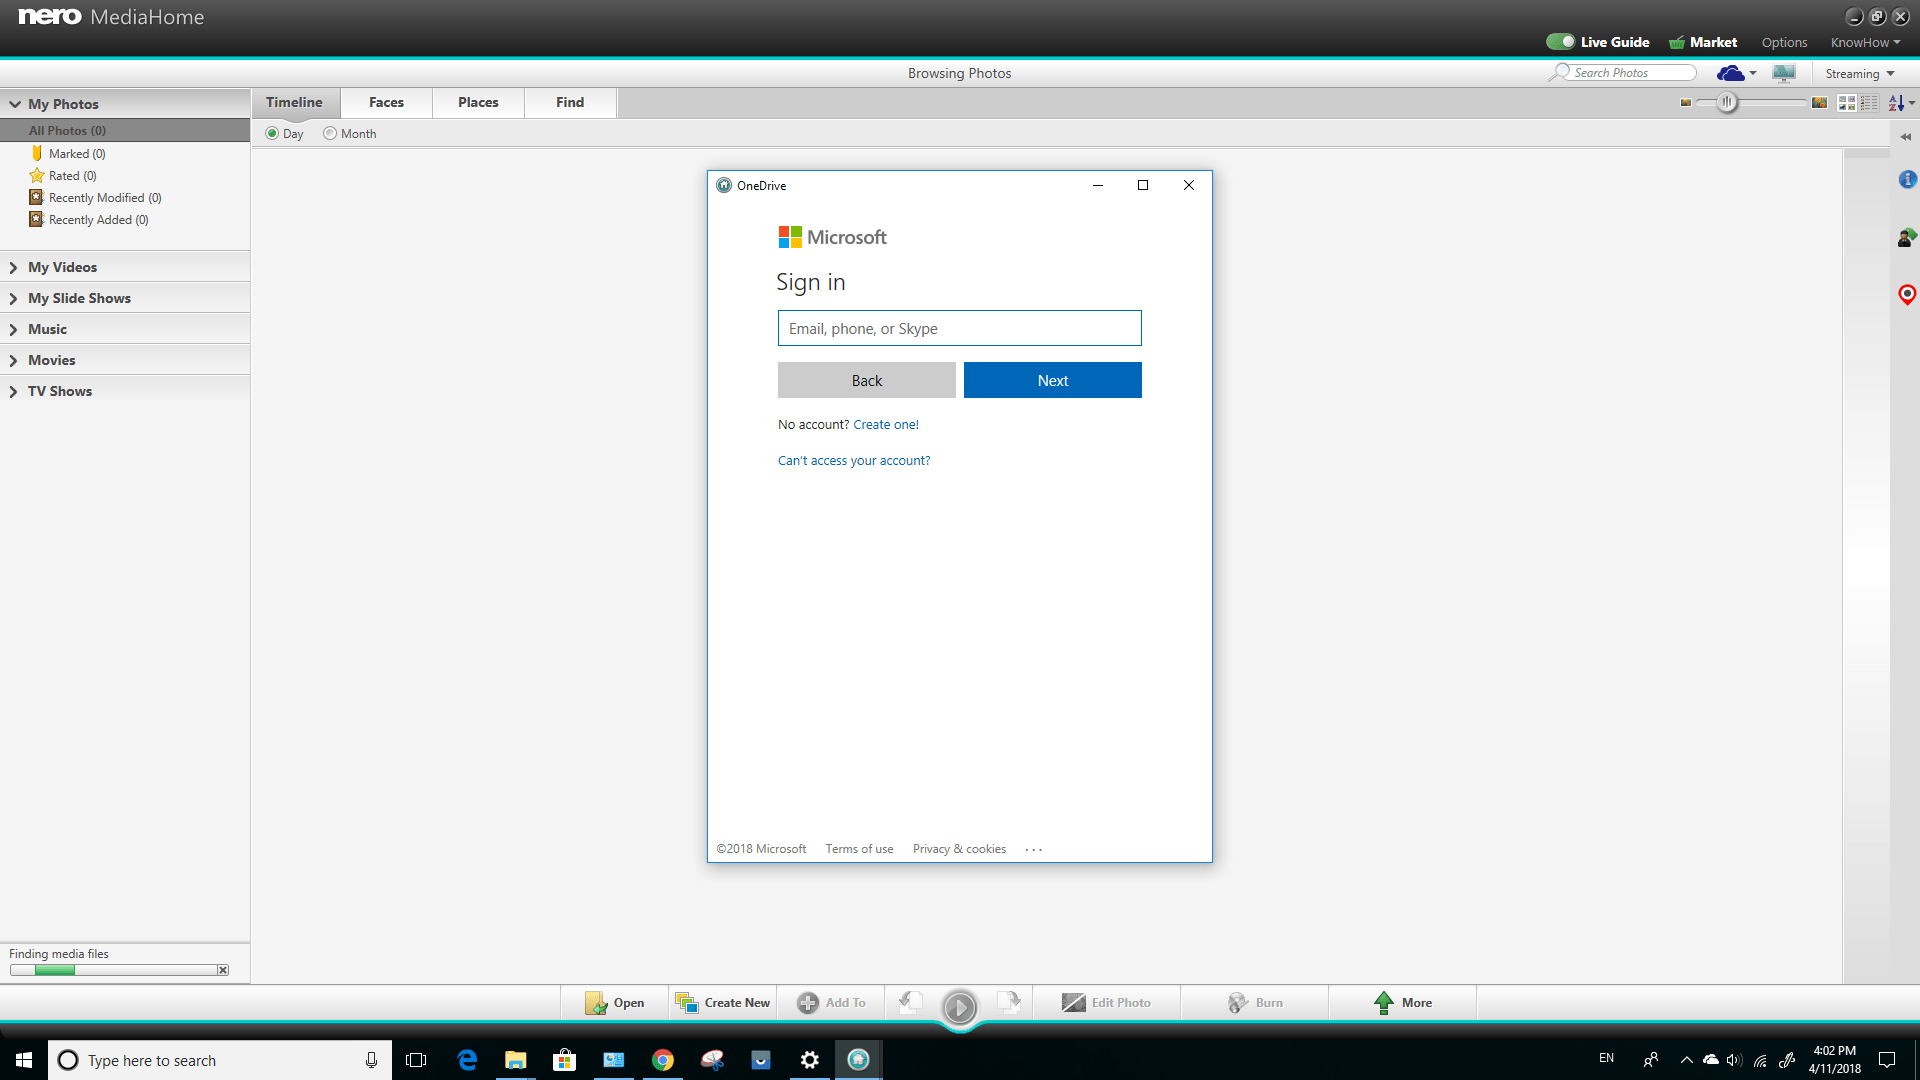
  2. If you want to access your online-only media files in Nero MediaHome library directly, you need to sign in to your OneDrive account. The interface is provided via Nero MediaHome, so you do not need to leave Nero MediHome. In order to access ‘OneDrive Files on Demand’ in Nero MediaHome , please sign in with the same account that you have signed in to with your OneDrive client applicationsign in
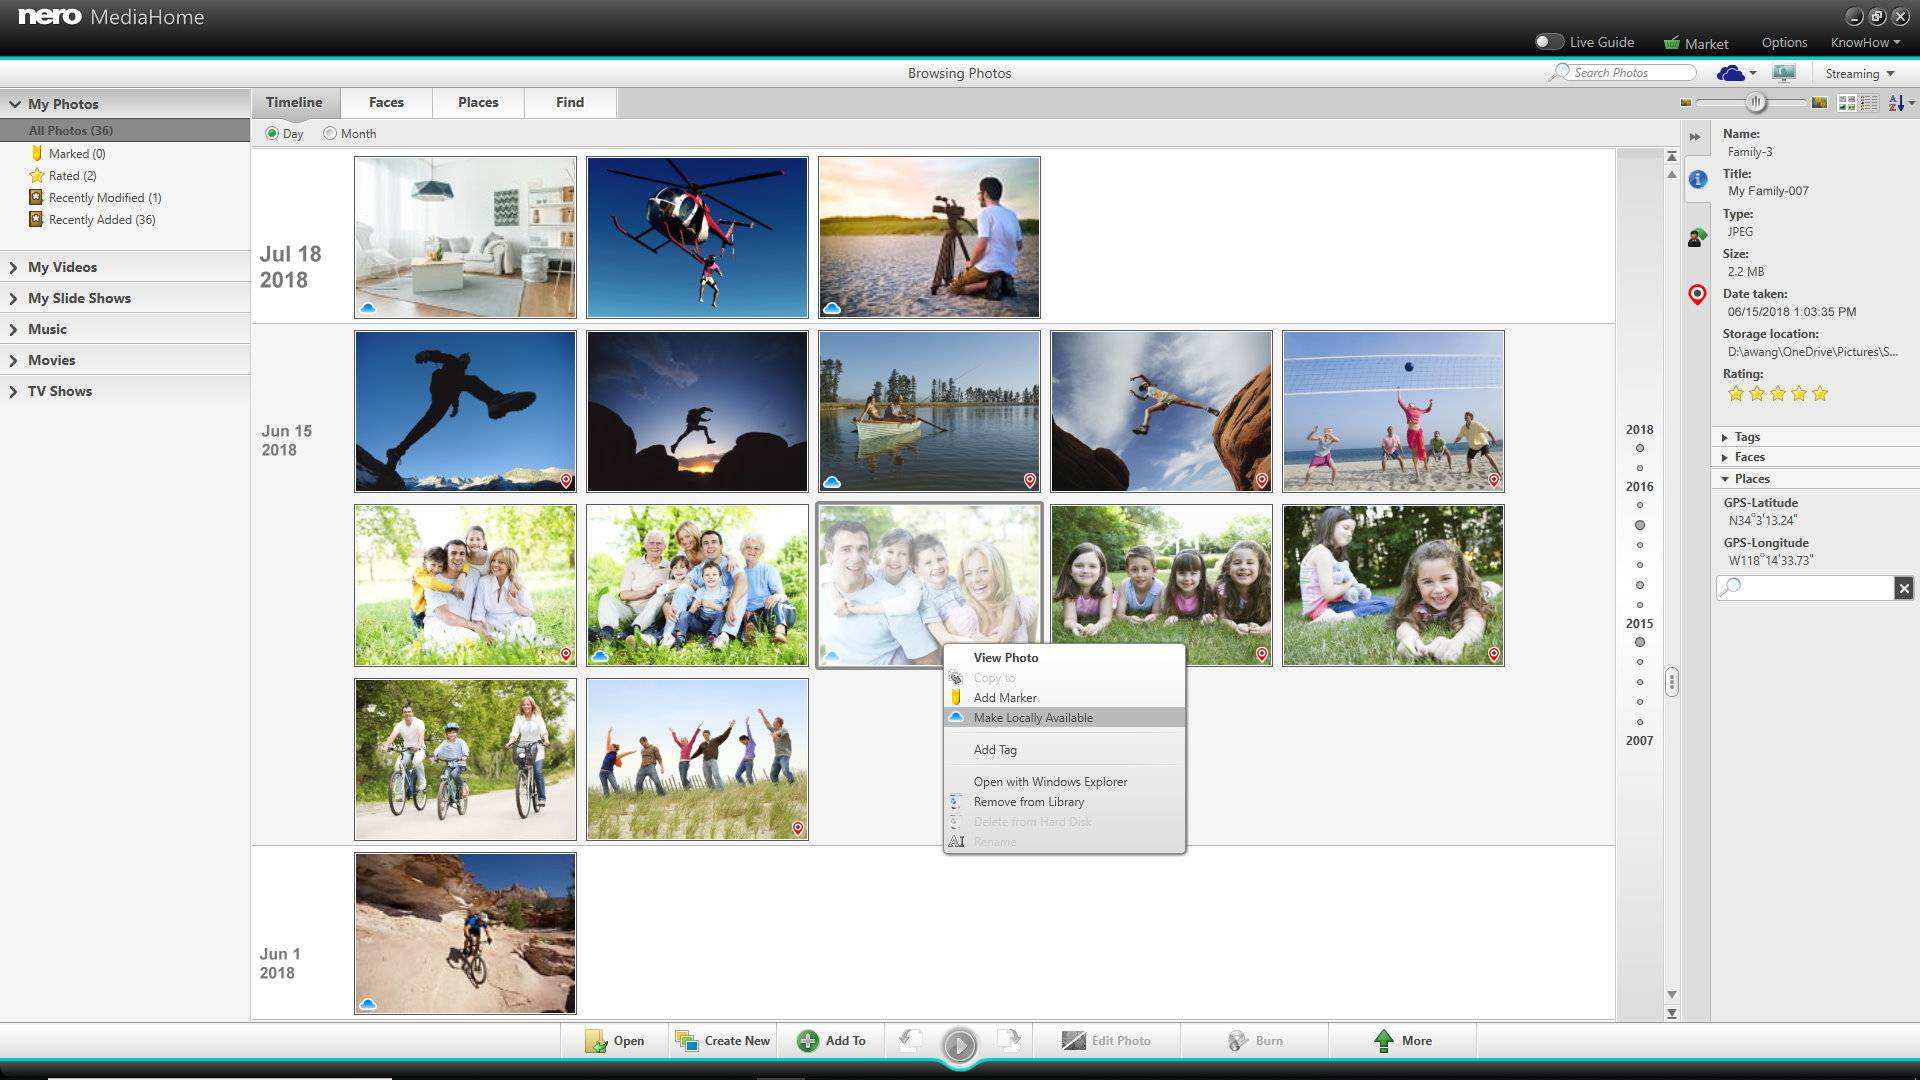
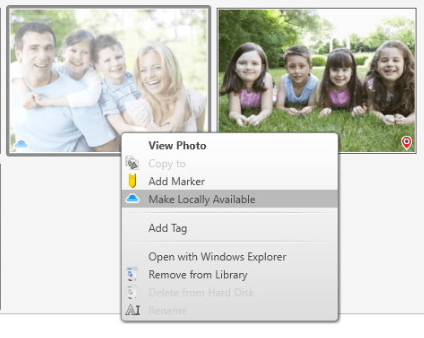
  3. Nero MediaHome will list the media files of your OneDrive account in the library. The clips with the blue-cloud icon are the ones that are online onlyNMH with OneDrive_01

Now, you can manage and playback your OneDrive media files directly in Nero MediaHome, including your online-only files. You also can easily make them locally available via right-click mouse.

context menu

Nero KnowHow 00126

How to restore my data via ‘OneDrive’ or ‘Google Drive’ backed up with NeroBackItUp?

Nero BackItUp does not only support backing up to Microsoft OneDrive or Google Drive but can also restore your data from OneDrive and Google Drive. Nero BackItUp also supports restoring data that you uploaded via other applications, or via the web browser of OneDrive and Google Drive.

The following steps show the process when logged in to your account. For more details on how to login check Nero KnowHow 00127 / Nero KnowHow 00128.

Click the button “Restore” in the Home screen. Nero BackItUp will open the selection screen for the restore job.

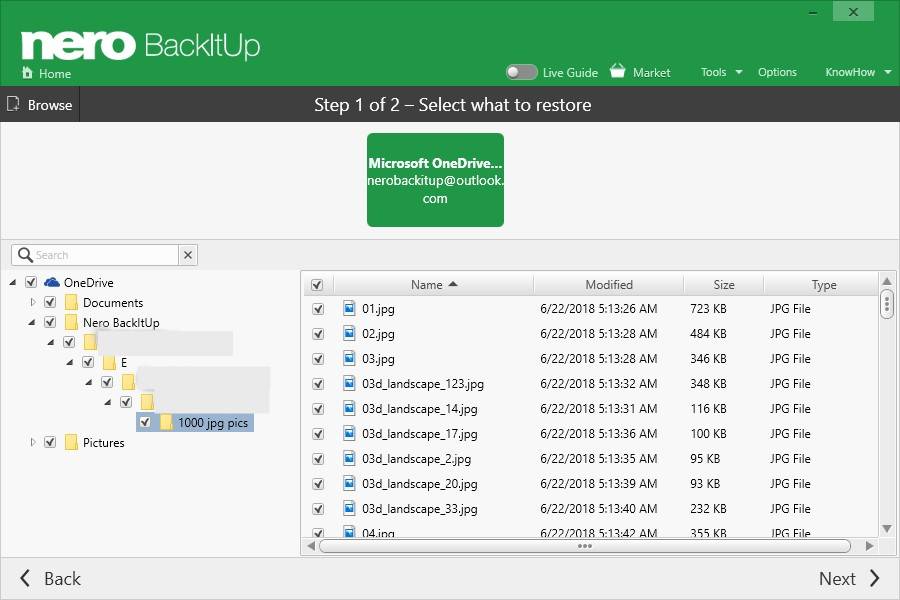
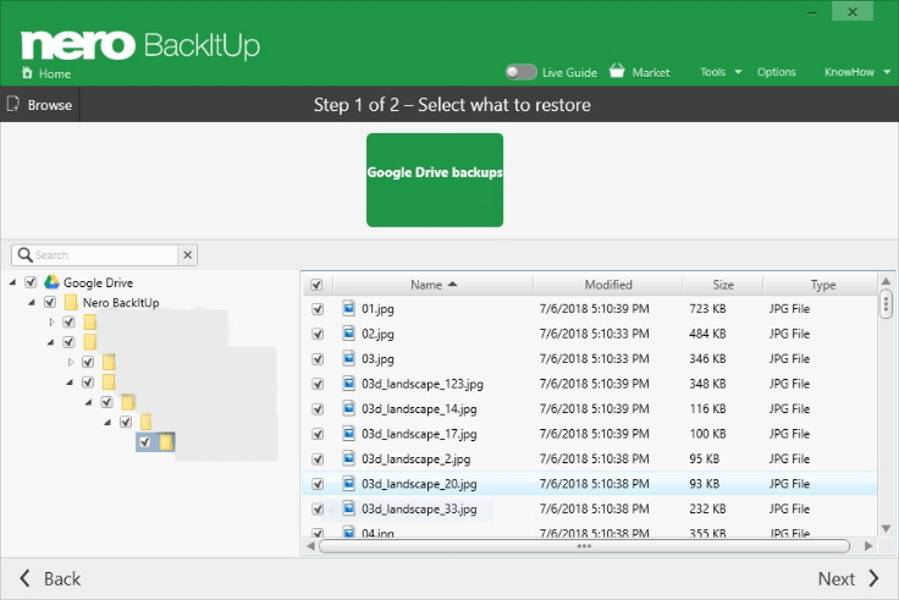
  1. Click on your Microsoft OneDrive backup job, or Google drive backup job. In the left panel you can see the folder structure of your BackItUp OneDrive/Google Drive backup. Click on a folder in the left panel to see the file content in the browser on the right hand side. You can select/unselect the folders in the left folder tree and select/unselect the files in the right browser.

OneDrive_new

Google Drive_new

  1. After you selected the folders and files, that you want to have restored, click “Next” to select the restore path and the conflict handling options

3

  1. When you have done that, click “Restore Now”. Nero BackItUp will restore the data from Microsoft OneDrive or Google Drive, respectively

4

Nero KnowHow 00129

Do I have options for my ‘OneDrive’ and ‘Google Drive’ backup done with Nero BackItUp?

When using Nero BackItUp with your OneDrive or Google Drive account, you might find it useful to understand some basic options you have, and understand issues you might run into.

1. Online Backup is interrupted 

Nero BackItUp will provide some reasons in the left panel in case the backup is not complete or cannot be completed. This might be due to the fact the network is disconnected or there is not enough space on the online storage space to complete the backup.

2. Manually change Online Backup Options 

If you you clicked “Edit” in the pop up menu to manually change the backup source or other options for backup, but it does not work, please note that this is only functional when the backup job is not running.

3. Check your Online Backup Jobs

When you select “Browse Backup Online” in the left panel or “Browse Target” in the job pop-up menu, Nero BackItUp will open the default browser of Microsoft OneDrive or Google Drive to let you check.

4. Avoid duplicated Syncing in Microsoft OneDrive

If your PC already has installed Microsoft OneDrive Client, and in there you have enabled “sync all OneDrive folders to local PC”, then you will find that the backup data will be synced to your PC again. This is not necessary and will eat up your disk space.

In this case, please open Microsoft OneDrive client, select the “Account” tab, click “Choose Folders”, uncheck the folder “Nero BackItUp”, then click “OK”. Afterwards the backup data will not sync to your local PC twice.

5

5. Avoid duplicated Syncing in Google Drive

If your PC already has installed latest Google Drive client “Backup and Sync”, and in the application settings “Sync everything in My Drive” is enabled , the backup data will be synced to your PC again.

In this case, please open the Google Drive tab in the preference of “Backup and Sync”. First select “Sync only these folders”, then uncheck the folder “Nero BackItUp” under the root folder, and click “OK” to apply the modifications. Afterwards the backup data will not sync to your local PC twice.

6

Nero KnowHow 00130


Can I backup via ‘OneDrive’ with Nero BackItUp?

Are you worried that your important files could get lost or might be unusable on your local PC due to hard disk errors, or hazardous events like storm or fire? Do you want to schedule backups of several folders or files in different locations, or want to restore files from your online storage to the local PC?

From version 2019 Nero BackItUp supports to backup and restore via Microsoft OneDrive online storage. The new online copy feature, will easily backup your local files to Microsoft OneDrive or restore from Microsoft OneDrive.

This FAQ deals with the OneDrive online backup feature. For the restore feature, please check Nero KnowHow 00129.

Backup to Microsoft OneDrive works similar to the existing backup job process.

  1. Select a backup job type for the backup job

Open Nero BackItUp main screen. If you have never created a backup job, click the big green button “Back up Now”. If you have already had backup jobs, then click the button “Add backup” at the top-right, and start to create a new backup job.

1

2

Select “Online Copy”, in the pop-up menu. It will show the online storage account to which you are currently logged in. You can also login to a new account via “Add Online Storage”.

3

For the time being, Nero BackItUp supports the two most prominent online storage services: Microsoft OneDrive and Google Drive.

1

Click the button “OneDrive” to select Microsoft OneDrive as the backup target.

  1. Login and accept the related request for permission

In the pop-up dialog, please input your Microsoft OneDrive account login and password.

2

After having logged in successfully, you will see a request for permission, which you need to approve by clicking on the “Yes” button.

3

Via this approval, you give permission to three cases, shown below in detail.

a) Have full access to all files you have access to

Nero BackItUp needs to get approval to access your OneDrive account for uploading or downloading files. Nero BackItUp will NOT modify any existing data you uploaded by any other Microsoft OneDrive client. The application will create a new folder named “Nero BackItUp” under the root of OneDrive storage. All backup data will be uploaded to this folder.

b) Access your info any time

Nero BackItUp needs this permission as an application to support scheduled backups, which are working in the background. This is also needed for uploading big files that take a longer time for uploading. With this permission, the whole backup process in Nero BackItUp will not be interrupted, even in the case a OneDrive access authorization would be out of date while the backup is being carried out (for this case there is no  waiting and no extra account/password input needed).

c) Read your profile

Nero BackItUp needs to read your profile information. Afterwards, Nero BackItUp will access your Microsoft OneDrive account.

Once this is done, Nero BackItUp will switch back to the “Backup Task” screen. Your account info, and storage information will be shown in the screen.

4

  1. Select your backup source for the backup job

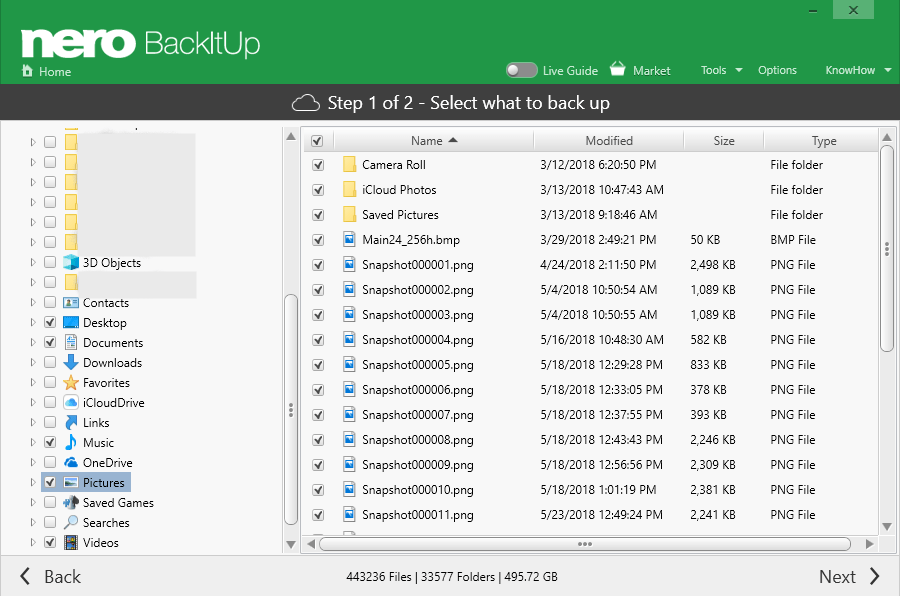
Click “Next” and you can select your backup source for the backup job.Nero BackItUp provides two types of backup source selection: Automatic Selection and Customize Selection.

In Automatic Selection mode, Nero BackItUp will quickly scan your PC, and auto-select the folders based on the media types, that you can select via the four selection boxes. After the scan is done, Nero BackItUp will calculate the total number of files and folders, and at the same time calculate the total file size. This type of selection mode is easier to use with higher efficiency for beginners, or for users who want to do a full backup.

9

If you want to customize your backup source, click on the “Customize Selection” link below, where you can manually select your backup source(s).10 (1)

  1. Change backup timing option for the backup job

After you have selected the backup source, click “Next” and change the timing option for the backup job.

11

You can enter a dedicated name for the backup job and can select between five different types of scheduled backups.

Tip!

If you want to make sure to always backup the latest files to Microsoft OneDrive, it is better to select “Continuously”.

  1. When everything is set, click the button “Back Up Now”. Nero BackItUp will switch back to the Home Screen, and the newly created job starts immediately.

5

Tip!

Nero BackItUp only supports backing up to or restore from one Microsoft OneDrive account at a time, but in fact you can create multiple backup jobs for one Microsoft OneDrive account. So if you have created several jobs for one OneDrive account, these will be processed sequentially.

If you want to backup to or restore from a different Microsoft OneDrive account, just click on the OneDrive button again. In the pop-up menu click “Log Out”, and the current login account will be disconnected. Then login to another Microsoft OneDrive account and repeat the above procedures.

Nero KnowHow 00127