Applies to:
Users who want to use their Nero products on more PCs with the same Nero Account.
What is an Extra Device License?
An Extra Device License allows you to use your Nero Account on one additional PC without signing out another device.
Normally, every Nero product has a maximum number of PCs that can be signed in at the same time.
For example:
- Most Nero products: 1 PC
- Nero TuneItUp Pro (3 PCs): Up to 3 PCs
If the number of signed-in PCs exceeds the allowed limit, you will see the Device Limit Reached dialog.
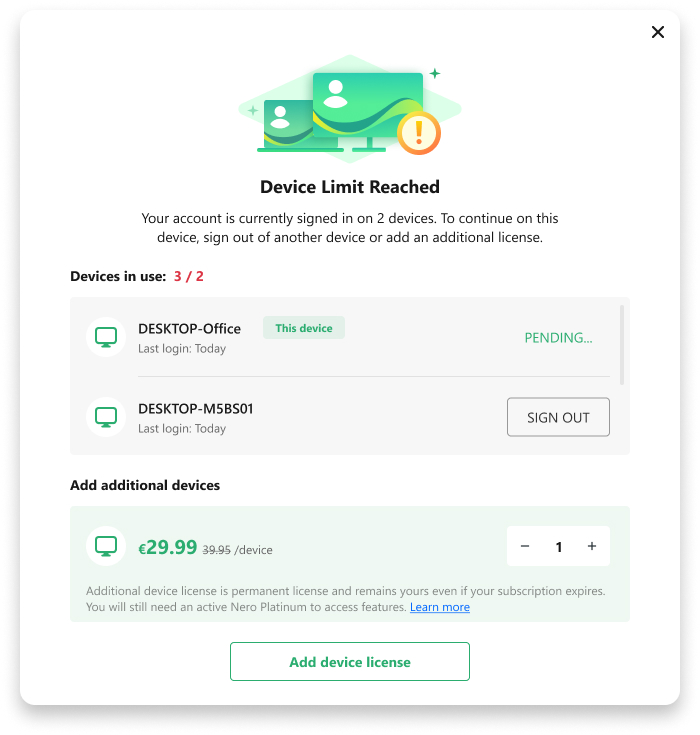
You can then choose to:
- Sign out of one or more existing PCs to free up a device.
- Purchase an Extra Device License (available if your Nero Account contains a Nero Platinum product).
- Purchase Nero Platinum first if you don’t already own it. After that, you can also purchase Extra Device Licenses.
What do I get with an Extra Device License?
After purchasing an Extra Device License:
- One additional PC can sign in to your Nero Account.
- All Nero products in your Nero Account are available on that PC.
- You no longer need to sign out another PC to use the new device.
Which product features can I use?
An Extra Device License does not include any Nero products or premium features by itself.
Instead, it allows the additional PC to use the products already available in your Nero Account.
For example:
- If your account includes Nero Platinum and Nero AI Video Upscaler PRO, both products can also be used on the additional PC.
- If one of these product licenses expires or becomes inactive, its premium features will no longer be available on any PC, including those covered by an Extra Device License.
- Once the product license becomes active again, the corresponding features are automatically restored on all authorized PCs.
Is the Extra Device License permanent?
Yes.
The Extra Device License is a lifetime license and permanently increases the number of PCs that can use your Nero Account.
However, it does not replace or extend your product licenses. Premium features are available only while the corresponding product license is active.