What’s new in Nero Motion Tracker

The latest update of Nero Motion Tracker allows the application to be run outside Nero Video separately which gives you the best freedom to track objects without minding the timeline editing.

Auto face tracking

One of the exciting new features in Nero Motion Tracker is the Auto Face Tracking. With this feature, the motion tracker can automatically detect and track faces in a video. This is especially useful for video editing and surveillance purposes. The Auto Face Tracking feature uses advanced algorithms to accurately identify and follow faces, ensuring that the captured footage is focused on the right subjects. Whether you’re a content creator or a security professional, the Auto Face Tracking feature in Nero Motion Tracker will greatly enhance your workflow.

Add text and clip art

The latest update of Nero Motion Tracker includes the exciting new feature of adding text and clip art to your videos. Now you can easily enhance your videos with stylish text overlays and fun clip art elements. Whether you want to add a catchy title, include captions, or simply decorate your footage with creative graphics, Nero Motion Tracker has got you covered. With a wide range of fonts, colors, and clip art options to choose from, you can unleash your creativity and make your videos truly stand out.

Nero KnowHow 00321

What’s new in Nero Recode

Better Quality, Faster Speed

In the latest update of Nero Recode, we have made significant improvements to the video encoding process. Our engineers have developed advanced algorithms that ensure better video quality while maintaining faster encoding speeds. Now you can enjoy high-quality videos without sacrificing time. Whether you’re converting videos for playback on your mobile device or creating a digital archive of your favorite movies, Nero Recode has got you covered.

Support for Adding Subtitles to Videos

In addition to the improvements in video encoding, the latest update of Nero Recode now includes support for adding subtitles to your videos. Whether you want to add captions for better accessibility or include translations for international viewers, Nero Recode makes it easy. With a simple and intuitive interface, you can import subtitle files in various formats and customize their frame rate and delays. Now, you can enhance your videos with subtitles and make them more engaging and inclusive.

Difference between soft and burn-in subtitles

Subtitles are a great way to enhance your videos, but it’s important to understand the difference between soft and burn-in subtitles. Soft subtitles are separate files or embedded text streams that can be turned on or off by the viewer. They are typically used for adding captions or translations to videos. On the other hand, burn-in subtitles are permanently embedded into the video itself and cannot be turned off. They are commonly used for videos that need to be shared on platforms that don’t support separate subtitle files. Nero Recode supports both types of subtitles, giving you the flexibility to choose the best option for your videos.

Nero KnowHow 00320

What’s new in Nero PhotoSnap

Enhance your photos with powerful tools

Nero PhotoSnap is proud to present its latest update, packed with exciting new editing features. Now, you can take your photo editing skills to the next level with advanced tools like AI-powered auto-enhancement, professional-grade filters, and precise color adjustments. Whether you’re a beginner or a seasoned photographer, these tools will help you transform your photos into stunning works of art. Stay tuned for more details on how to make the most of these new features!

Add Text and Clip Art to Your Photos

In the latest update of Nero PhotoSnap, we are excited to introduce our new text and clip art features. Now you can easily add text and clip art to your photos, allowing you to personalize and enhance your images in creative ways. Whether you want to add captions, quotes, or decorative elements, our tools provide you with a wide range of fonts, styles, and clip art options to choose from. With just a few clicks, you can transform your photos into unique and visually appealing compositions. Stay tuned for more tips and tricks on how to make the most of these exciting features!

Applying LUT to your photo

With the latest update of Nero PhotoSnap, you can now take your photo editing skills to a whole new level by applying LUTs (Lookup Tables) to your photos. LUTs are powerful tools that allow you to quickly and easily change the look and feel of your images. Whether you want to give your photos a vintage film look, a cinematic color grade, or a trendy Instagram filter, the LUT feature in Nero PhotoSnap has got you covered. Stay tuned for more tips and tricks on how to make the most of this exciting new feature!

Nero KnowHow 00319

Upscale images with cloud GPU acceleration⚡

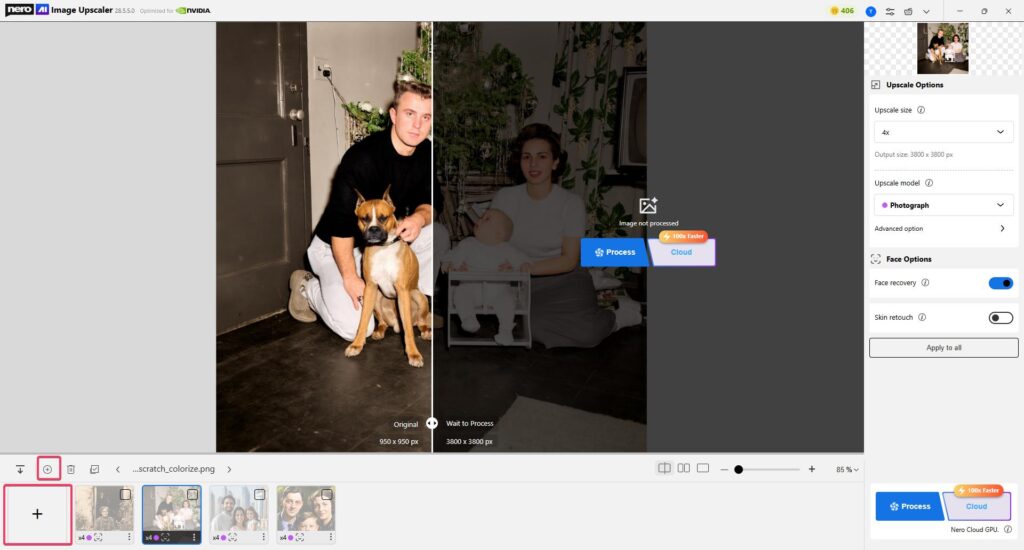
We are pleased to announce that the latest version includes an online engine mode. Users can now upscale images faster than ever before, thanks to the acceleration provided by the cloud server GPU.

What is the online engine mode?

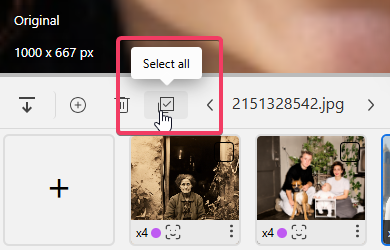
This mode refers to the integration of a web service engine within the AI Image Upscaler Windows Desktop App to handle the process of image upscaling.

Therefore, images will be uploaded to the server for processing. Rest assured that your precious pictures will not be stored after processing. Our server will promptly and securely delete your uploaded data, ensuring that there is no risk of your valuable information being exposed. We prioritize your data privacy and are fully committed to protecting it.

Why do we need the online engine mode?

The speed of AI image upscaling greatly depends on the performance and power consumption of the GPU.

Expensive GPU

In recent years, due to the influence of Bitcoin and AI-Generated Content (known as AIGC), the prices of graphics cards have skyrocketed. Not all users can afford to equip their desktop computers with high-performance graphics cards.

Even if your desktop computer at home has a good graphics card, you may still have to endure long waits caused by the lack of a dedicated graphics card while traveling on business trips.

travel and work with laptop

No more errors, hardware issues, quality compromises, or long loading times! That’s why the online engine mode is introduced.

Can I use the online engine mode for free?

First of all, the online mode is not a free service. It requires consuming credits from your account to enable its usage. Generally, it takes 1 credit to upscale one image.

Secondly, you need to have Pro version privileges. You can upgrade your entitlement through In-App purchases or online purchases.

If you have subscribed to our Platinum Suite 1-Year License (known as the Nero Platinum Suite 365), congratulations, you can log in to your Nero Account to obtain your entitlement.

How to use the online engine mode?

  1. Run the app.

    Run the app
    Run the app
  2. Import the image.

    Import image
    Import image
  3. In the AI model selection section on the right side of the settings panel, you can click on the mode options and select Online mode.

    select online mode
    Select online mode
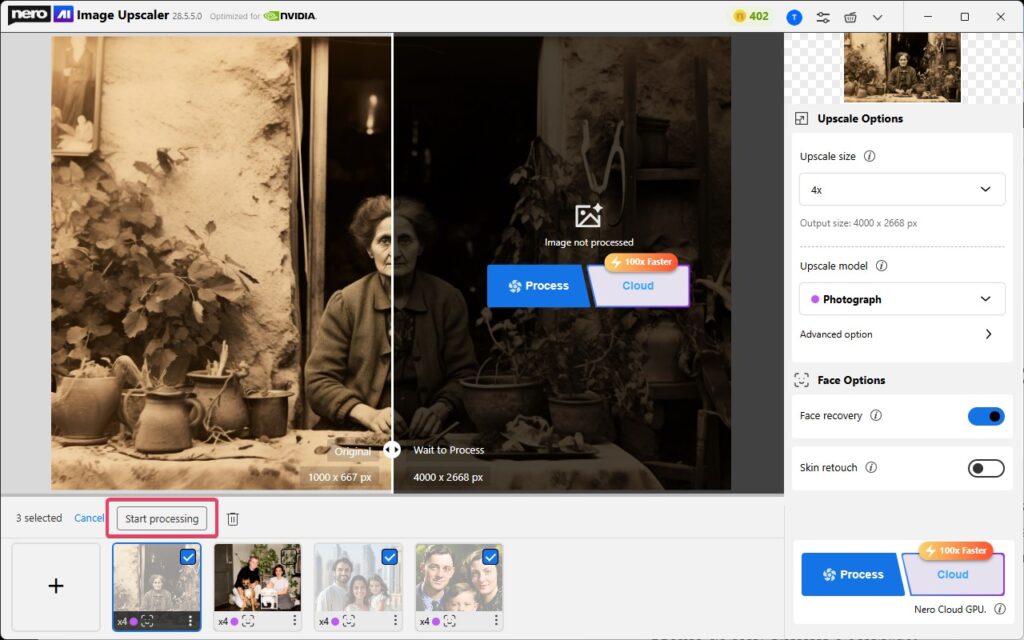
  4. Click on Start to begin.
    Select AI model and click [Start processing]
    Select the AI model and click [Start processing]
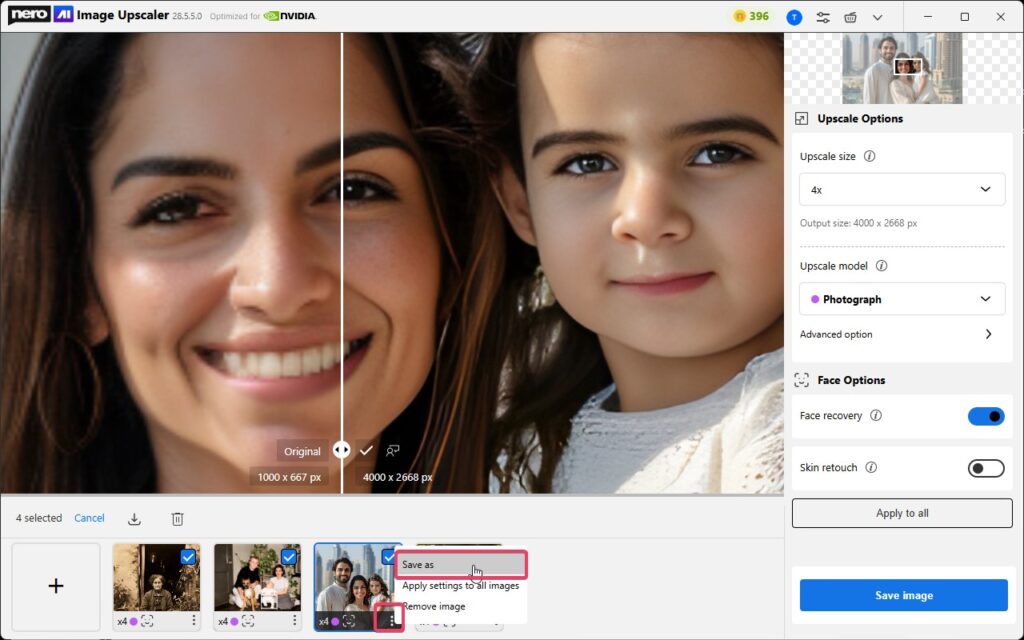
  5. Don’t forget to save the result.

    Save the result
    Save the result

Additionally, you can also set the preferred engine mode as Online mode and specify the default model within the preferences settings. Turn on the switch for automatic start.

Preferred engine, model and auto-start
Preferred engine, model and auto-start settings

Simply import the image without clicking the Start button, and the app will automatically perform the image upscaling task.

What should be considered?

First, you need to have an internet connection.

Second, you need to have the Pro version privileges.

Third, you need to have enough credits.

Fourth, you need to agree on the Privacy Policy and EULA.

Finally, once the task is processed successfully, please save the images to your local storage promptly.


Nero KnowHow 00318

Nero Start release notes – 25.5.81.0

This release includes some user experience improvements and bug fixes.

Improvement

Jump into your use case just in 2 steps!

Back from vacation, are you still struggling about how to make a video with so many pictures and videos?

Follow the introdution below to create a vacation video just in 2 steps!
Jump into your use case just in 2 steps

Not only creating video automatically, but also other use cases, now, from Nero Start > Solutions, you can jump into your use cases just in 2 steps


Nero KnowHow 00317

Windows电脑如何投屏到Apple TV

温馨提示:最新内容已迁移到新网站:www.1001tvs.cn


1.网络连接

首先确保Windows电脑和Apple TV设备连接在同一Wi-Fi下(最好是5G频段的WiFi)

2.安装雨燕投屏

Apple TV端安装方式:打开App Store搜索“1001 TVs”,下载安装即可。或直接点击获取1001 TVs Apple TV 版

IMG_4296_副本

IMG_4301_副本

Windows端安装方式:下载即可使用,无需安装。

3.投屏幕(镜像投屏)

1.在Apple TV端打开雨燕投屏,进入主界面
IMG_4295_副本

2.在Windows端打开雨燕投屏,进入“投屏幕”界面,并进入选择“电脑投屏到电视”界面,该界面会自动搜索并显示同一Wi-Fi下的目标设备
QQ截图20220125145456_副本

3.选择我们要连接的Apple TV设备,便可一件轻松投屏

4.若Windows端搜索不到可用设备,可以手动添加设备。点击界面下方的“手动添加一个”按钮,在弹出的窗口输入Apple TV端页面的ip地址,就可以投屏到Apple TV了。
QQ截图20220125145519_副本 

QQ截图20220125145609_副本 

IMG_4309_副本

4.投屏设置

可在PC端更改投屏画质以满足不同客户需求。如果遇到卡顿的情况,建议尝试降低清晰度。

5.注意事项:

1.投屏时没有声音,建议电脑连音箱。
2.尽量连接5G频段的Wi-Fi,投屏会更稳定,延时少。


Mac电脑如何投屏到Apple TV

温馨提示:最新内容已迁移到新网站:www.1001tvs.cn


1.网络连接

首先确保Mac和Apple TV设备连接在同一Wi-Fi下(最好是5G频段的Wi-Fi)

2.安装雨燕投屏

Apple TV端安装方式:打开App Store搜索“雨燕投屏”,下载安装即可。或直接点击获取雨燕投屏Apple TV 版

IMG_4296_副本

IMG_4301_副本

Mac端安装方式:同样在 Mac App Store上搜索并安装“雨燕投屏”即可。或点击立即获取Mac App

IMG_4355_副本

3.投屏幕(镜像投屏)

1.在Apple TV端打开雨燕投屏,进入主界面
IMG_4295_副本

2.在MAC端打开雨燕投屏,进入“投屏幕”界面,并进入选择“投屏到电视”界面,该界面会自动搜索并显示同一Wi-Fi下的目标设备IMG_4354_副本

IMG_4352_副本_副本

3.选择我们要连接的Apple TV设备,便可一件轻松投屏
IMG_4352_副本2 

IMG_4349_副本2_副本
4.若MAC端搜索不到可用设备,可以手动添加设备。点击界面下方的“手动添加一个”按钮,在弹出的窗口输入Apple TV端页面的ip地址,就可以投屏到Apple TV了
IMG_4353_副本 

IMG_4350_副本 

IMG_4349_副本

4.投屏设置

可在Mac端更改投屏画质以满足不同用户的需求。如果遇到卡顿的情况,建议尝试降低清晰度。

5.注意事项:

1.镜像投屏时没有声音,建议电脑连音箱。
2.尽量连接5G频段的Wi-Fi,投屏会更稳定,延时少。

安卓手机如何投屏到Apple TV

温馨提示:最新内容已迁移到新网站:www.1001tvs.cn


1.网络连接

首先确保Apple TV和Android手机连接在同一Wi-Fi下(最好是5G频段的Wi-Fi)

2.安装雨燕投屏

Apple TV:打开App Store搜索“1001 TVs”,下载安装即可,或点击获取1001 TVs Apple TV版

IMG_4296_副本

IMG_4301_副本

Android手机端:可在各大应用市场直接下载,搜索“雨燕投屏”即可找到。目前上架的手机市场有:VIVO,OPPO,小米,华为,应用宝,豌豆荚,魅族,360手机助手,百度手机助手。海外用户获取地址:雨燕投屏 for Google Play。

IMG_4306(20220125-142425)_副本

3.投屏幕(镜像投屏)

1.在Apple TV端打开雨燕投屏,进入主界面。
IMG_4295_副本

2.在Android端打开雨燕投屏,进入“投屏幕”界面,该界面会自动搜索并显示同一Wi-Fi下的目标设备。
IMG_4307(20220125-142425)_副本

3.选择我们要连接的Apple TV设备,便可一键轻松投屏。
IMG_4307(20220125-142425)_副本2 

IMG_4308(20220125-142425)_副本 

IMG_4303_副本

4.若安卓端搜索不到可用设备,也可以使用扫码配对功能。点击界面下方的“扫码连接”或右上角的扫码按钮,扫描Apple TV端的二维码,就可以投屏到Apple TV了。
IMG_4307(20220125-142425)_副本3
 IMG_4305_副本
 IMG_4303_副本

注:①首次扫码需要给摄像头授权。②投屏开始之前,需要授予通知权限,以便在通知栏查看投屏状态。

4.投屏设置

1) 更改投屏清晰度以满足不同客户需求
如果遇到卡顿的情况,建议尝试降低清晰度。

手机端:在投屏界面可以直接更改清晰度。

Apple TV端:暂时无法调节清晰度。

2) 更改投屏设置 (投屏过程中可能会出现延时卡顿,清晰度不高等问题,可以通过更改手机端的投屏设置来提高投屏质量)

1.截屏模式:默认为自动选择,点击右侧按钮,可更改为编解码/图片模式。

2.忽略电池优化:部分机型投屏过程中可能会中断,建议开启此选项。

3.打开悬浮窗:为防止投屏时被意外中断,建议开启此选项。

5.注意事项:

安卓手机镜像投屏时没有声音,建议手机连一个蓝牙音箱或者蓝牙耳机;
          
尽量连接5G频段的Wi-Fi,投屏会更稳定,延时少。

苹果手机如何投屏到Apple TV

温馨提示:最新内容已迁移到新网站:www.1001tvs.cn


1.网络连接

首先确保Apple TV和iPhone连接在同一W-iFi下(最好是5G频段的WiFi)

2.安装雨燕投屏

Apple TV:打开App Store搜索”1001 TVs”,下载安装即可。或直接点击获取1001 TVs Apple TV 版

IMG_4296_副本

IMG_4301_副本

iPhone端:同样是打开App Store搜索并安装雨燕投屏即可。或直接点击获取雨燕投屏ios版

IMG_4294(20220125-132021)

3.投屏幕(镜像投屏)

1.在Apple TV端打开雨燕投屏,进入主界面
IMG_4295_副本

2.在iPhone端打开雨燕投屏,进入“投屏”界面,该界面会自动搜索并显示同一Wi-Fi下的目标设备。
IMG_4297_副本

3.选择我们要连接的Apple TV设备,在连接到Apple TV设备后,点击“开始投屏”,并继续点击“开始直播”,等待3秒倒计时即可投屏
IMG_4297_副本

IMG_4298_副本

IMG_4299_副本

IMG_4300_副本

4.若在ios端搜索不到可用设备,也可以使用扫码配对功能。点击界面右上角的扫码按钮,扫描Apple TV端的二维码,接下来同样继续第三步的步骤就可以投屏到Apple TV了。
IMG_4297_副本2 IMG_4302(20220125-140236)_副本

注:①首次进入时,需要授予雨燕投屏“查找和连接本地网络设备”的权限。②首次扫码需要给予雨燕投屏摄像头授权。

4.注意事项:

尽量连接5G频段的Wi-Fi,投屏会更稳定,延时少。