Our digital life is meant to make things easier but in fact it is not that easy without knowing some of the fundamental concepts behind the digital world.
In this blog we try to answer the question: How can I play wirelessly and securely to my Smart TV using Nero?
In fact more and more customers put this question. On one hand it shows that streaming to Smart TVs has become extremely popular on the other hand it reflects that reports about being spied via your Smart TV have become a fear for many users. This blog will help you getting rid of this fear via some useful tips and continue enjoy streaming with Nero.
Growing Number of Smart TVs
Due their comfortable internet and multimedia functions Smart TVs have become really popular. Likewise the security aspect of such devices has become a matter of public concern. In the past, TV set vendors were accused of having enabled functions in their Smart TVs that would allow spying of customers by collecting user data and of having provided such data to third parties.
The vendors opposed to that, but nevertheless there is the thread of hackers trying to utilize special functions of your TV set. Given that Smart TV security implementations are close to not existing hacker attacks are a realistic scenario.
How can I protect myself?
The most simple way of protection is disconnecting your Smart TV from the internet, but this goes along with not being able to use those functions of your TV that make it smart: home network streaming and the ability to access content via the internet.
If you do not want to miss those functions here are some useful tips how to protect your Smart TV from unwanted third party access.
1. Set Filters in your Router
One of the most secure ways of protection from unwanted access is blocking special internet pages via the filtering options of your router.
Internet and LAN / WiFi access of your TV can be reduced to a few URLs that you control via the so called white list. Additionally your router allows you to limit the internet connection to dedicated devices – e.g. if you use the integrated ‘parental control’.
How to set these limitations depends on your router’s setting options. Via these you can decide which pages should be accessible at all or – via the opposite approach – can just block dedicated URLs.
2. Deactivate the built in Webcam and the Microphone
If your Smart TV has an integrated webcam we recommend deactivating it via the set up menu of your Smart TV. Additionally you should also deactivate the microphone. If you want to be totally safe you can also put some tape over the camera. This may sound a bit over the top but in fact it is known that hackers have options to remotely activate the camera again without the signal on the camera even showing that the camera is on.
3. Deactivate HbbTV Service
Deactivate the function ‘HbbTV‘ in the setup menu of your TV. Similar to ‘Teletext’ with ‘Hybrid broadcast broadband TV‘ broadcasters can show additional information on the screen. Different to ‘Teletext’ that is embedded in the TV signal, ‘HbbTV’ uses the internet connection of your Smart TV.
Consumer advice centers accuse TV vendors of misusing this function by collecting user data and handing these over to third party without the user’s agreement.

In case your TV set does not include this function yet, there are standalone add-on boxes available providing the HbbTV function. If you want to be on the safe side you do not need such a device. In general we recommend taking a look into the TV set’s menu or – if available – into the device manual to understand if your TV has this function included or not.
Deactivating this service needs a closer look into the setup menu of your TV set. Terms used here to describe the HbbTV function can be quite cryptic like ‘data service function’ or ‘interactive service’. Not each vendor activates this function by default. But checking it, is worth the effort, anyway.
4. Smart TVs with Android OS
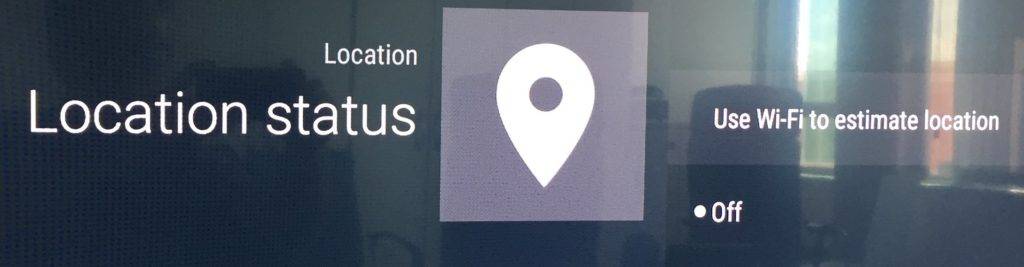
As of today, vendors like Sony are offering their range of TV sets with fully integrated Android OS known from Smartphones. As Android is Google’s mobile operating system you should take a closer look into the menu of your TV regarding Google data services. For protecting your privacy, we recommend not allowing Google to collect data.
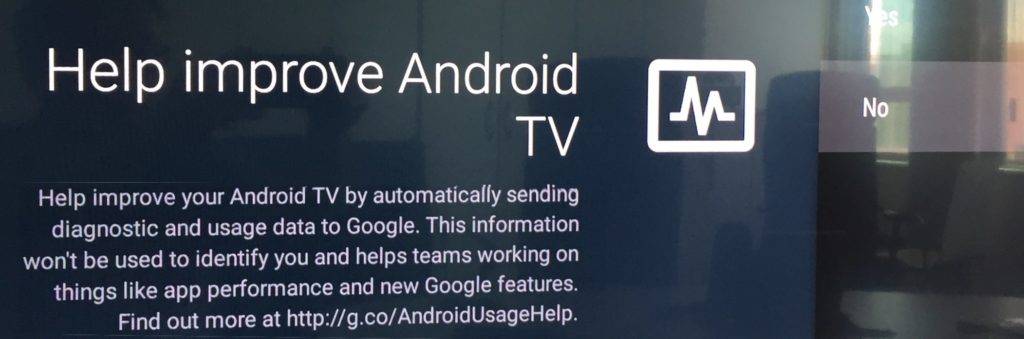
We also recommend disabling the location option.
5. Regularly update your TV’S Firmware
Make sure that you keep your Smart TV’s firmware always up to date. Updates can be triggered directly via the TV set when connected to the internet. You can also use your (safe) PC connected to the internet for downloading the firmware update, save it on a USB stick, connect it to your TV, and execute the update this way.
6. Adapt your Surfing Behavior
Due to the fact that Smart TVs largely lack security options make yourself aware of which web pages you need and want to access. Do not open pages that you cannot judge security wise. Only use apps und web pages from known source via a secured connection (https). Never type in sensitive data like your bank account into any page used with your Smart TV. If you do not use secure connections these data could even be sent unencrypted and hackers would have no problem accessing these.
Enjoy Streaming with Nero Streaming Apps
If you follow those above tips that suit best to your streaming behavior you will continue enjoying streaming with Nero Apps. With Nero MediaHome (PC) and Nero Streaming Player (free mobile App for iOS and Android) you have comfortable ways of making best use of your SmartTV with streaming your photos, slide shows, movies, and music, wirelessly to the big TV screen in the living room.
Installing Nero Receiver on your tablet (or smartphone) allows you to stream photos, movies, and music even without using your Smart TV directly to your tablet (smartphone), preferably.
Nero KnowHow 00076