Frequently ask questions for subscription and billing – Android

In general, your subscriptions are managed by Google. You can check the official document from Google:
https://support.google.com/googleplay/answer/7018481?co=GENIE.Platform%3DAndroid&hl=en
We listed some frequently asked questions below:

Q1: I would like to trial the subscription features before I pay. How to do it? Will I be billed if I cancelled subscription in free trial phase?
If ‘3-day Free Trial’ is available for your subscription product, just clicking ‘Buy Now’ will start your subscription immediately and you will not be billed in your free trial phase. If you want to cancel your trial before be billed, you need to cancel the subscription at least 24-hours before your renewal date.

Q2: How do I cancel my subscription?
If you subscribed via one of your Android mobile apps, you must cancel your subscription through the Play Store.
In order to cancel your subscription, please follow the following steps:
1. Launch the Play Store app on your Android device
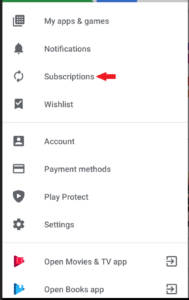
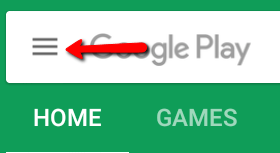
2. Tap on the Menu button in the top left of the screen
Google subscription_1
3. Tap on Subscriptions
mobile-my subscription
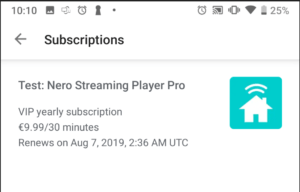
4.Tap Nero Streaming Player Pro VIP subscription. Below is a test example screen shot:
my subscription
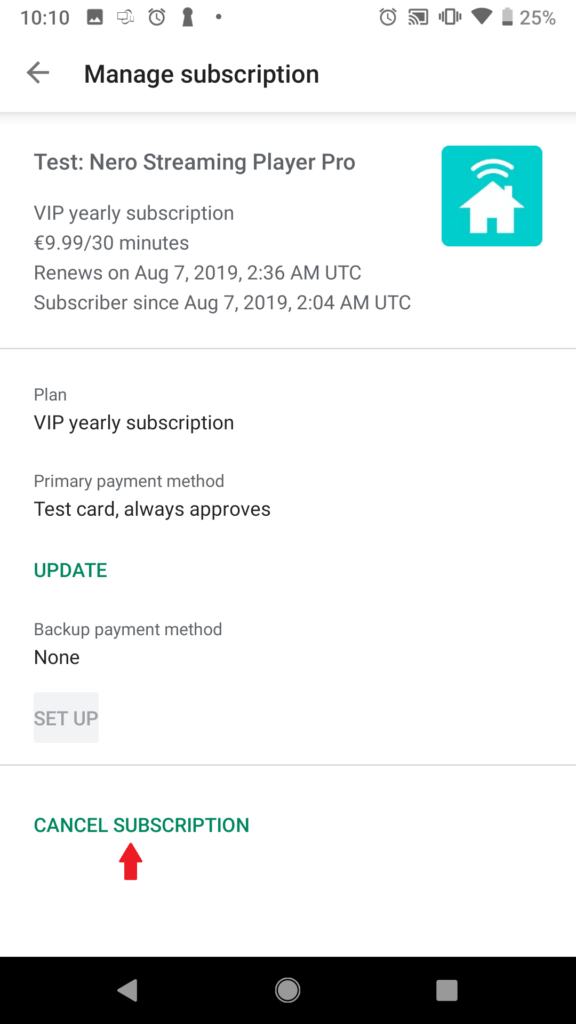
5. Tap Cancel Subscription. Screenshot_20190806-221016
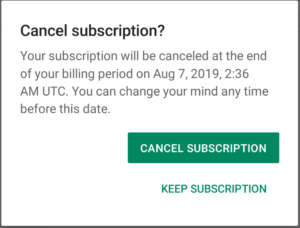
6. It will pop up a confirmation dialog. Tap Cancel Subscription again
mobile-cancel subscription-confirm

Alternatively, you cancel your Google Play subscription online without an Android device by following these steps:
1. Log in to Google
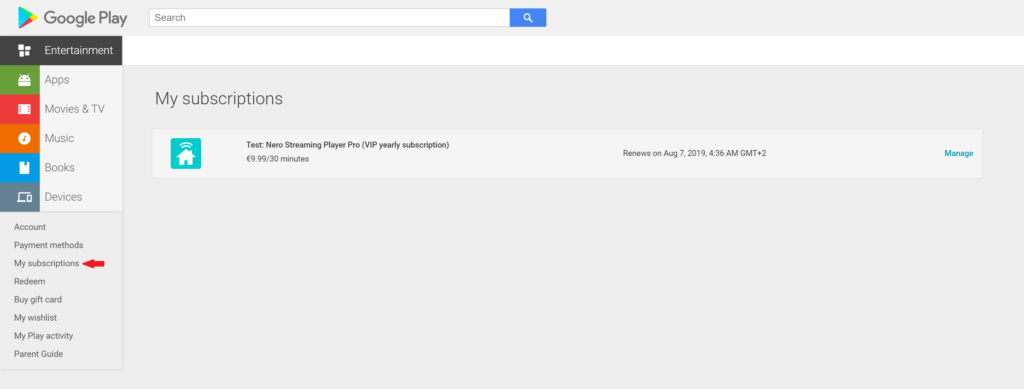
2. Go to https://play.google.com/store/account/subscriptions
web-my subscription
3. Find the subscription you want to cancel.
4. Click Manage.
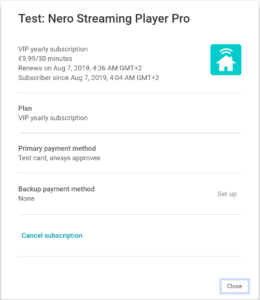
web-my subscription-manage
Note that if you follow these steps and only see options to re-subscribe, that means that you had already canceled your subscription.
5. Click Cancel subscription

Q3: Does deleting the app cancel my subscription?
No, uninstalling an app will not automatically stop your subscription. You must cancel your subscription to end your subscription. If you uninstall the app without canceling your subscription, you will still be charged. If an app you’ve purchased a subscription for is removed (discontinued completely) from Google Play, your future subscription will be automatically canceled but past subscriptions will not be refunded.

Q4: Where can I manage my subscription?
Being in control of your subscription is really easy! To view, end or cancel your subscription, follow these steps:
1. Open the Google Play Store app on your Android device
2. Tap the Menu button
3. Tap Account
4. Tap Subscriptions
5. Tap the ‘Nero Streaming Player Pro VIP subscription’
Here you can:
1. View your subscription details, including renewal date and price
2. Cancel your subscription. If you cancel, your subscription will stop at the end of the current billing cycle

If you have more questions, please contact us at support@nero.com

Nero KnowHow 00199
My Smart TV is not detected by Nero Streaming Player App, what should I do?

1. Please make sure your TV or media player, and your mobile phone are connected in the same WiFi network.

2. Please make sure your Smart TV is compatible with DLNA/uPnP.
You can use DLNA product search to confirm if your TV is a DLNA certified product: https://spirespark.com/dlna/products/. You can search by manufacturer, product type or device classes and capabilities.

3. If your TV is an Android TV and integrated Google Play Store, you also can download and install Nero Receiver TV on your TV. Nero Streaming Player works perfectly with Nero Receiver TV.

How to install Nero Receiver on Smart TV?

If you have an Apple TV, Nero Receiver is also supported at Apple TV now.

How to install Nero Receiver on Apple TV?

4. Disable the WLAN of your mobile device and re-enable it. Disable/disconnect the the network connection of your TV and re-enable it.

5. Restart Nero Streaming Player to try again.

6. Check if your router has AP isolation enabled. If the AP isolation is enabled, please turn it off and try to play again.
Take TP-Link as an example, device management–>AP isolation –>Off

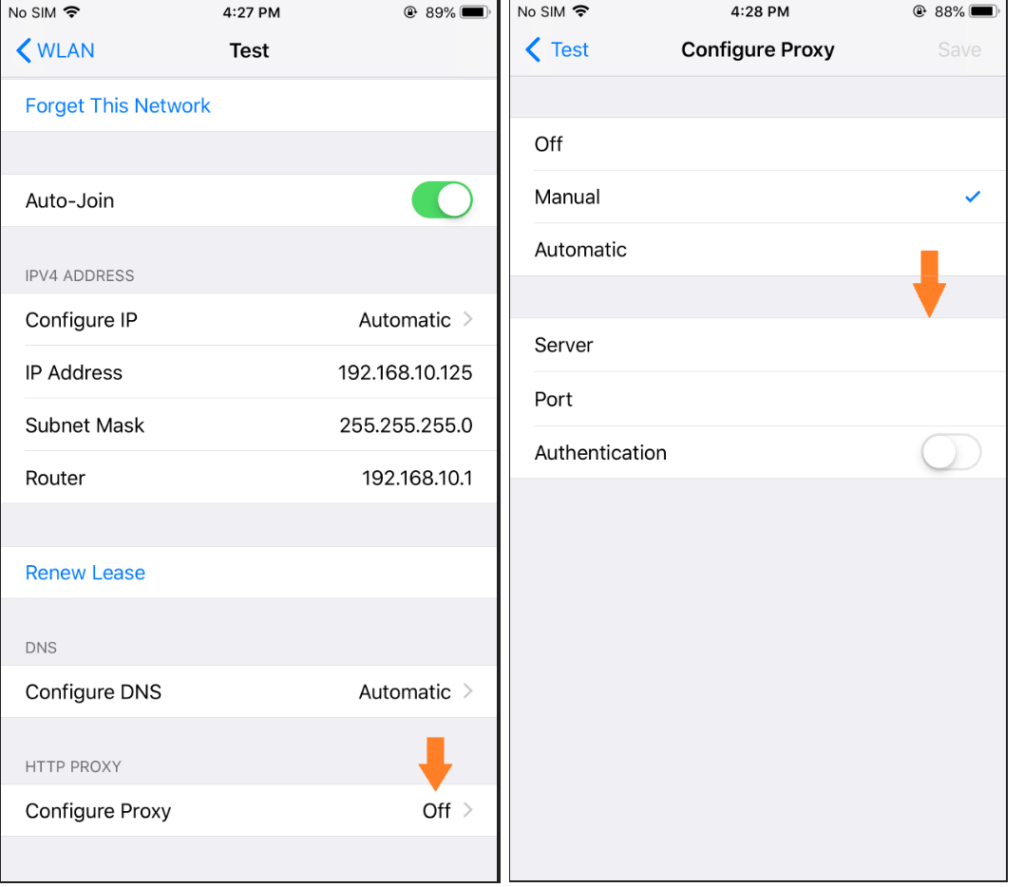
7. Check if proxy settings is enabled on the mobile network. If there is a proxy, please turn it off or add the IP of target device to the exception list.
manually config PROXY

8. Upgrade Nero Streaming Player to latest version.

9. Hotspot: Find another phone, open personal hotspot, connect your phone and TV to this hotspot, and now try to play to TV. If Nero Streaming Player is playing correctly when using this hotspot, it can basically confirm that there is a problem with your router settings. Please check it.
Note: If you only open the current phone hotspot and connect your TV to this hotspot, the connection will not work properly for iOS. Please make sure to use a hotspot from another phone.

10. Try Nero stick: Nero Easy Stream FullHD – HDMI Stick: https://www.nero.com/enu/products/nero-easystream/?navid=116134471207
HDMI port need to be available for your TV.

11. Write feedback to us inside of Nero Streaming Player

Nero KnowHow 00198

Frequently ask questions for subscription and billing – iOS

In general, your subscriptions are managed by Apple. You can check the official document from Apple:
https://support.apple.com/en-us/HT202039

We listed some frequently asked questions below:
Q1: I would like to trial the subscription features before I pay. How to do it? Will I be billed if I cancelled subscription in free trial phase?
If ‘3-day Free Trial’ is available for your subscription product, just clicking ‘Buy Now’ will start your subscription immediately and you will not be billed in your free trial phase. If you want to cancel your trial before be billed, you need to cancel the subscription at least 24-hours before your renewal date.

Q2: How do I end my trial?
To end your trial on iOS, follow these steps:
1. Open the Settings app on your iPhone or iPad
2. Tap your name at the top of the screen
3. Tap iTunes & App Store
4. Tap your Apple ID at the top of the screen
5. Tap View Apple ID – you may be asked to sign in
6. Tap Subscriptions
7. Tap the ‘Nero Streaming Player Pro’ subscription
8. Tap Cancel Subscription to end the trial – you can continue to use the subscription features until the trial period is over.
Nero Streaming Player Pro will keep a spot for you on the mat any time if you change your mind!

Q3: Does deleting the app cancel my subscription?
No, deleting the app does not cancel your subscription. If you really want to leave Nero Streaming Player Pro and want to cancel your subscription, please follow the steps of Q5  to cancel your subscription first.

Q4: Where can I manage my subscription?
Being in control of your subscription is really easy!

To view, change or cancel your subscription on iOS, follow these steps:
1. Open the Settings app on your iPhone or iPad
2. Tap your name at the top of the screen
3. Tap iTunes & App Store
4. Tap your Apple ID at the top of the screen
5. Tap View Apple ID – you may be asked to sign in
6. Tap Subscriptions
7. Tap the ‘Nero Streaming Player Pro’ subscription

Here you can:
1. View your subscription details, including renewal date and price
2. Choose a different subscription, which will start at the end of the current billing cycle
3. Cancel your subscription. If you cancel, your subscription will stop at the end of the current billing cycle

Q5: How to change and cancel my subscription?
To cancel the automatic renewal of your subscription, follow these steps:
1. Open the Settings app on your iPhone or iPad
2. Tap your name at the top of the screen
3. Tap iTunes & App Store
4. Tap your Apple ID at the top of the screen
6. Tap View Apple ID – you may be asked to sign in
7. Tap Subscriptions
8. Tap the ‘Nero Streaming Player Pro’ subscription
9. Tap Cancel Subscription to end the automatic renewal. If you cancel, your subscription will stop at the end of the current billing cycle.

If you have more questions, please contact us at support@nero.com

Nero KnowHow 00197

How to access my mobile device at MAC wirelessly?

From WiFi+Transfer iOS v.1.2.5/Android v.1.3.6, when you turn on WiFi+Transfer,  whether you’re using an Android or an Apple device, you are able to open it directly on your Mac system.

First of all, please make sure that:
1. you are using the right version: WiFi+Transfer iOS v.1.2.5 and higher / Android v.1.3.6 and higher.
2. your mobile device and your Wi-Fi enabled Mac are on the same Wi-Fi network.
3. please switch on WiFi+Transfer and keep it in the foreground.

Then, follow the steps:
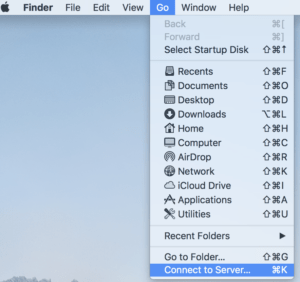
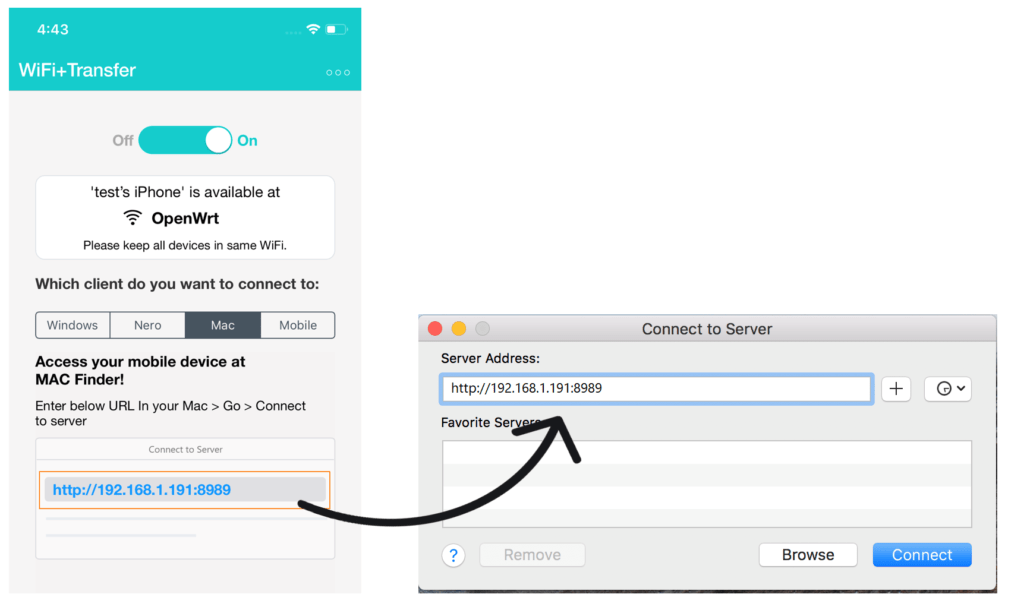
1. In Mac Finder, Go > Connect to Server
connect to server
2. Enter the URL listed in WiFi+Transfer in the ‘Connect to Server’ dialog. Click ‘Connect’.
input URL_combined
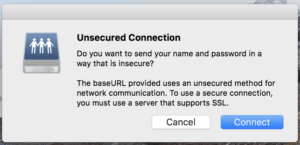
3. You may get a system message – ‘Unsecured Connection’. But actually WiFi+Transfer will NOT send or get any name and password from your system. Please click ‘Connect’.
connect_unsecured connection
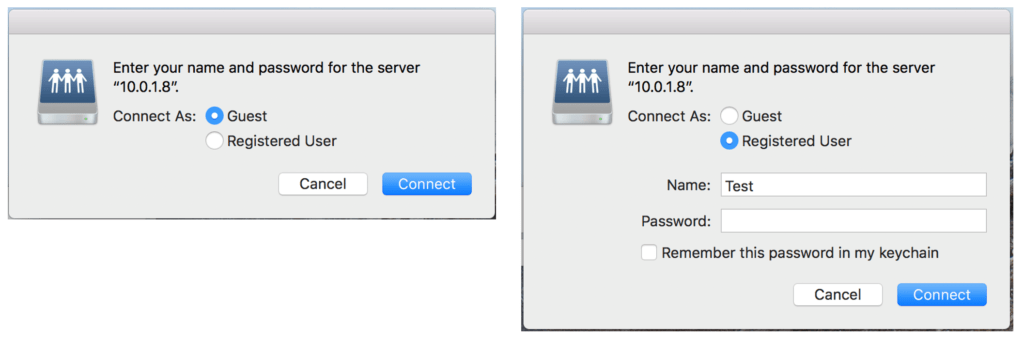
4. You will then be asked to enter your name and password. Whether you are connected as ‘Guest’ or ‘Registered User’, simply leave it empty and click ‘Connect’.
enter name
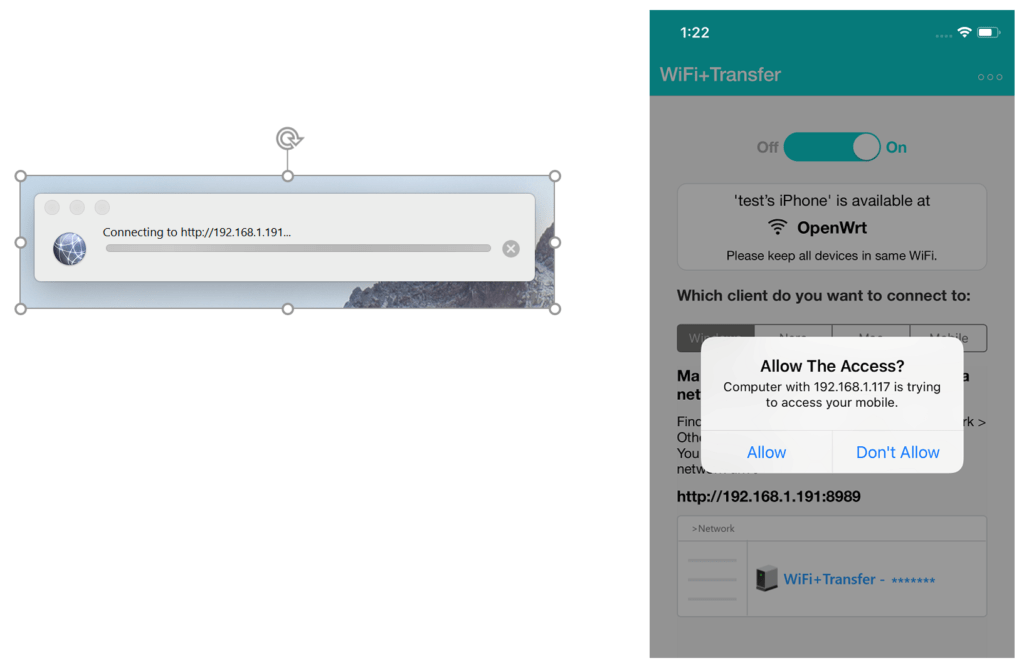
5. At this moment, your Mac is connecting your mobile device. You need to allow the access of this Mac in the ‘WiFi+Transfer’ of your mobile device.
allow access_combined

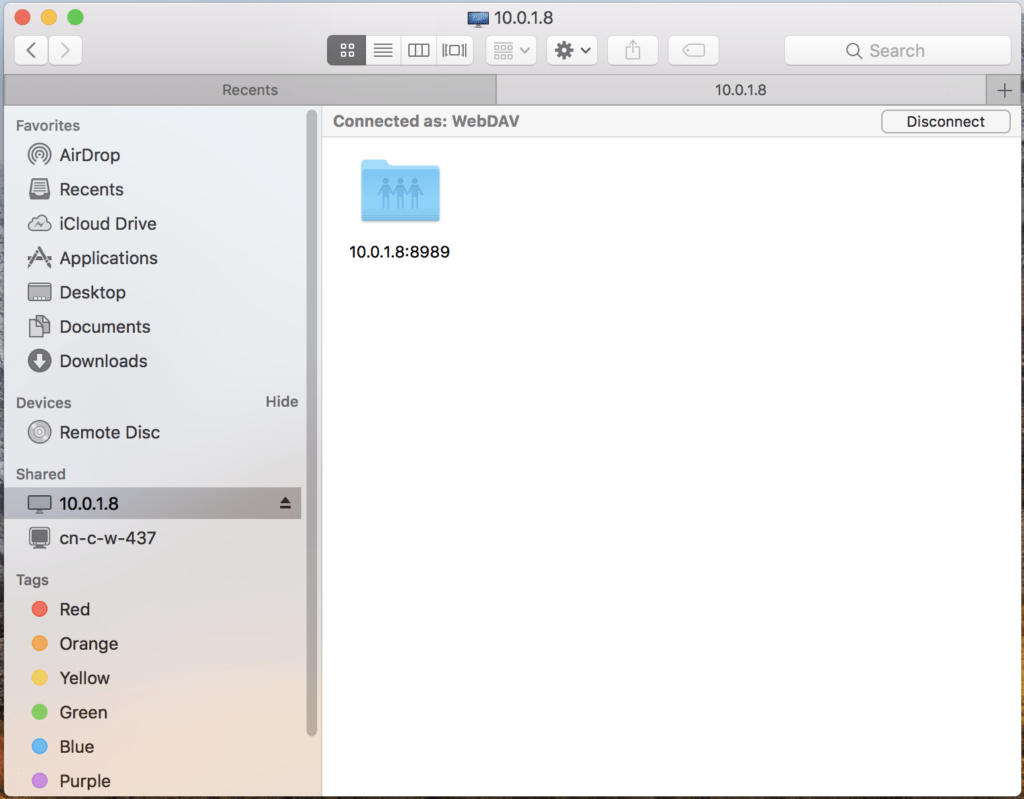
Once you agree, you will see that your mobile device has been successfully listed in the form of an IP address in your Finder > Shared.
Finder_shared

Nero KnowHow 00195

When I try to click ‘Network’ in Explorer, I got ‘network discovery is turned off’ warning. What shall I do?

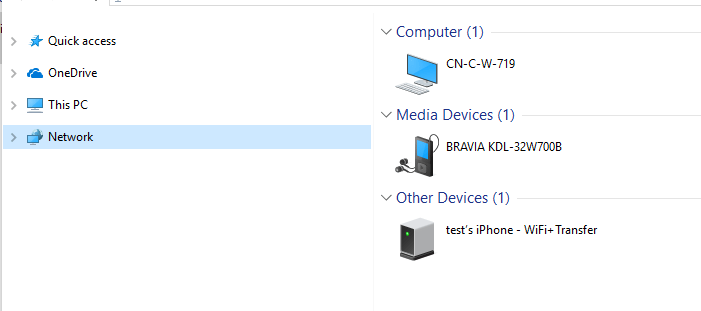
From WiFi+Transfer iOS v.1.2.5/Android v.1.3.6, when you turn on WiFi+Transfer, your mobile device will be listed in ‘Windows Explorer > Other Devices’ as follows:
network_other devices

If this is the first time you’ve tried to discover your mobile device on your network, when you click ‘Network’ in Windows Explorer, you may see a warning because of your system settings:
network discovery turned off

1. When this warning pops up, you will find a prompt bar above Windows Explorer.
not visible_change option
2. Click this yellow bar to list its menu. Click the first item ‘Turn on network discovery and file sharing’
turn on option
3. If you see the following dialog box from the system, we recommend that you open only the network discovery and file sharing for the private network.
turn on for private network

Your network discovery is now turned on.

Nero KnowHow 00194