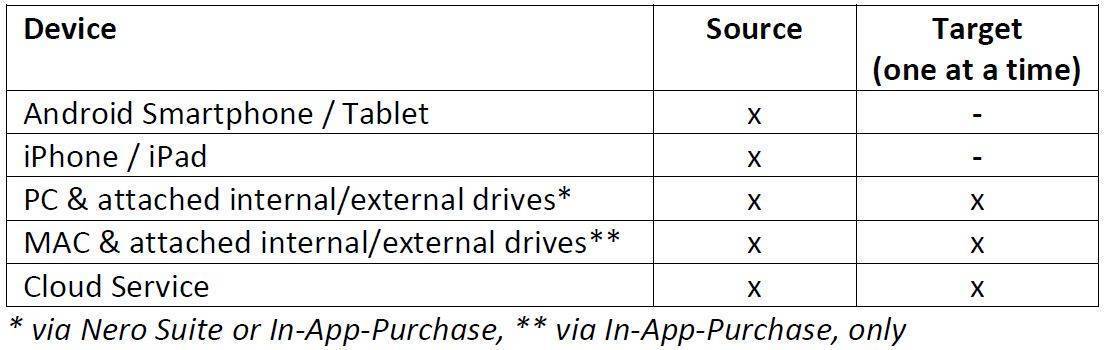
Via DriveSpan App for iOS and Android you can easily merge and consolidate all of your media and data located on a PC and attached external hard discs / storage drives, mobile devices, or on your cloud storage to one central storage location (e.g. a PC, an external hard disc or the cloud). All included devices for consolidation – your sources and the target – are controlled wireless via ‘DriveSpan App’ within the same WiFi network.
Before starting the consolidation, you should check your configuration and your use case for enabling a smooth and error-less consolidation. For details on setting up your devices for consolidation, also check Nero KnowHow 00144. For a demo video of DriveSpan App check Nero KnowHow 00154.
Check your configuration and use cases based on below factors:
the number and types of used devices
the size of your data to be consolidated
the capacity (free space) on your target device
the bandwidth of your network
etc.
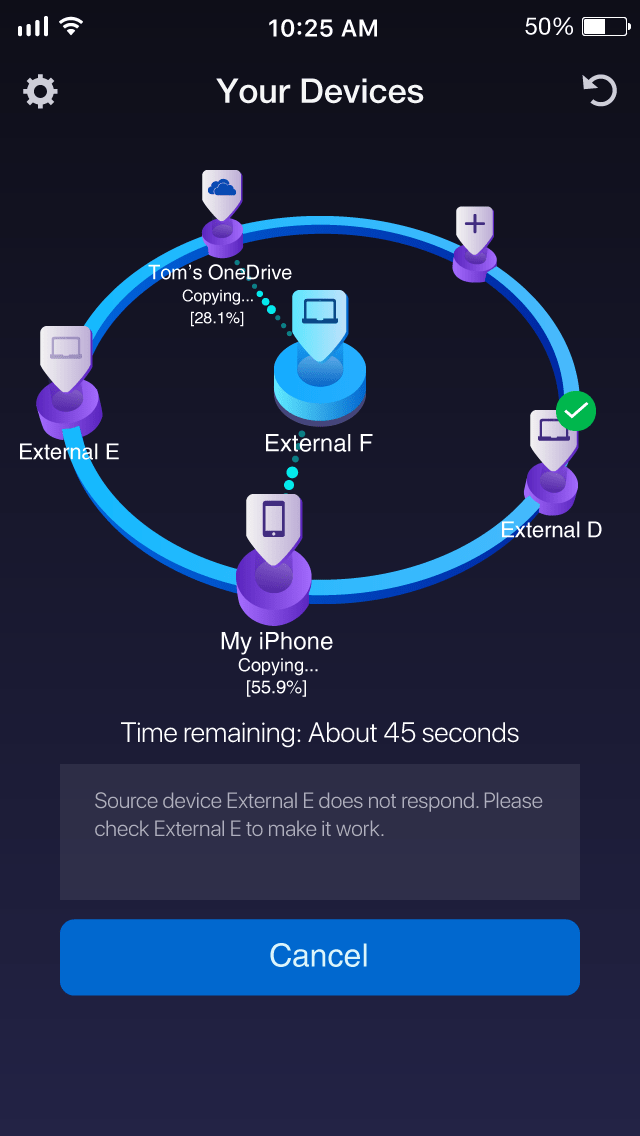
During the consolidation, DriveSpan App will identify issues and if possible will provide clear text solutions via the info box on the home screen. In most cases this will help you to resolve the issue. For example: the above message shows that external drive E is not responding. In this case you should check the proper physical connection and also the power supply of your drive (if the latter applies for your case).
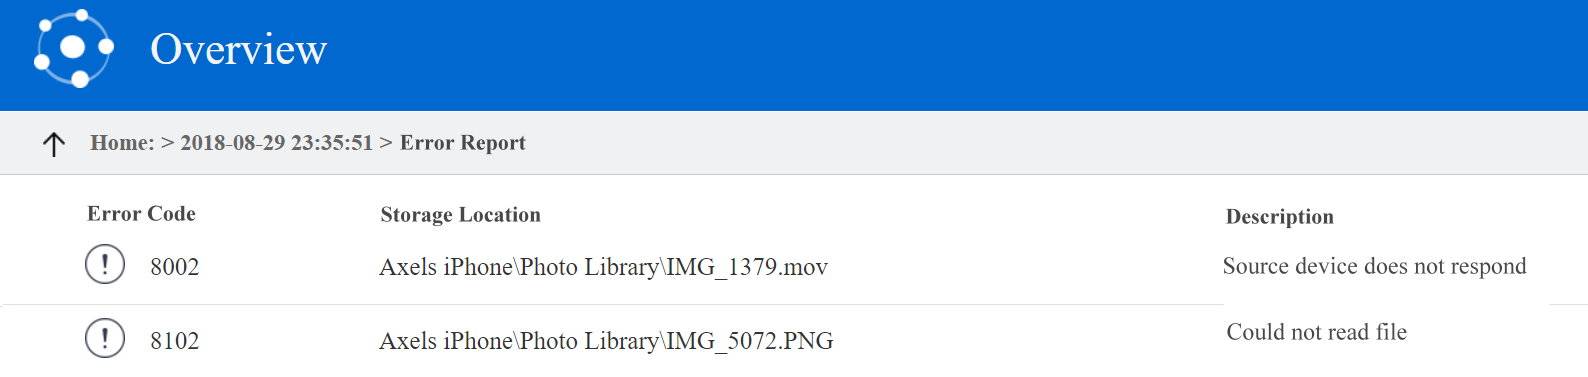
After the consolidation is finished, respective errors will be documented in ‘Overview’ > ‘Error Report’. The ‘Error Report’ lists all given issues during a consolidation with related error codes, and a description of the issue. If you did not manage to fix your issue based on the proposed solution in the info box, please check the ‘Error Report’ and report your issue including the given error code.
If no errors occurred during your consolidation, the ‘Overview’ will not show an ‘Error Report’.
When editing disc compilations, Nero Burning ROM checks if files added to the disc compilation are available and comply with the given disc compilation type. If the files are not compliant with the selected disc compilation, they cannot be added. For example, if you add a .txt file into the DVD Video Disc folder “VIDEO_TS”, the below message dialog will pop up, and only the compliant files will be added to the disc.
The below typical types of compilations will check for compatible files:
Audio CD
CD EXTRA
DVD-Video
AVCHD(TM)-VIDEO for DVD Disc
BDMV-Video
AVCHD(TM)-VIDEO for Blu-Ray Disc
What can I do if such message dialog pops up?
Check the information in the message box. It will show details about the compliant files or folders for the disc
In the bottom of the message dialog you will see the file path list for non-compliant files and folders
Save and exit the compilation editing. This can help you continuing the compilation editing next time
Create disc compliant files, first by using other Nero applications like Nero Video, Nero Recode, etc.
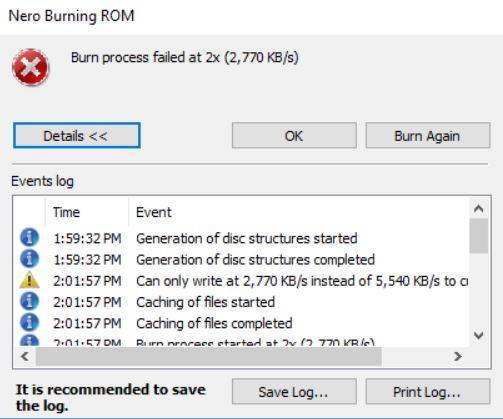
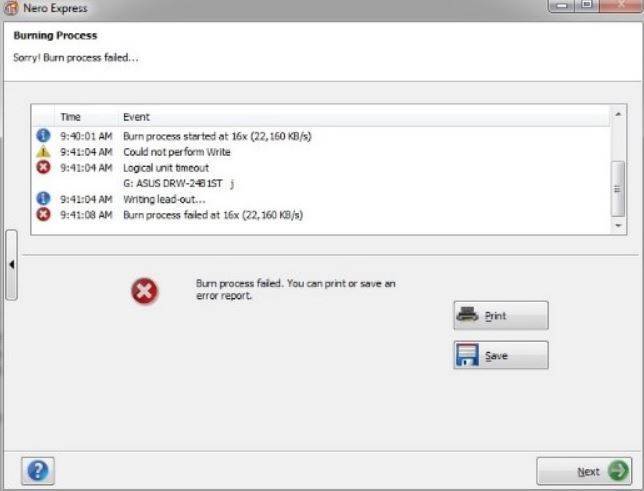
While using Nero Burning ROM or Nero Express for burning content to a disc, you may come across the error message ‘Burn process failed …’.
So, what does these errors mean and how to fix the related issues?
In the whole burning process of Nero Burning ROM or Nero Express, the given application will do different checks to make sure that the burning related operations do not fail. These will be:
checking device(s)
checking the medium
checking disc erase or similar operations
If any critical error happens (like the disc/medium is broken, the disc recorder cannot be accessed, etc.) and the application cannot fix or recover the given issue, such an error dialog will pop up in the application.
As the dialog will indicate and show in detail within the message box, most of the typical cases are related to the fact that the disc/medium is broken or the disc speed for burning is not working correctly. So, in many cases putting a new disc into your disc recorder and clicking the button “Burn Again” will solve your issues. The disc speed issue can probably be solved by updating your firmware.
Still there are some situations when the above mentioned solutions cannot resolve your issue. For such cases it is meaningful to do a deeper check via the application log file.
For creating a log file, in Nero Burning ROM please click the button ‘Save Log…’ or ‘Save’ in Nero Express, within the respective message box .
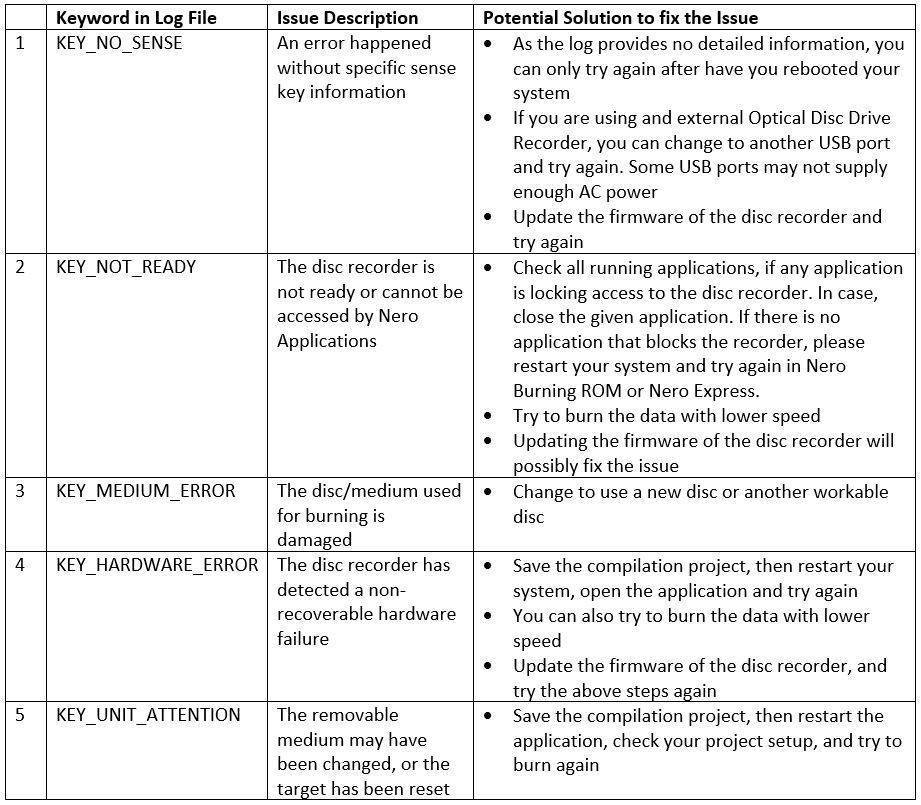
In the exported log files, you can find some keywords.
Below table lists some of the most important keywords that you can check based on the provided solutions, here. This may help fixing your issue.
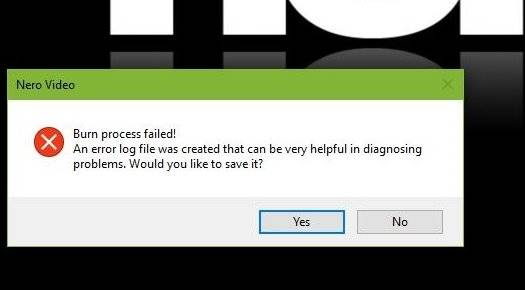
When using Nero Video for burning videodiscs, you may run into this error.
“Status 3” is a general status for the burning process in Nero Video. It means that some error occurred when burning video data to disc either due to missing system resources (1), issues within the transcoding process (2) before the burning has started, or (3) in the final burning process.
Not enough System Resources will cause “Burn process failed with status 3”
Burning a videodisc Nero Video contains several processes, like creating disc menus, transcoding the video files in the authoring project, and burning the content to disc/local disk. During the whole process, the application needs enough system resources (CPU, Memory) to complete the job. So, when burning a video disc in Nero Video, please make sure those applications requesting huge system resources are not running at the same time.
Failed Transcoding will cause “Burn process failed with status 3”
While burning content to disc in Nero Video, all video and audio source clips should match DVD/AVCHD/BD disc compatibility, like the video format, the video resolution, and the bitrate of the video files. In many cases, the files used within a disc project do not match DVD/AVCHD/BD disc compatibility, so Nero Video needs to transcode these files before burning them to the disc medium or to a local disk. Sometimes, this transcoding process may fail, also causing the following burning process to fail, resulting in the error “Burn process failed with status 3”.
Below you can find some reasons for failed transcoding:
Not enough space on the hard disk partition (default is C:\, but it can be modified in Options -> Application Setting -> Save) which is used to store the transcoded files
Some source video files may not be supported in Nero Video encoding engine
The source video files added to your disc project may be damaged, which will cause the transcoding to fail
etc.
If the above cases apply, we recommend doing a pre-transcoding of your source files in Nero Recode. From Nero Reocde 2019, the application has the option to select disc compatible profiles to trans-code video files.
For more information, refer to Nero KnowHow 00131.
Issues within the burning process causing “Burn process failed with status 3”
Nero Video will do different checks to make sure that the burning related operations do not fail. These will be:
checking device(s)
checking the medium
checking disc erase
or similar operations
If any critical error happens (like the disc/medium is broken, the burner cannot be accessed, etc.) and the application cannot fix or recover the given error, such a dialog will pop up in the application, indicating that the burning failed with the given error.
The error message shows a link to a log file for getting a better understanding of the issue.
Click ‘ok’ to open it or go to this path: “c:\Users\<UserName>\AppData\Roaming\Nero\Nero 2019\Nero Vision\NeroVideoLog.txt”, where you can find the error information of “Burn process failed with status 3”.
Please check the log file for some error codes with typical keywords like “KEY_******”. Below table shows typical error codes and options how to fix these.
In some edge cases, if the size of the created disc content is larger than the disc capacity, this may also cause the burning failed error.
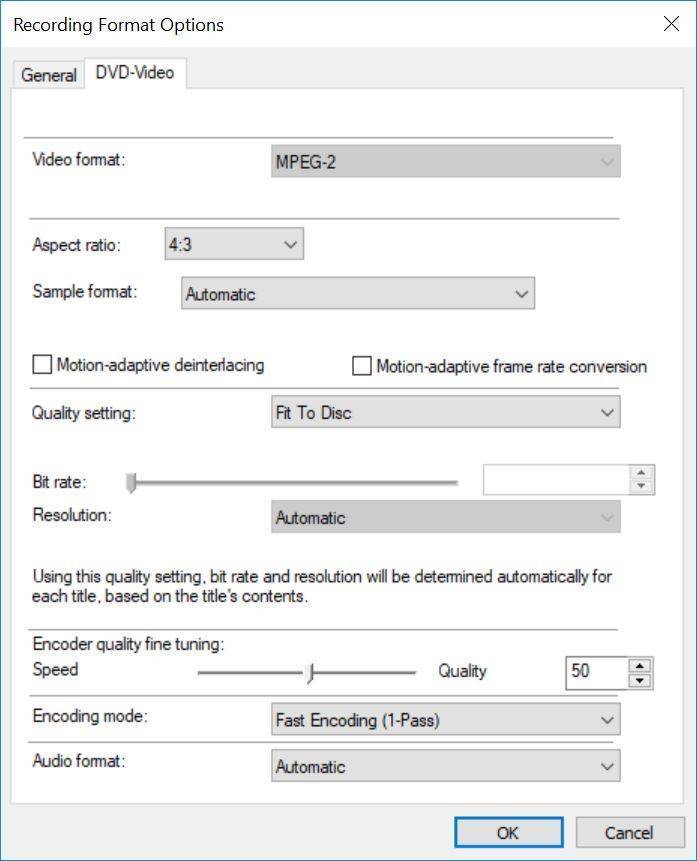
To fix such an issue, you may (1) either change the disc content to remove some files from the content, or (2) modify/change the quality setting of the video files.
For the second case you can open the “Recording Format Options”, select the disc type, and change the “Quality setting” to “Fit to Disc”. In this case, Nero Video can automatically transcode the file in a suitable quality, matching your disc type and the available space on the given disc.
If the above solutions cannot fix the issue, please change the burn destination from Optical Disc Drive to Image Recorder, and burn the image to local disk. Use other burning software like Nero Burning ROM or Nero Express and burn again. For more information also check Nero KnowHow 00150.
NOTE: If you want to restart the application or restart your PC, please make sure the Nero Video project is saved.
Case 1: If you own a Nero 2019 product (and further), and you are using one of the below mentioned applications, please follow the three steps as described.
Nero BackItUp
Nero Express
Nero Burning ROM
Nero Recode
Nero Video
Nero DuplicateManager Photo
Nero MediaHome
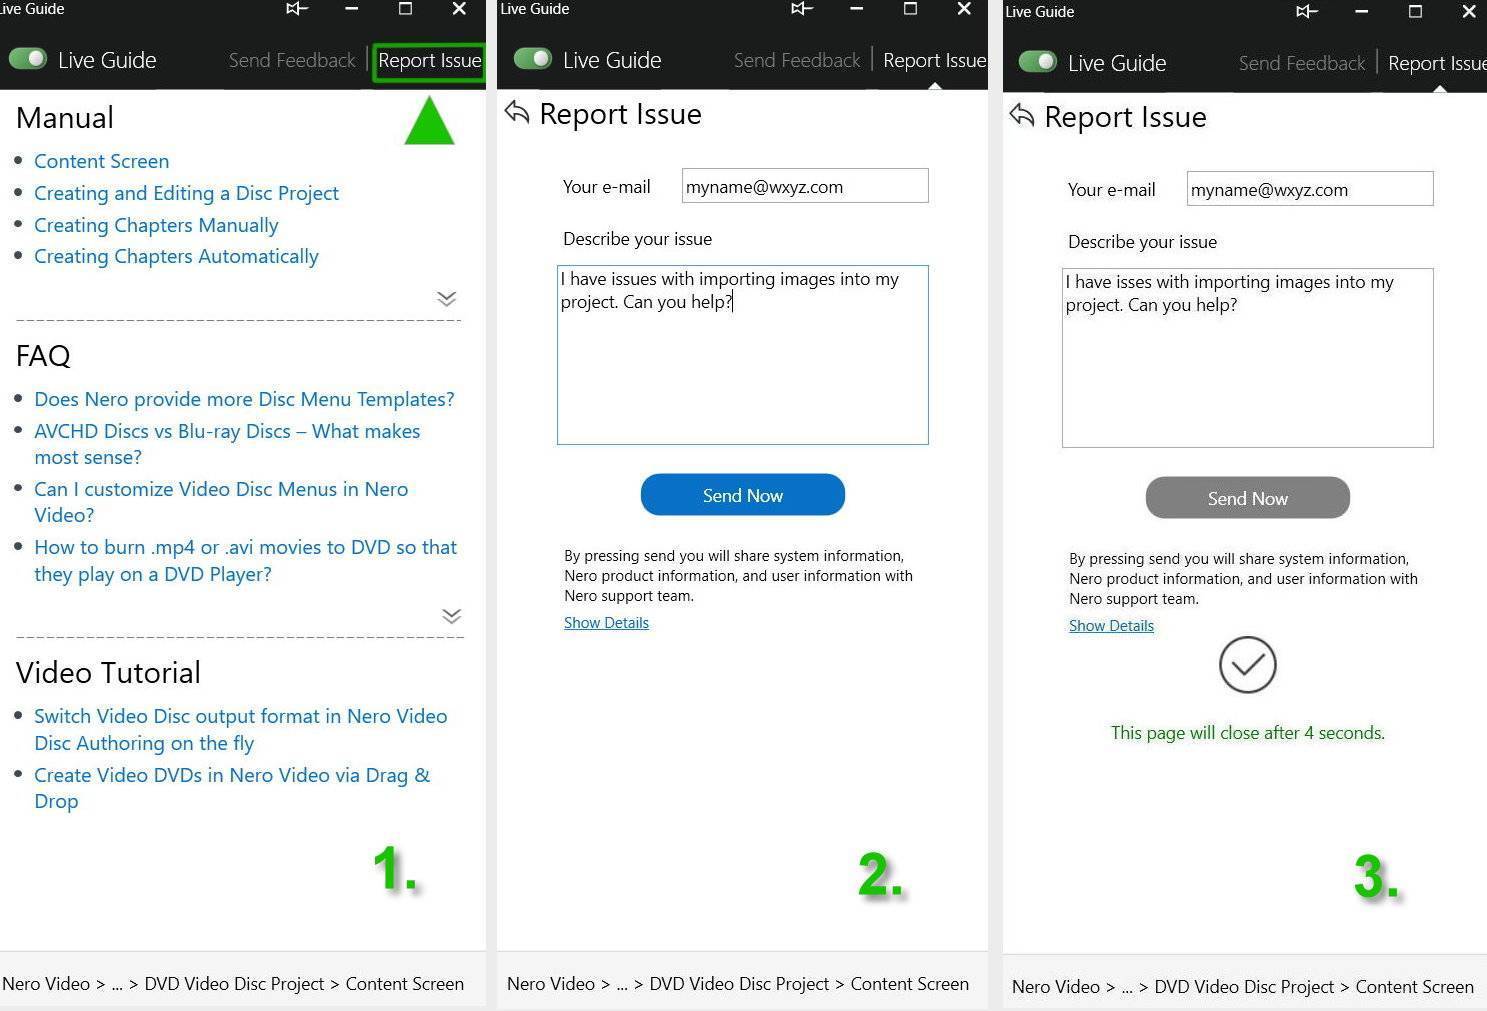
Keep the respective Nero application open in the window, mode, or task in which the issue occurred and switch on ‘Live Guide’. ‘Live Guide’ will show the context path at the bottom. Click on ‘Report Issue’ in the header top right
Insert your mail address and your issue and click send
‘Nero KnowHow PLUS’ will indicate that the message was sent successfully
Case 2: If you own a Nero 2019 product (and further), and you are just using a different than the the above mentioned applications, please follow the three steps as described below.
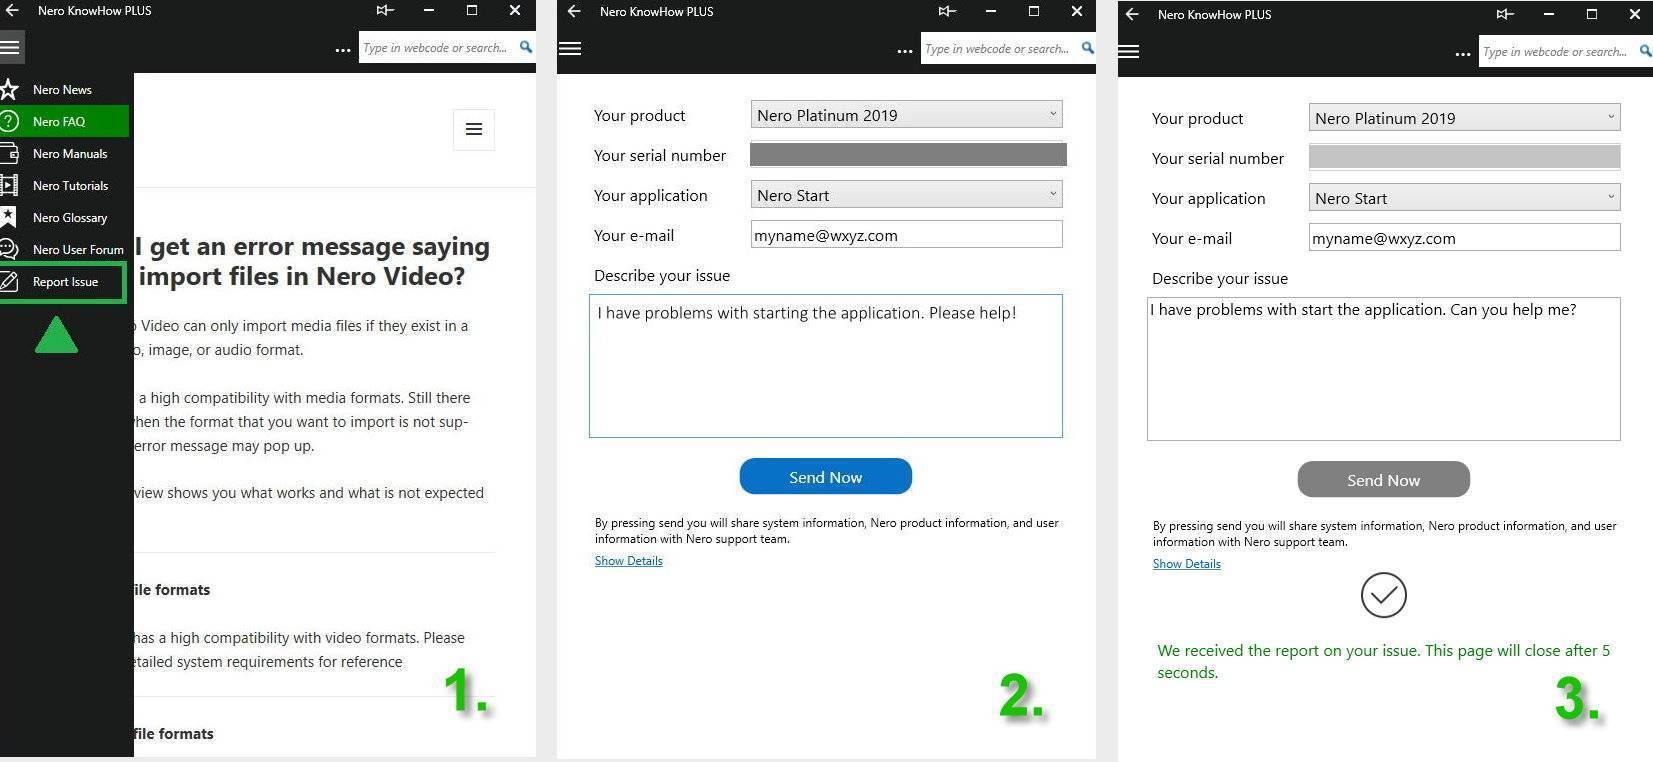
Open ‘Nero KnowHow PLUS’ and click on ‘Report Issue’ in the category menu left hand side.
In the ‘Report Issue’ page, please insert your mail address and your issue and click send
‘Nero KnowHow PLUS’ will indicate that the message was sent successfully
Case 3: If you are using an earlier Nero Product (earlier than version 2019), please follow the three steps as described below.
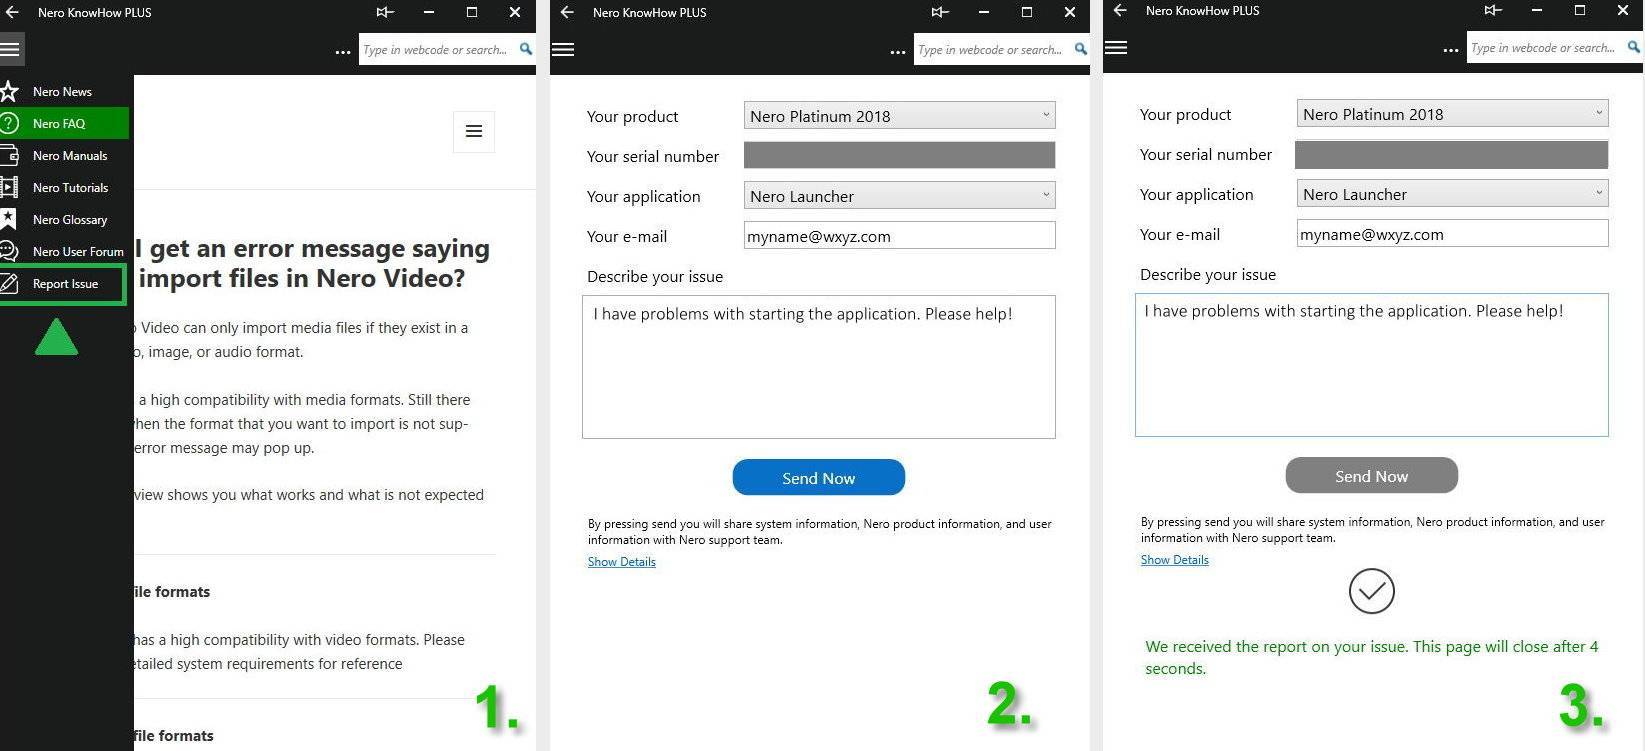
Go to nero.com ‘Support’ and download ‘Nero KnowHow PLUS.exe’. On your PC with the given Nero Suite or standalone product version installed, click on the executable file of ‘Nero KnowHow PLUS’, and click on ‘Report Issue’ in the category menu left hand side
In the ‘Report Issue’ page, please insert your mail address and your issue and click send
Nero ‘KnowHow PLUS’ will indicate that the message was sent successfully
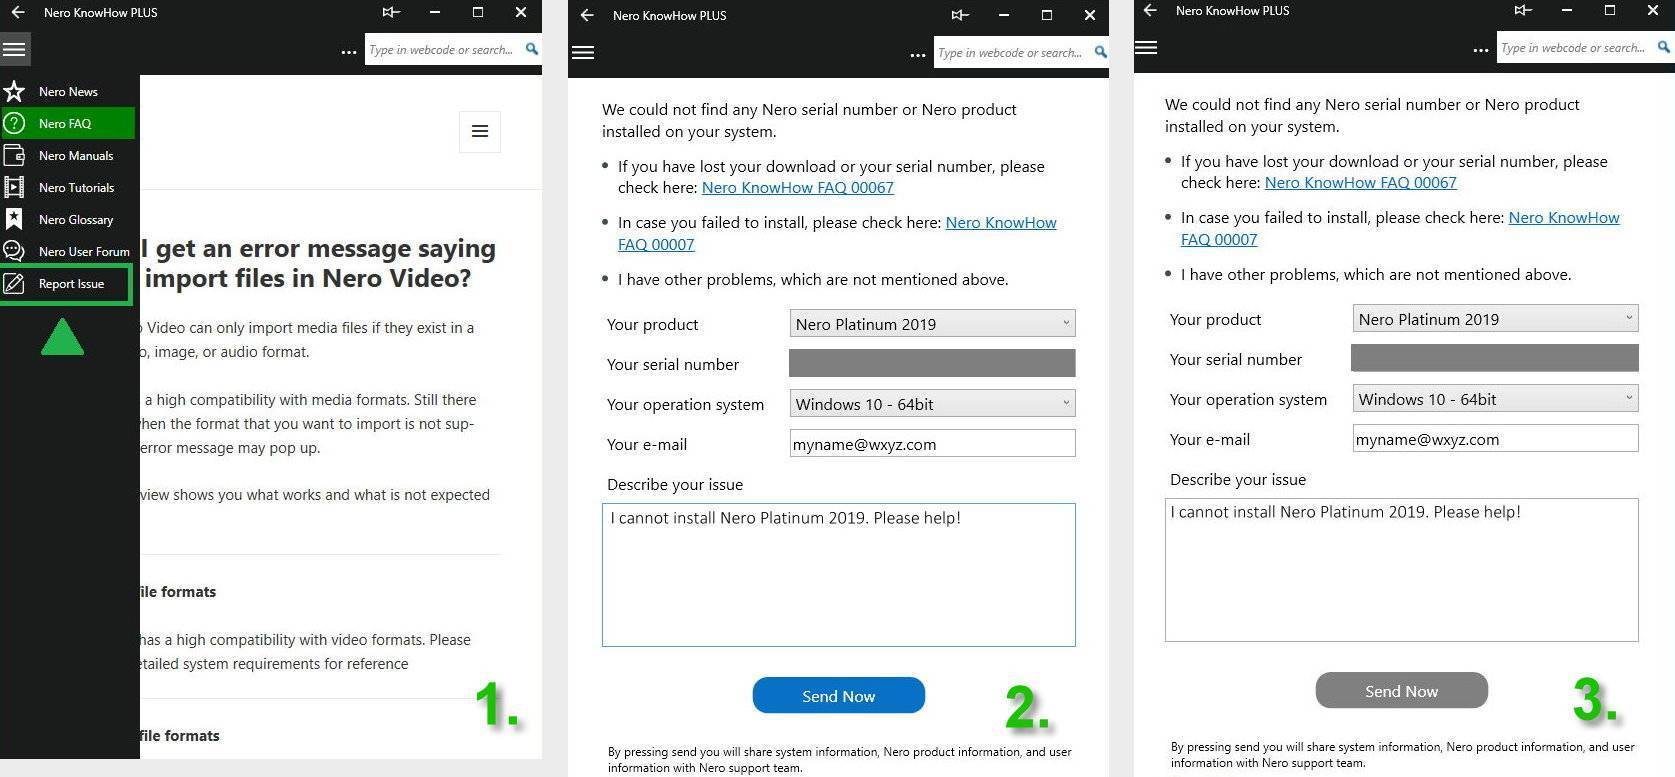
Case 4: If you own a Nero product, but failed to install the product, please follow the below steps to report an issue.
Go to nero.com ‘Support’ and download ‘Nero KnowHow PLUS.exe’. On your PC on which you tried to install the given Nero Suite or standalone product version, click on the executable file of ‘Nero KnowHow PLUS’, and click on ‘Report Issue’ in the category menu left hand side
In the ‘Report Issue’ page, please select your product and your operating system, then insert your mail address and your serial number. Then report your issue and click send
‘Nero KnowHow PLUS’ will indicate that the message was sent successfully
 Nero KnowHow 00148
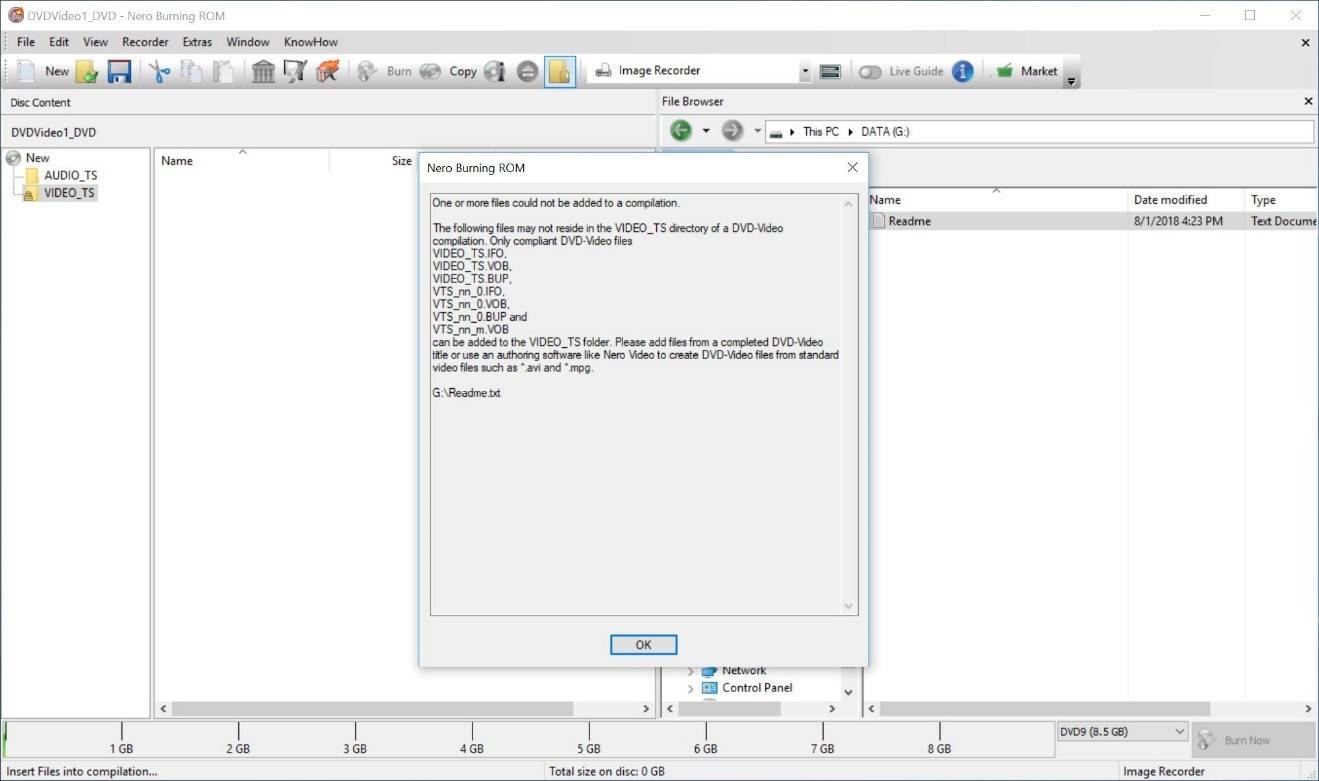
 Nero KnowHow 00138