Im Nero Video Diskerstellungs-Modul gibt es drei Stellen, an denen Sie die Abspielreihenfolhe der Titel in Ihrem Disk-Menü überprüfen können.
1. Im Inhaltsbildschirm, in den Sie Ihre Videodateien importieren, können Sie auch die Abspielreihenfolge prüfen und per Drag & Drop oder Kontextmenü ändern.
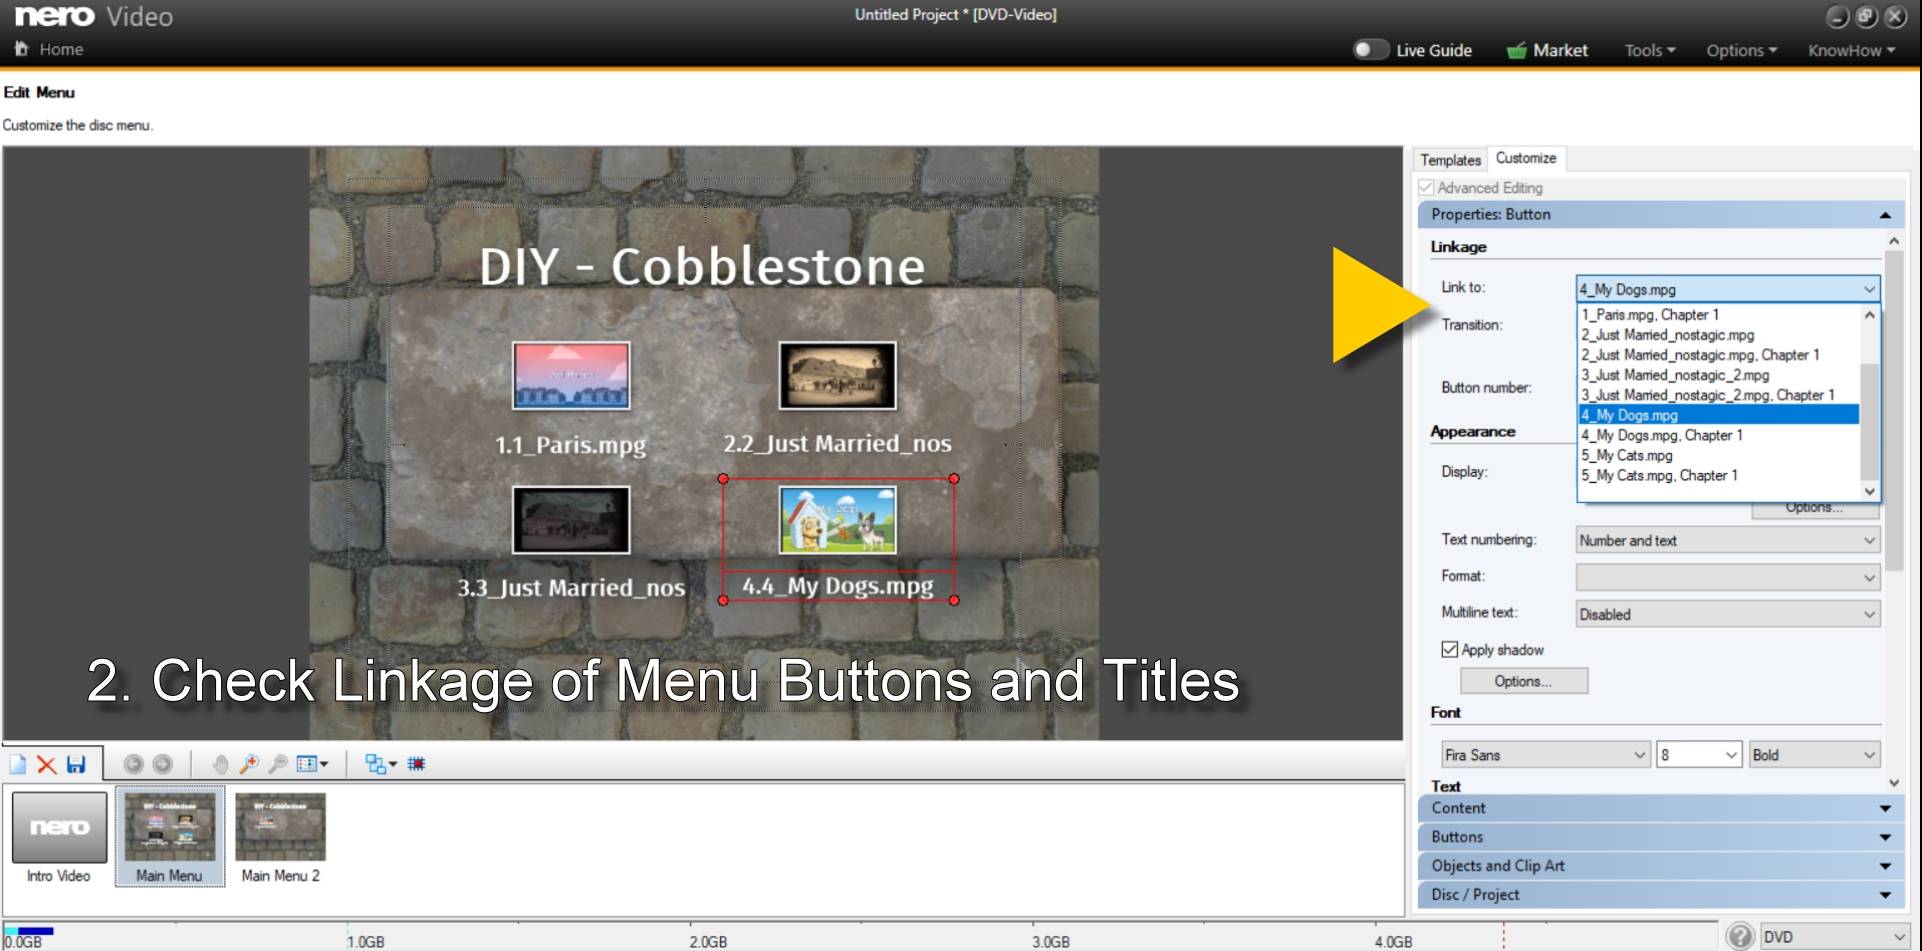
2. Im Menü-Bildschirm unter „Anpassen“ und „erweiterter Bearbeitung“ > „Eigenschaften: Schaltfläche“ prüfen Sie bitte die Reihenfolge und Verlinkung in der Drop-Down-Auswahl von „Verknüfungen“.
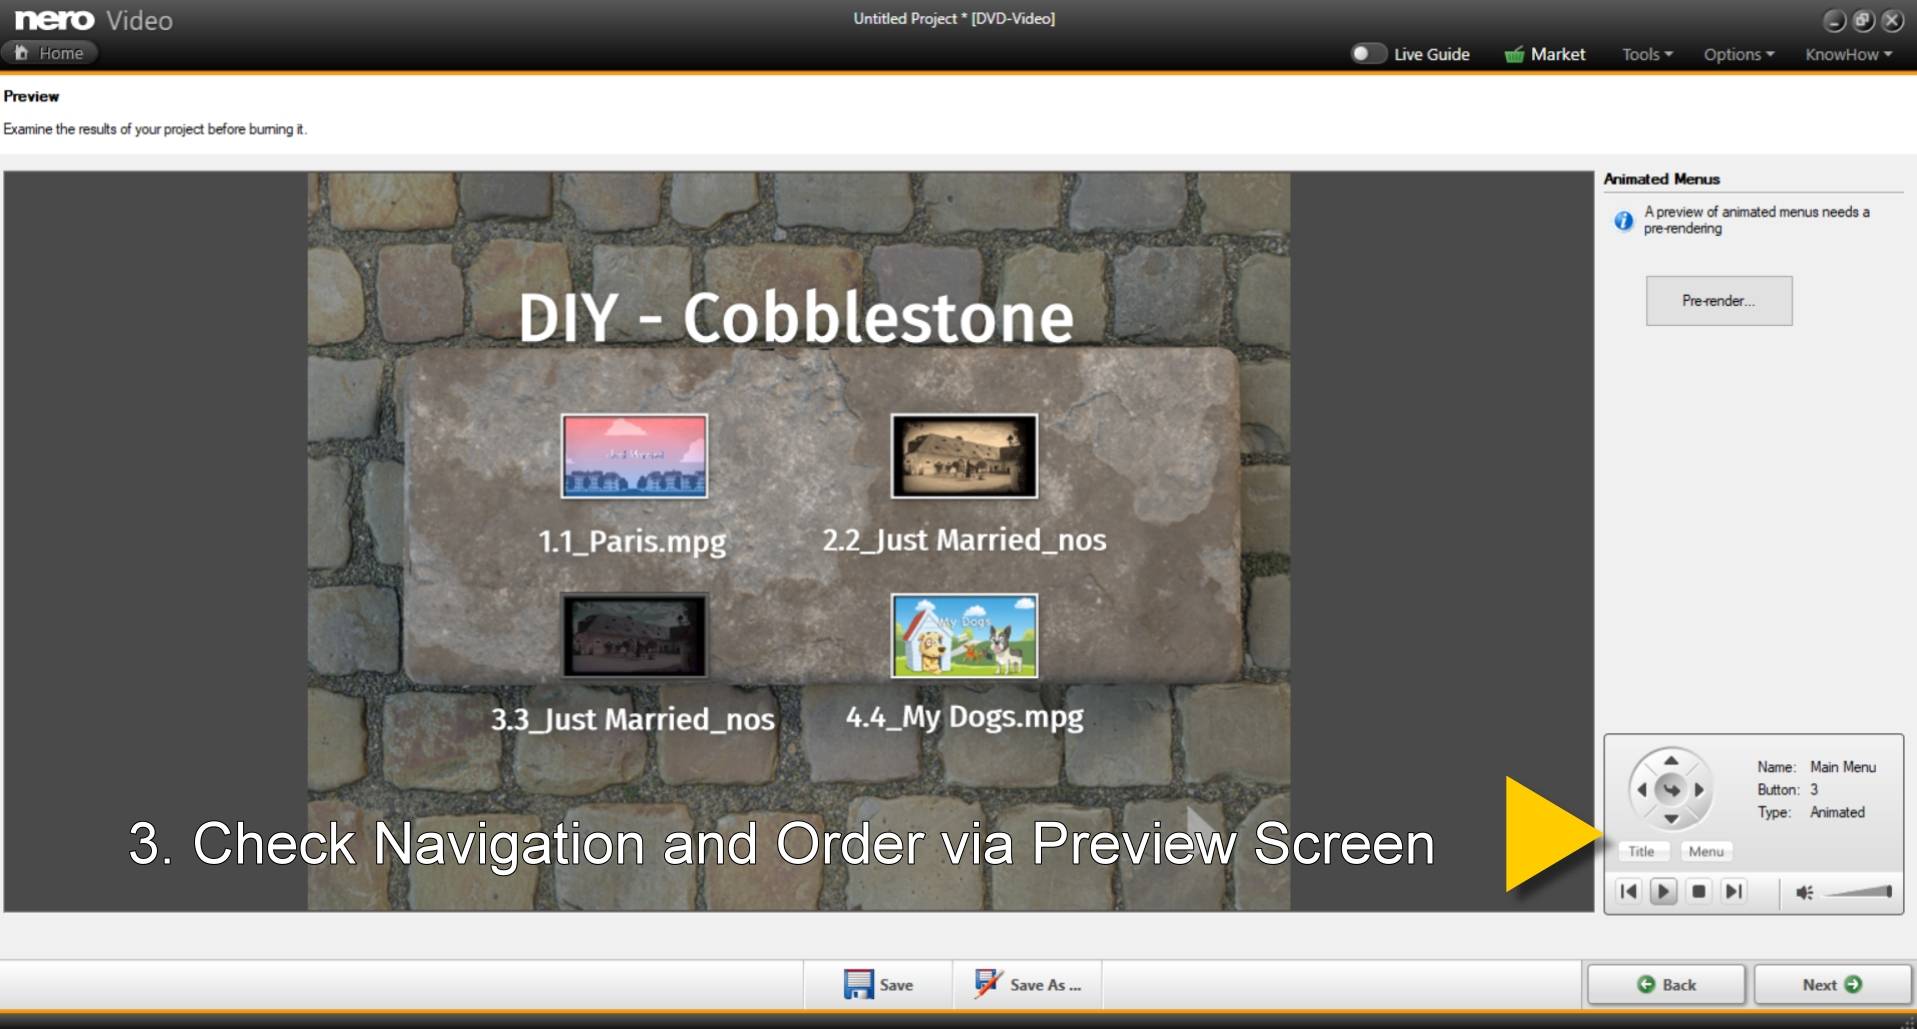
3. Zur abschließenden Kontrolle vor dem Brennen öffnen Sie im nächsten Schritt bitte das Vorschaufenster. Überprüfen Sie die Menü-Navigation und die Abspielreihenfolge. Die Simulation der Wiedergabe zeigt Ihnen, ob Ihr DVD-Player im Wohnzimmer die Disk so abspielt, wie Sie es wünschen. Sollte hier etwas nicht stimmen, gehen Sie für Änderungen bitte zurück zu Punkt 1 oder Punkt 2.
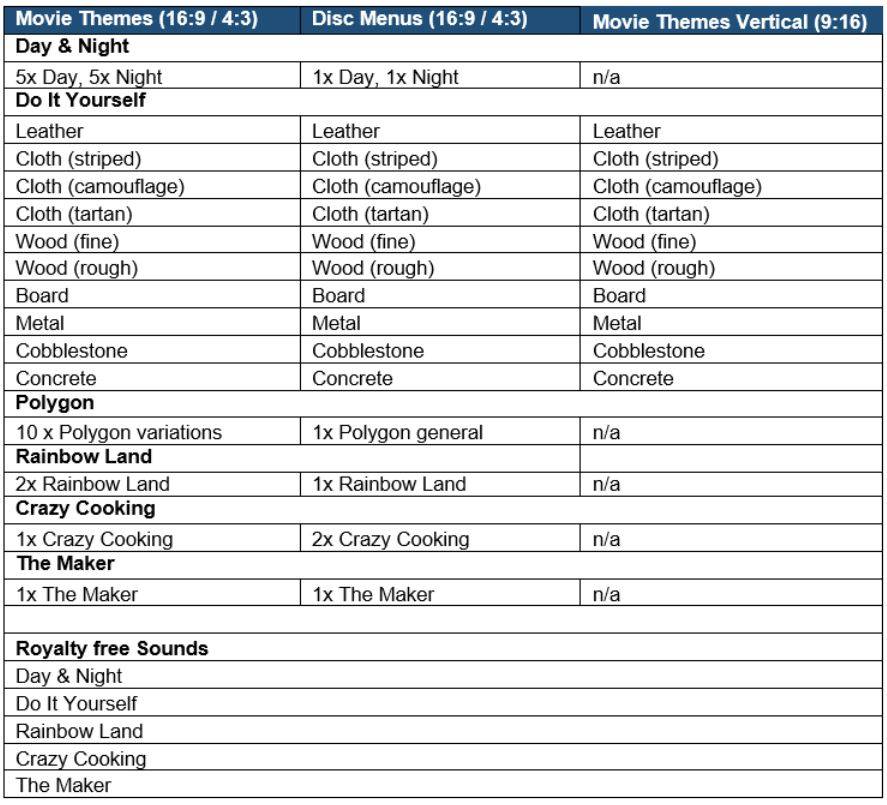
Mit dem neuesten Online-Update erhalten Anwender von Nero Platinum 2019 und Nero Video 2019 ein komplettes Set von 66 hochwertigen Nero LifeThemes PRO, darunter 44 Filmvorlagen, 17 Diskmenüs und 5 neue GEMA-freie Musikstücke – alles kostenlos!
Neue Themen sind Motive für Tag und Nacht, spezielle Do It Yourself Themen, bunte Variationen von Polygonen und vieles mehr. Jede der neuen Filmvorlagen kann als Standardvorlage für die 1-Click Video Story verwendet werden.
Holen Sie sich das kostenlose Update und probieren Sie die Vorlagen aus!
Sie können Fotos und Videos in Nero Video in der Express-Bearbeitung über das FX-Steuerungsfenster oder in Advanced Editing über die Effektpalette und das Eigenschaftenfenster drehen.
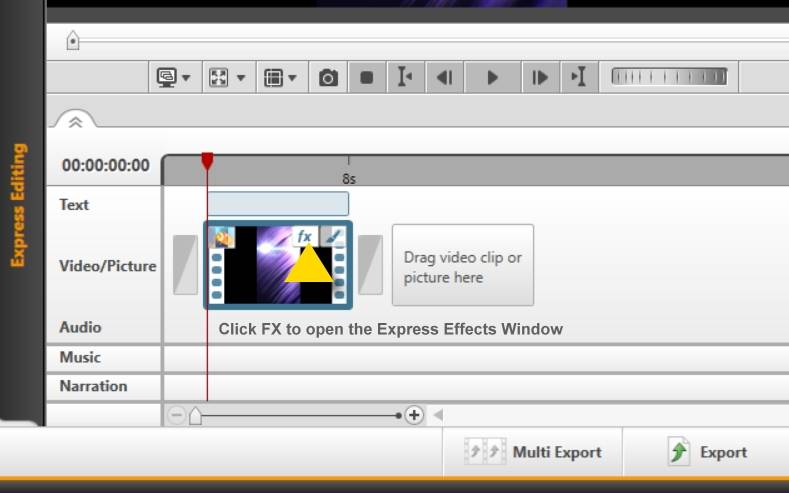
Express-Bearbeitung
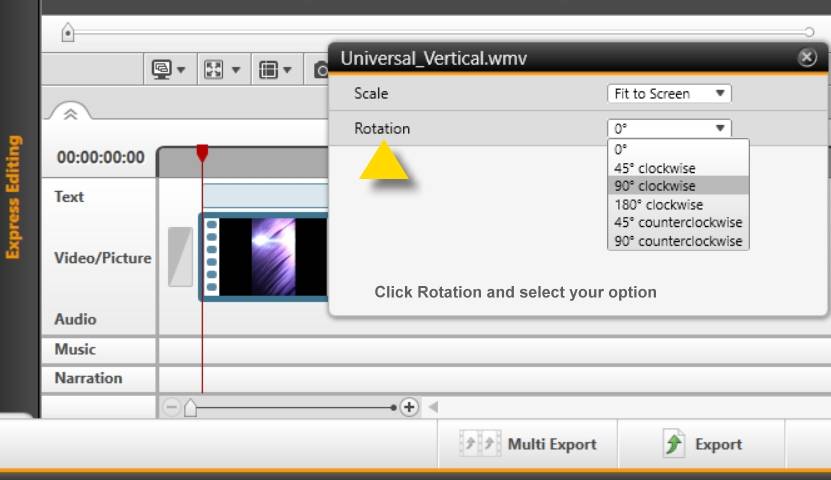
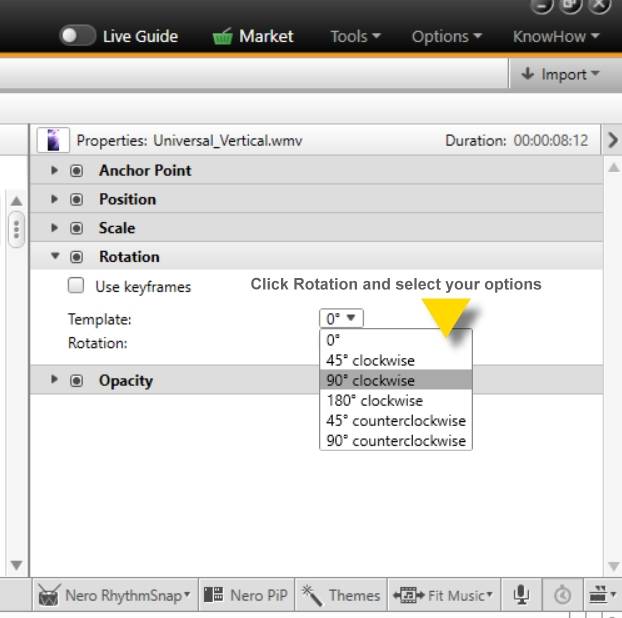
Platzieren Sie Ihren Clip in der Timeline. Bewegen Sie den Mauszeiger über das Miniaturbild. Sie sehen nun zwei Symbole. Klicken Sie auf das FX-Symbol, um das Express-Effektfenster zu öffnen. Klicken Sie auf Drehung und wählen Sie Ihre Option.
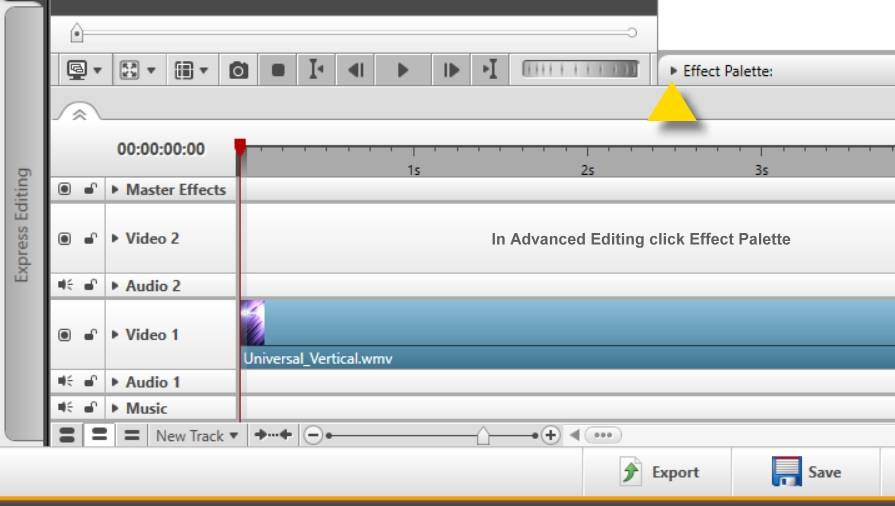
Erweiterte Bearbeitung Platzieren Sie Ihren Clip in der Timeline. Klicken Sie auf die Effektpalette, um das zugehörige Effekt-Eigenschaftenfenster zu öffnen. Klicken Sie auf Drehung und wählen Sie Ihre Option.
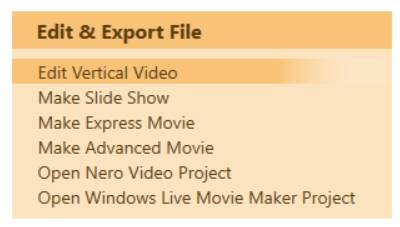
Tipp: Wenn Sie Fotos und Videos mit Ihrem Smartphone im Hochformat aufgenommen haben, können Sie diese auch nativ im Nero Video Vertical Editing-Modus bearbeiten und als vertikales Video exportieren. Gehen Sie dazu zum Startbildschirm und wählen Sie „Vertikalvideo bearbeiten„. Siehe auch Nero KnowHow 00083
Es gibt eine Reihe von Optionen, mit denen Sie Ihre importieren Clips in Nero Video darstellen und in der Vorschau anzeigen können. ‚Meine Medien‘ ist das Schlüsselfenster zum Anzeigen, Vorschauen und Überprüfen aller Ihrer Quelldateien.
Anzeigen Ihrer Clips in ‚Meine Medien‘
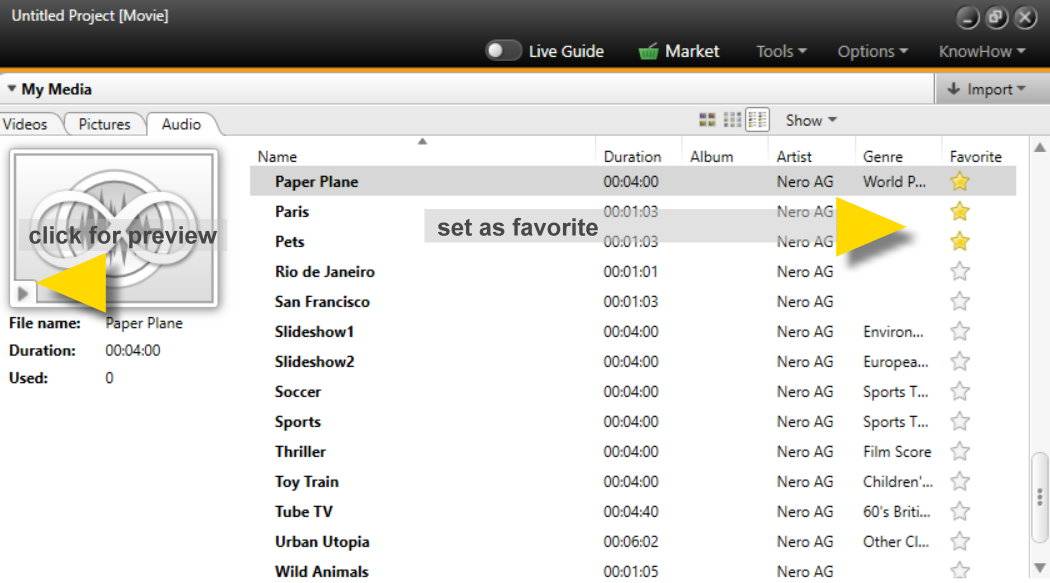
Unter ‚Meine Medien‘ finden Sie drei Registerkarten für die verschiedenen Medientypen: Videos, Bilder und Audio.
Standardmäßig ist dieses Archiv bereits mit einer Reihe von Clips gefüllt, so dass Sie mit der Bearbeitung beginnen können, ohne eigene Clips importiert zu haben.
Was Sie vielleicht nicht wissen, und deshalb ist es umso bemerkenswerter: unter der Registerkarte ‚Audio‘ stehen Ihnen fast 60 GEMA-freie Musikstücke zur Verfügung, die Sie in Ihren Projekten verwenden können (wenn Sie Nero Platinum 2019 besitzen). Diese sind alle von hoher Qualität und können in Ihrem Projekt leicht zur Auswahl vorgehört werden, indem Sie auf ‚Listenansicht‘ klicken, ein Musikstück auswählen und auf die Wiedergabetaste in der Vorschau-Miniaturansicht klicken.
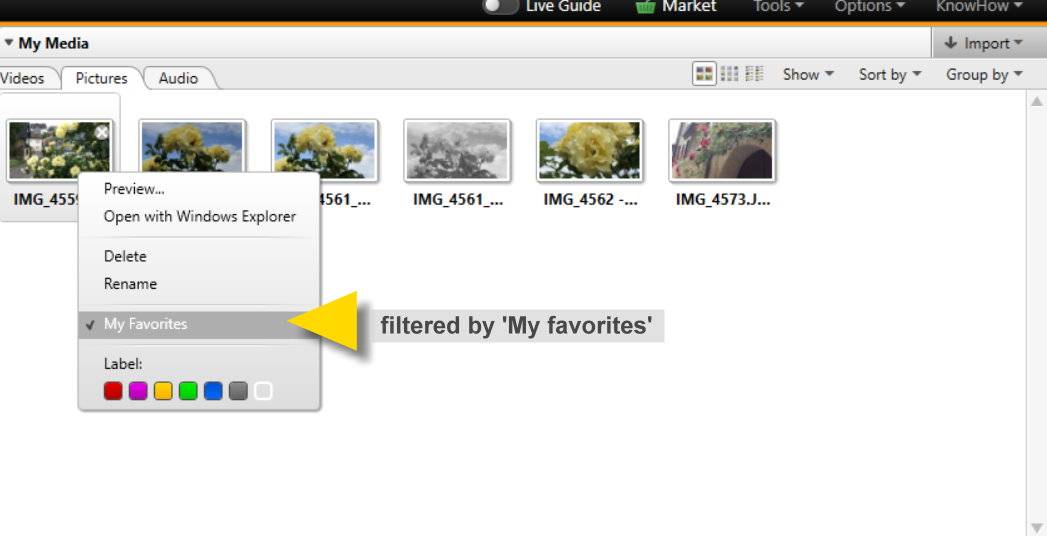
Die Anzeigeoptionen für Listenansicht, Kleine Miniaturansichten und Große Miniaturansichten gelten für alle Registerkarten in Meine Medien, so dass Sie Ihre bevorzugte Option flexibel auswählen können. Auch die Option, einen Ihrer Lieblingsclips als ‚Favoriten‘ festzulegen, gilt für alle Ihre Assets auf den Registerkarten Videos, Bilder und Audio.
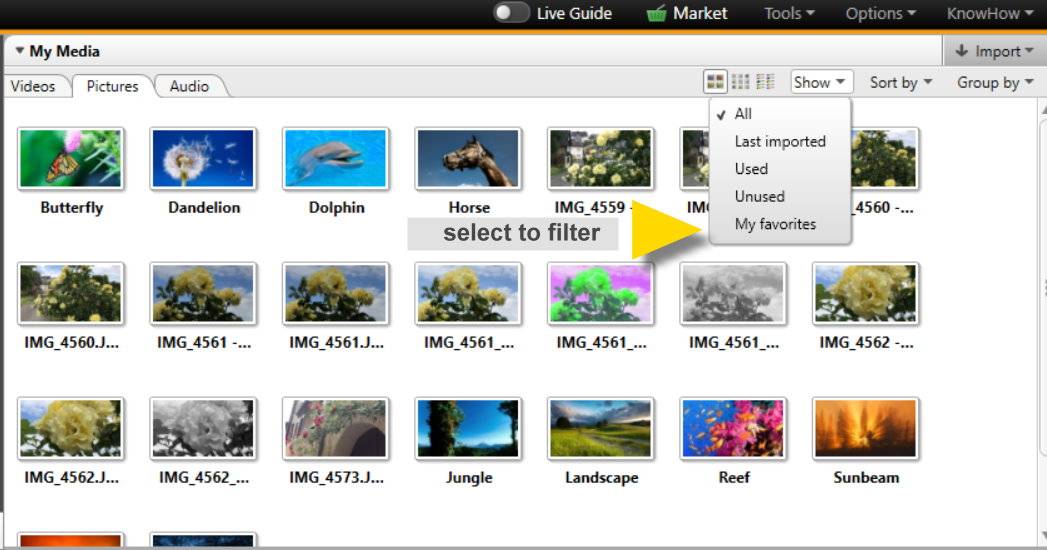
Verwenden Sie ‚Anzeigen‘, um Ihre Medien mit angewandten Filtern anzuzeigen.
Wenn Sie in Meine Medien auf ‚Anzeigen‘ klicken, wird eine Dropdown-Liste geöffnet. Der Standardfilter ist ‚Alle‘ und die bevorzugte Option hängt von Ihrem Projekt ab.
In vielen Fällen können wir davon ausgehen, dass eine gut geeignete Option ‚Zuletzt importiert‘ ist, mit der nur die Clips angezeigt werden, die Sie nach dem Start Ihres neuen Projektes importiert haben.
Sie können aber auch nur Ihre Favoriten oder nur die Clips anzeigen, die Sie in Ihrem Projekt verwenden. Der Filter ‚Unbenutzt‘ kann sehr komfortabel sein, wenn Sie Ihr Projekt abgeschlossen haben und es mit den nur tatsächlich verwendeten Assets speichern möchten. Das Umschalten zwischen den Ansichten hilft für den Überblick.
Zusätzlich haben Sie unter ‚Sortieren nach‘ weitere Sortierfunktionen (Name, Tag, Monat, etc.) um die Auflistung der Quelldateien Ihren Bedürfnissen und denen des Projektes anzupassen.
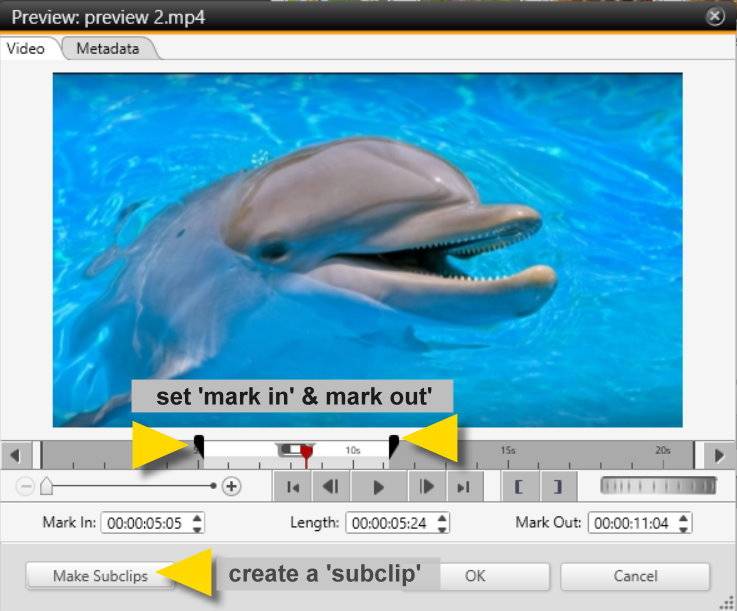
Mit dem Pre-Trim-Fenster können Sie Ihre Assets in der Vorschau ansehen und individuell bearbeiten.
Doppelklicken Sie auf ein Objekt in Meine Medien und das Vorschaufenster wird geöffnet. Dies ist für alle Arten von Medien verfügbar und Sie können die Metadaten für jeden Clip überprüfen, wenn Sie auf die entsprechende Registerkarte klicken (überprüfen Sie z.B. das Dateiformat, das Seitenverhältnis, die Auflösung, den Codec Ihres Quellclips, etc. ).
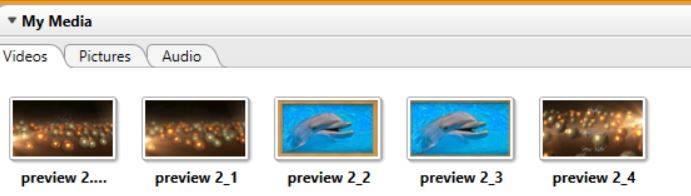
Eine sehr nützliche Funktion des Vorschneidefensters ist das Setzen von ‚Mark in‘ und ‚Mark out‘ und sogar das Erstellen von Subclips Ihrer Assets. Auf diese Weise können Sie Sequenzen Ihrer Clips trennen, noch bevor Sie sie zur Timeline hinzufügen. Jeder Subclip wird als separater neuer Clip in Meine Medien platziert.
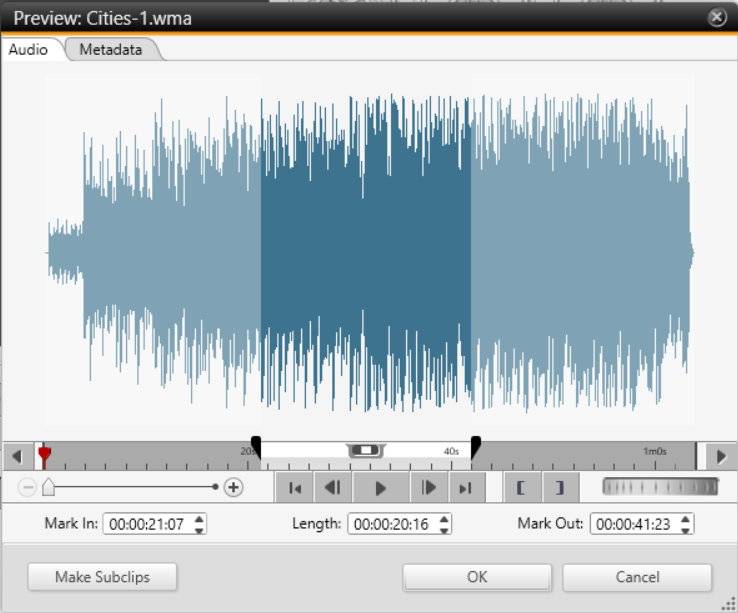
Auch wenn Sie spezielle Sequenzen aus Ihren Audio- oder Musikdateien bearbeiten möchten, bevor Sie sie in der Timeline verwenden, können Sie dies im Pre-Trim-Fenster ausführen.
Probieren Sie es einfach aus, es hilft, Ihre Bearbeitungsabläufe für den Rohschnitt erheblich zu verbessern, zumal alle hier beschriebenen Workflows in der ‚Express-Bearbeitung‘ und in der ‚Erweiterten Bearbeitung‘ identisch funktionieren.
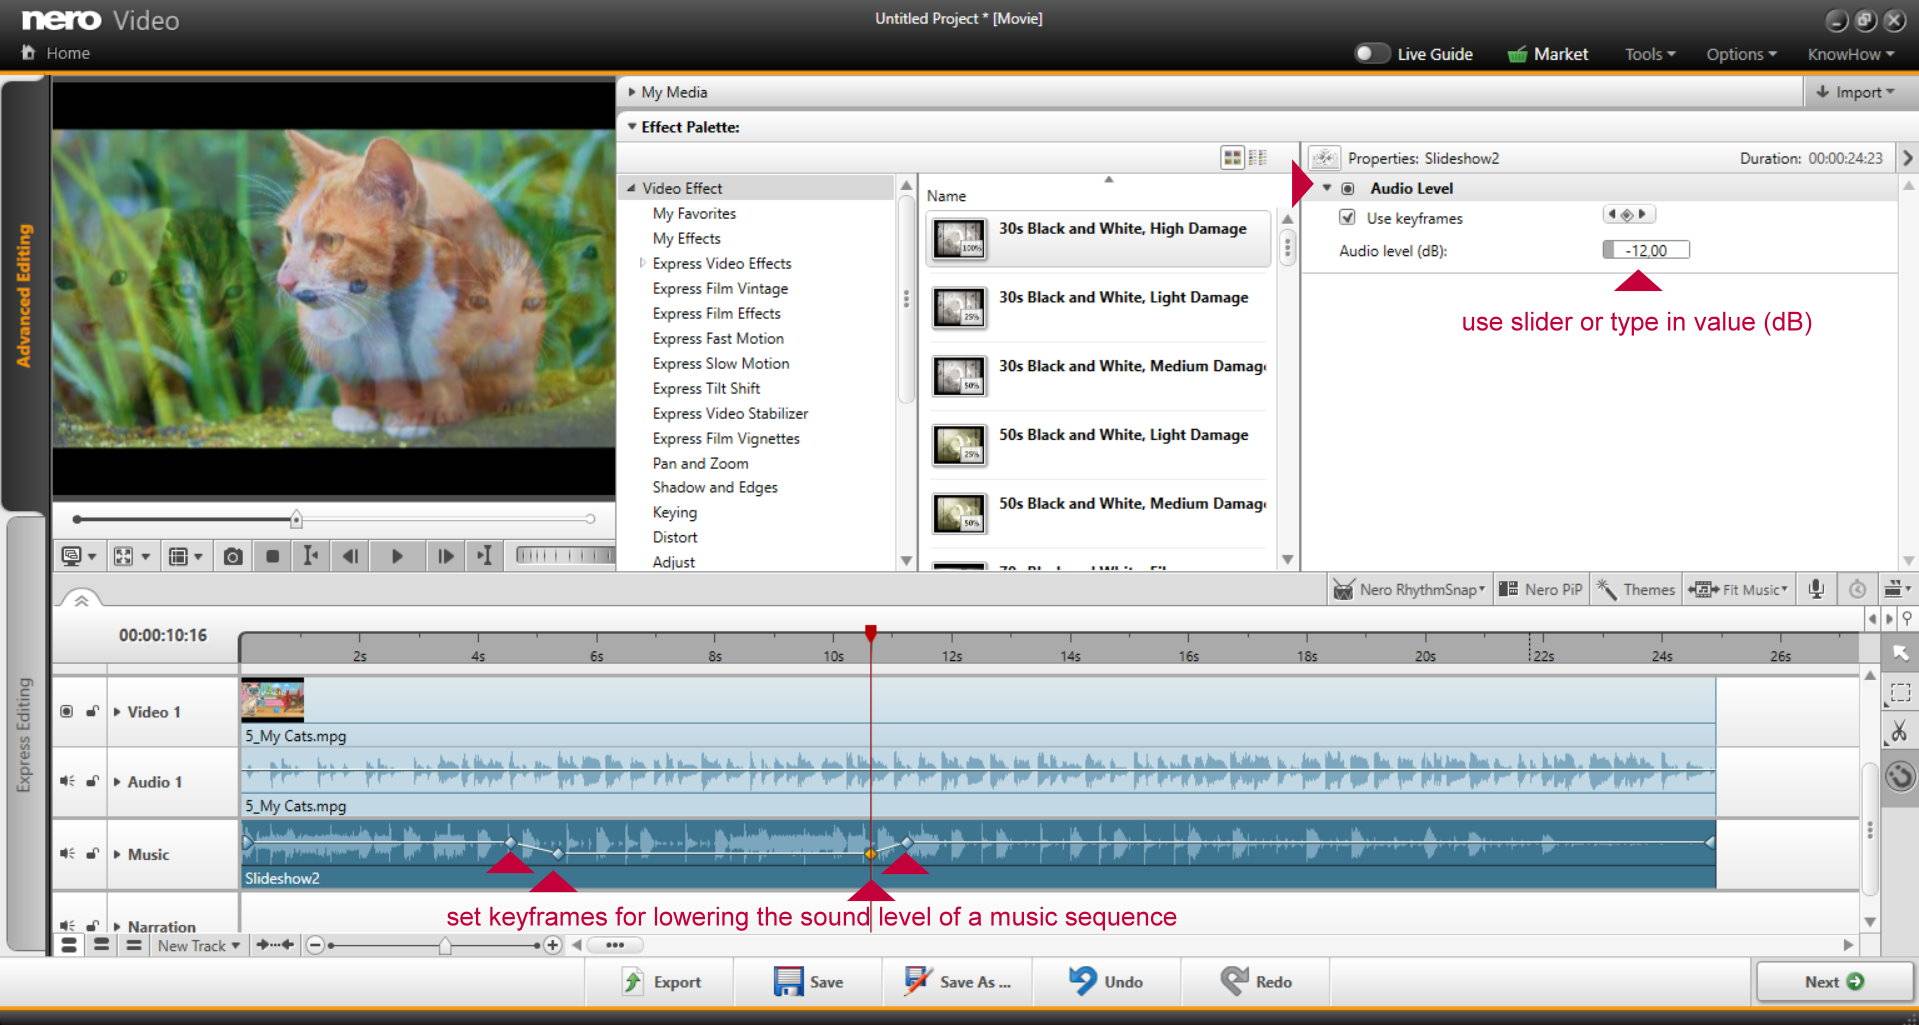
Der Fall, von dem Sie berichten, ist ein sehr typisches Szenario für Interviews, wenn Sie zwei Audiospuren bearbeiten und mischen wollen: eine mit Sprache, die andere mit Musik. In den folgenden Schritten erfahren Sie, wie Sie dies in Nero Video ausführen können.
Gehen Sie in den erweiterten Bearbeitungsmodus. Im folgenden Beispiel haben Sie zwei Spuren parallel (eine mit Musik, eine mit Sprache).
Wechseln Sie zur erweiterten Timeline-Ansicht, um die Wellenformen Ihrer Clips anzuzeigen
Wählen Sie den Track aus, den Sie bearbeiten möchten
Gehen Sie zur Effektpalette und zum Eigenschaftenfenster für Ihren Clip
Klicken Sie auf das Dreieck links neben‘ Audio Level‘, um den dB-Wert zu sehen
Verwenden Sie den dB-Schieberegler, um die Lautstärke pro Spur zu verringern oder zu erhöhen. Sie können auch z.B. -6dB eingeben, wenn Sie die Lautstärke um die Hälfte reduzieren möchten.
Tipp: Sie können auch Keyframes festlegen (bei Auswahl von ‚Keyframes benutzen‘), mit denen Sie Sequenzen mit unterschiedlichen Lautstärkeeinstellungen über die Zeitachse durchführen können. Dies ist sehr praktisch, wenn Sie Musik und Sprache in Schnittsequenzen von Interviews anpassen wollen.


 Zusätzlich haben Sie unter ‚Sortieren nach‘ weitere Sortierfunktionen (Name, Tag, Monat, etc.) um die Auflistung der Quelldateien Ihren Bedürfnissen und denen des Projektes anzupassen.