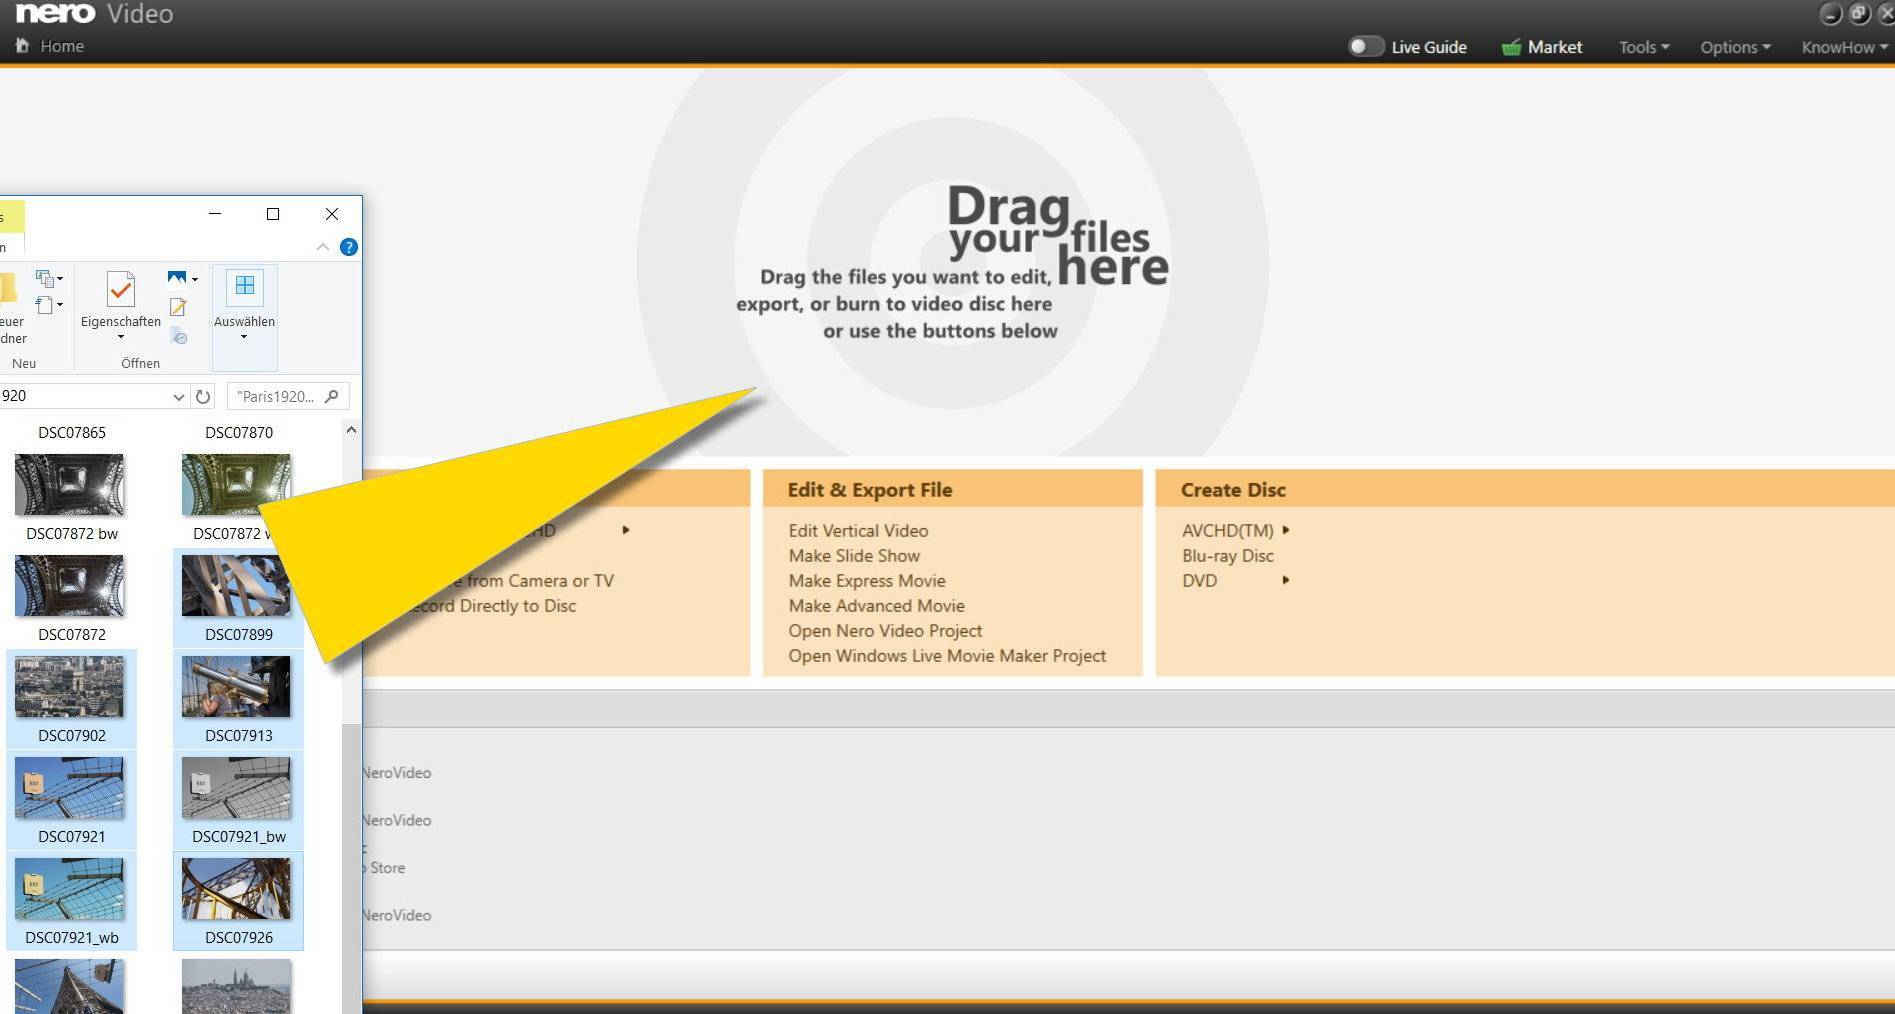
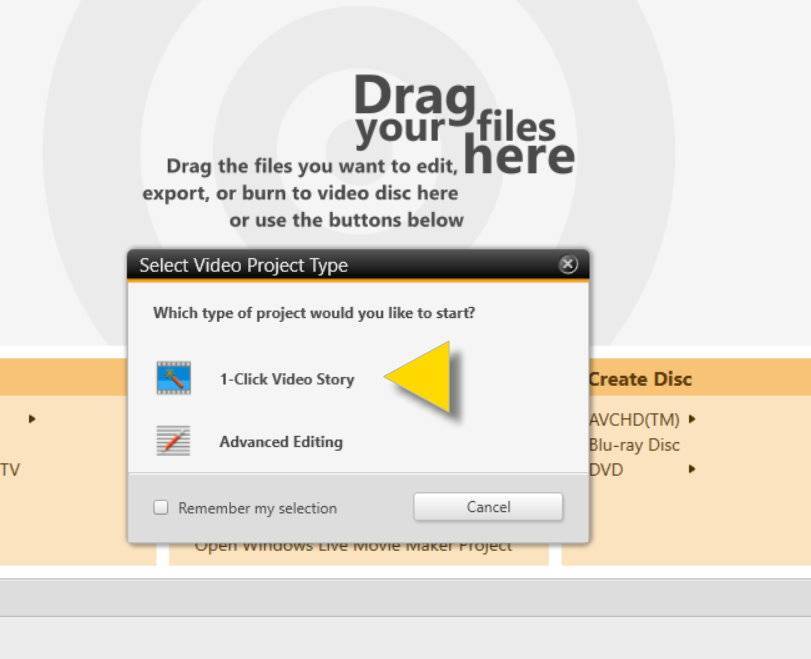
‘1-Click Video Story’ is a comfortable way to create professional slideshows and movies just via drag & drop, and one click, only. From Nero 2019 the feature is accessible via the drop zone in Nero Start and via the drop zone in Nero Video.
This unique feature helps creating polished movies and slideshows in a snap. Simply drag & drop photos and videos to the drop zone in Nero Video and select ‘1-Click Video Story’. All files will automatically be loaded into a pre-designed video project complete with intro and outro sequence, effects, captions and matching music. Simply preview the video project, export, and share it.
‘1-Click Video Story’ works with landscape footage (TV) as well as vertical photos and videos (smartphones). So, if you drag only vertical footage into the drop zone, Nero Video will automatically load your project into a vertical video project. If you drag & drop just landscape or mixed footage (landscape and vertical), Nero Video will open a TV landscape project and automatically remove the black bars in your vertical footage.
Tip: By default ‘1-Click Video Story’ uses a preloaded template. However, you have an easy option to use any of the theme templates in your product as your favorite personalized template for ‘1-Click Video Story’. For more details, see Nero KnowHow 00140.
From Nero Platinum 2019 ‘Nero DuplicateManager Photo’ comes with the new mode ‘find similar images’. Now it will find files with similar images fast and reliable. For your convenience, similar images will be automatically categorized into categories and you can select to keep or remove images based on your personal preferences.
How does this work and what do the categories tell me?
‘Nero DuplicateManager’ will analyze all the photo content that you have selected for analysis in the home page via the add function. When you have added one or several folders (even a complete drive) for duplicate detection click on ‘next’.
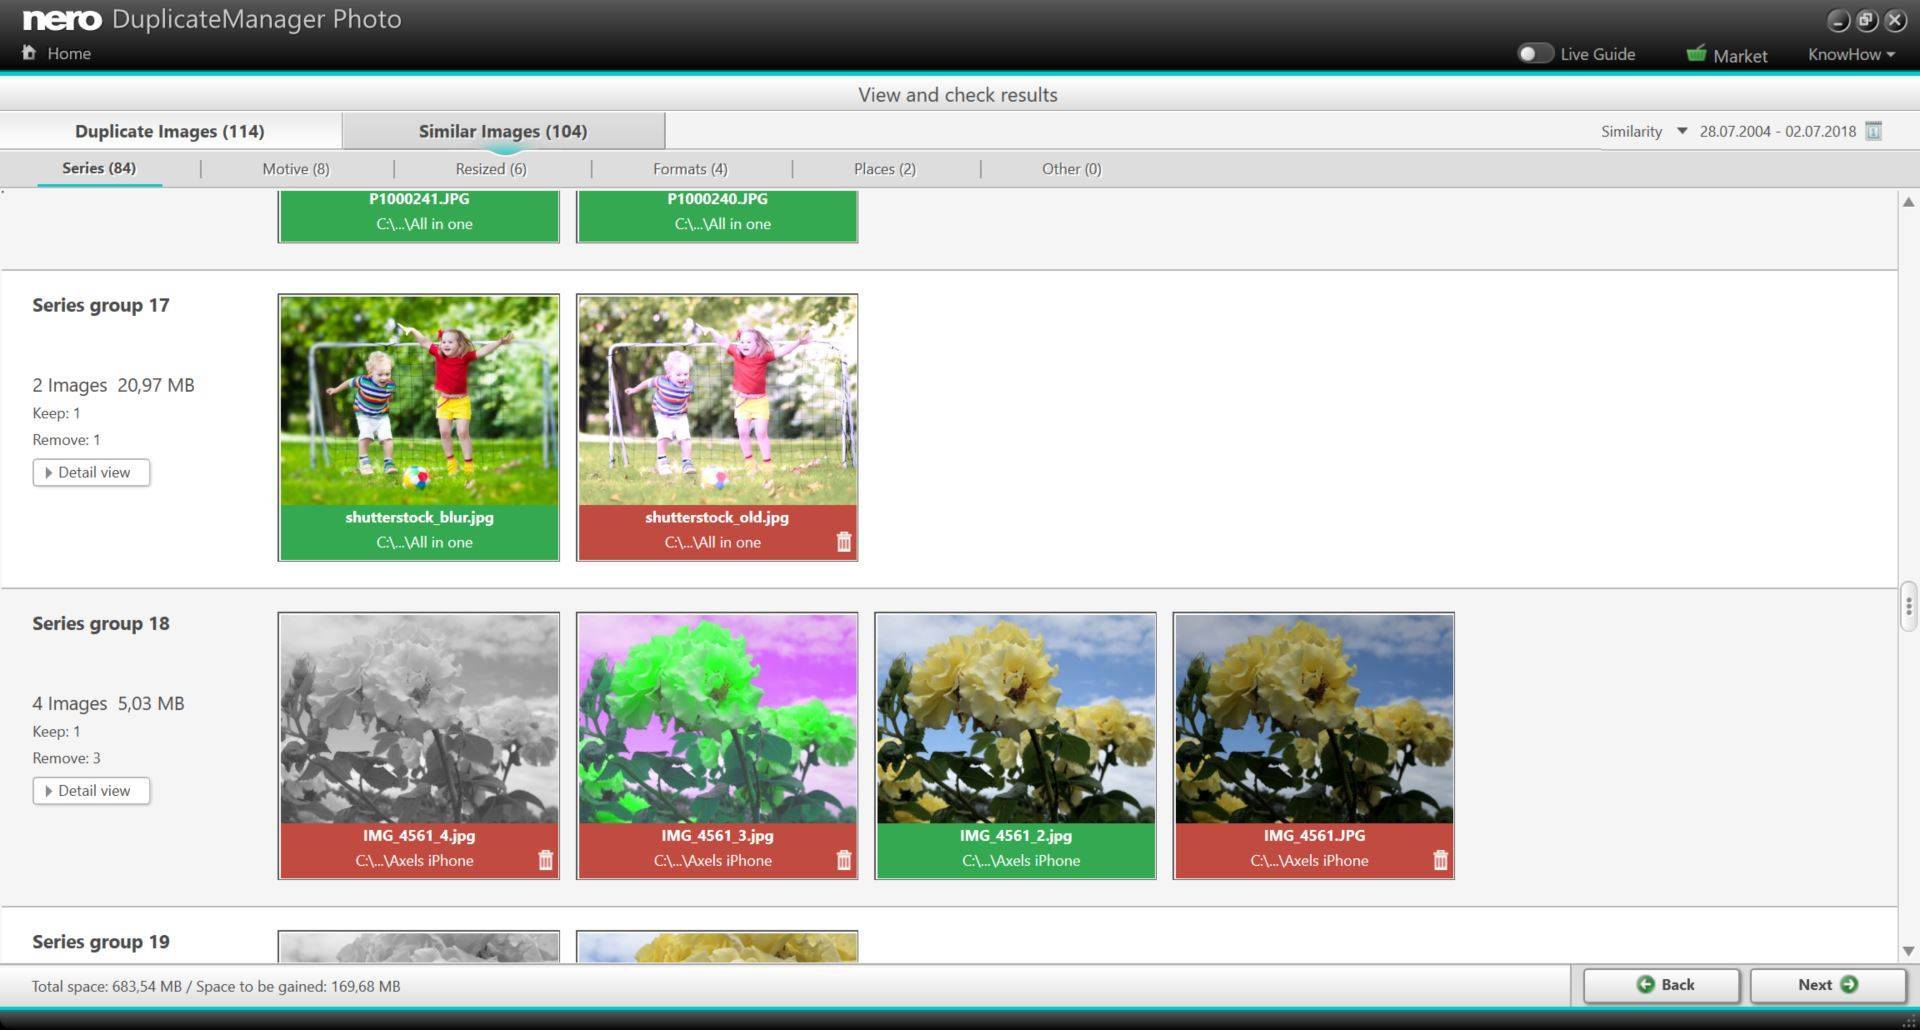
Now ‘Nero DuplicateManager’ will detect your exact duplicate images first and provides recommendations what is save to delete. The pre-selected red color at the bottom of the thumbnails indicates this.
In a second step, it will identify images that have a common source but have gone through different variations on your system over time. In this ‘Similar Images’ mode Nero DuplicateManager cannot and will not give recommendations what is save to delete, as the decision must be done by yourself.
The category tabs ‘Places’, ‘Series’, ‘Motives’, ‘Resized’, ‘Format’, and ‘Others’ already give a clue as to what the detected similar images relate to. When the detection for similar images is finished, ‘Nero DuplicateManager’ will list the categories in the order of the number of detected images per category displayed on the respective category tab. So, if most of your images are related to series shots, you will find the category ‘Series’ on the left hand side tab to start with.
Similar images – ‘Places’
Imagine you went on vacation and you have done many shots in different locations with the geotagging function switched on in your smartphone. E.g. if you went to a museum you may have done shots within a range of maybe 0.5 kilometers over some hours. For sure, there are shots with very similar content and shots sizes, especially when your wife and kids did more or less the same shots on their smartphones in the same location. Now, when you have imported all of the assets to your PC system, you will find many images that look very similar, although they are no exact duplicates.
‘Nero DuplicateManager’ makes it easy for you only keeping your favorites. The deleting can simply be assigned by hovering over the image and selecting the red basket icon, after which the indicator at the bottom of the thumbnail turns to red color. Simply undo this via the green thumb icon, after which the bottom of the thumbnail turns to green color, indicating that you want to keep this image.
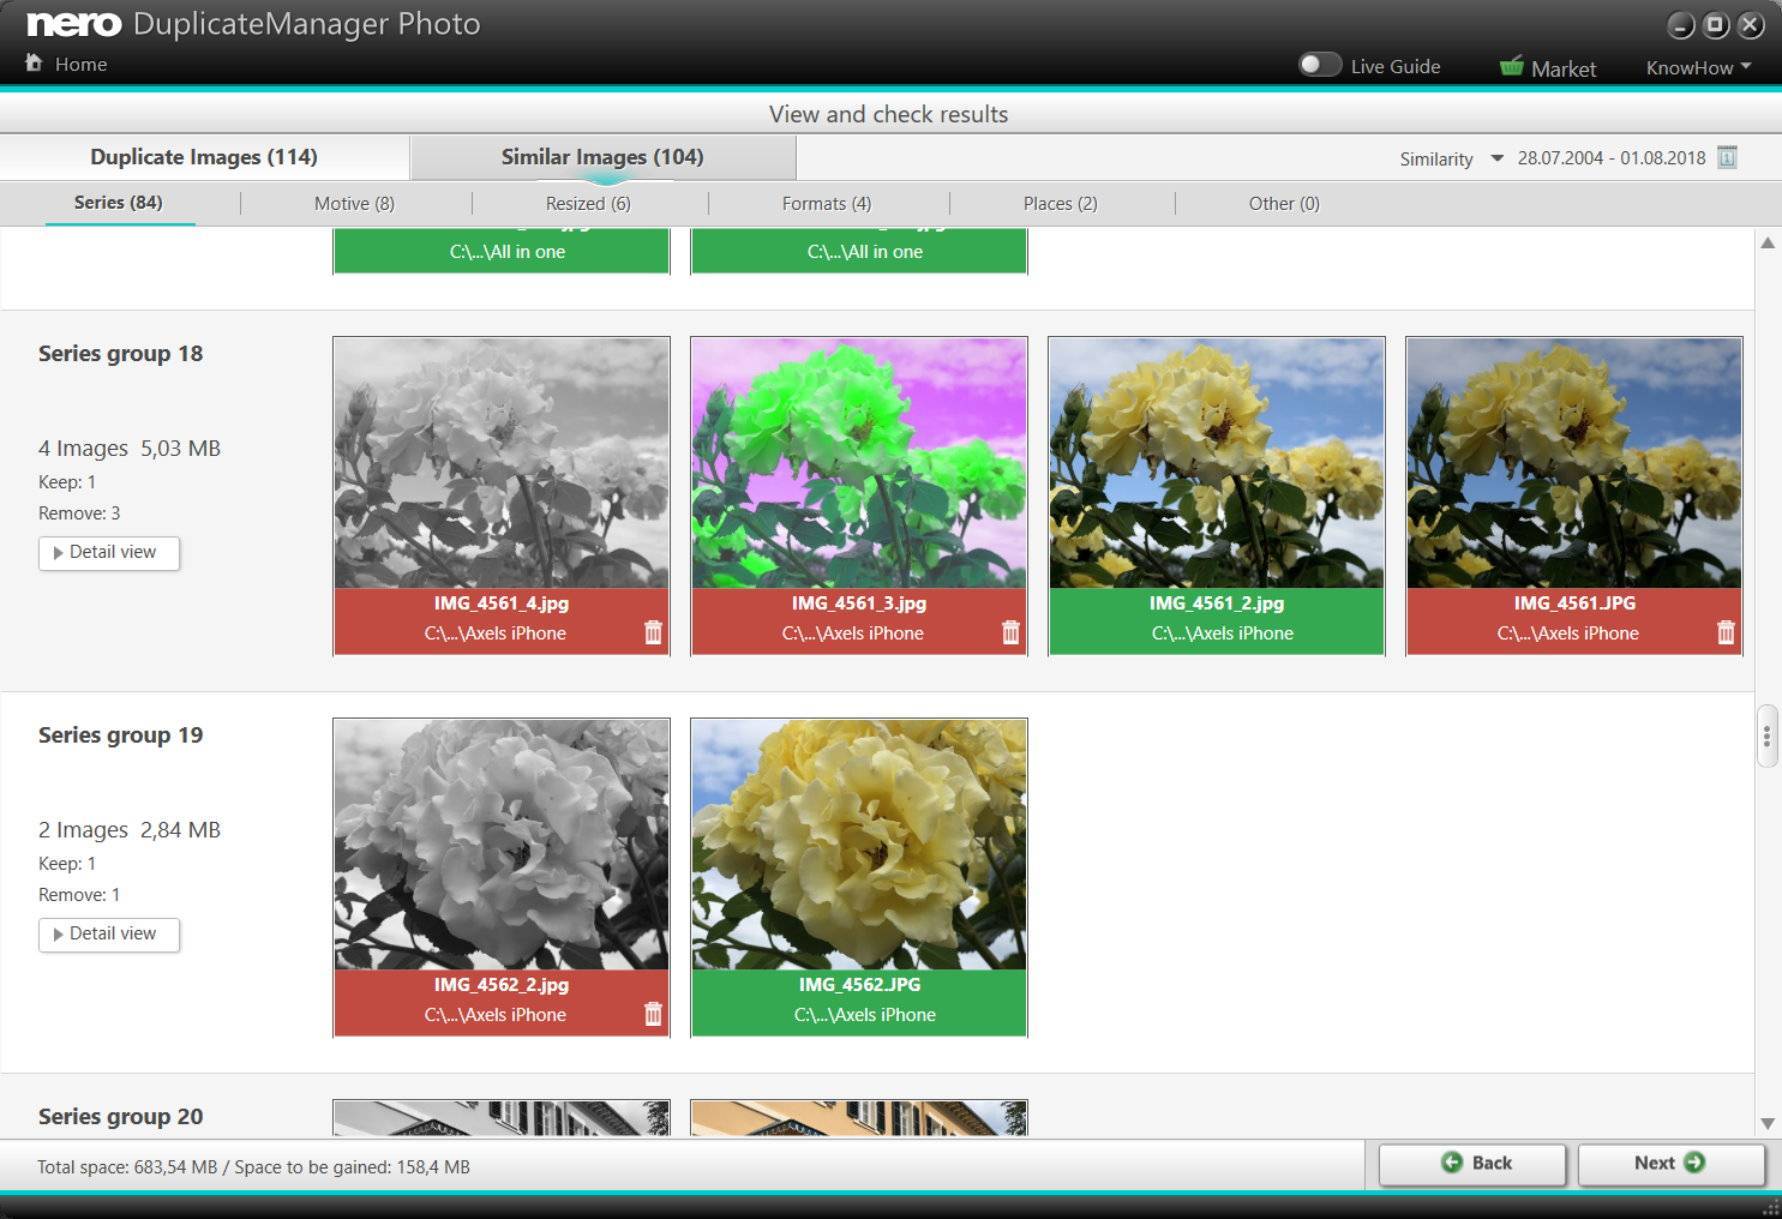
Similar Images – ‘Series’
Today, almost all smartphones or camera devices have an option to do HDR series shots, where images with lower, higher, and medium aperture per shot merge into one HDR image, which has more contrast and detail. If you did not deselect the option to keep the source files together with the HDR shot, you will end up with a number of almost identical images that just have different aperture values.
Another case related to a fast sequence of series shots is doing bracketing shots. Just press the record button longer, and your device will create a series of almost identical shots over the time you press the button.
For both cases, Nero DuplicateManager will collect these images under the category ‘Series’.
Just select your favorites (green) and free yourself by simply deleting (red) the rest.
Similar images – ‘Motive’
You might have done shots of your kids or friends in the same circumstances or location over a given time that have very similar shot sizes, and motives but do not qualify for series shots or places (no GPS data). Such images will be sorted into the ‘Motive’ category. As with the other cases, in here, you also have options for modifying similarity and time settings.
Similar Images – Resized
I guess you also have made the experience to downscale large images occasionally, just by reducing the resolution, e.g. if you want to put them into a ‘PowerPoint’ slide deck, or share them via mail attachment / via social media. ‘Nero DuplicateManager’ detects these images and provides concrete information on the image preferences e.g. resolutions via the ‘Details’ button. Now it is easy just keeping what you like to keep when cleaning up your image archive. As a rule of thumb, we recommend always keeping the image with the highest resolution. This will be your original shot with the best quality, in most cases.
Similar Images – ‘Formats’
As a matter of fact, images come in different formats. Imagine you have exported the same image from a photo editing project once as a PNG to make use of the alpha transparency in your video editing project, or just exported it as a JPEG for sharing. There are different reasons why you export and convert images to different formats with the same content. ‘Nero DuplicateManager’ detects different image formats with the same content in the category ‘Formats’. Just decide what you want to keep (green) or delete (red).
Similar Images – Other
Any detected image that does not fall into one of the above categories lists under ‘Other’.
Similar Images – Options
In most of the above cases, you can define the number of detected images more precisely by adding a special time (day, hour) or change the similarity slider from low to high.
Exact and Similar Images – Overview
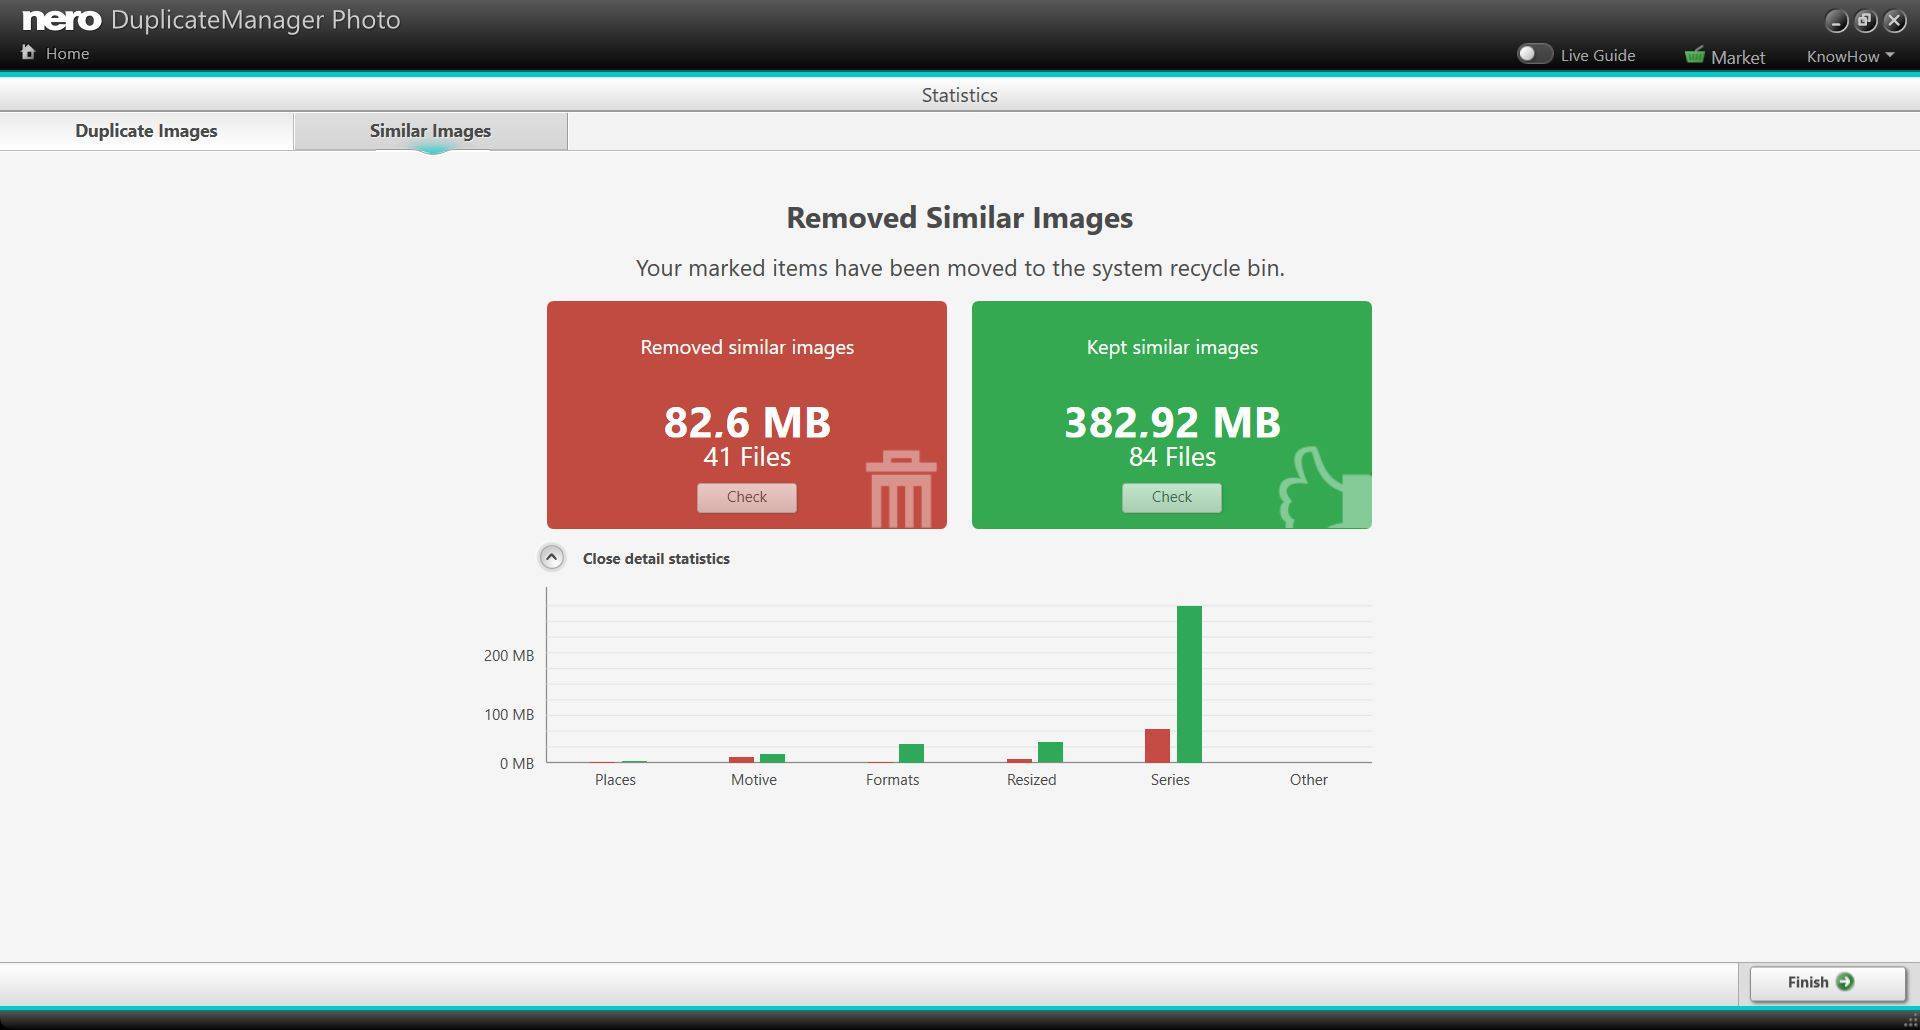
When you have selected the images, you want to keep or delete, click next and the images will be put to the recycle bin. You can restore these from within the application – so, no worries!
Both tabs ‘Duplicate Images’ and ‘Similar Images’ will give an overview of what was deleted or kept.
The similar images tab also has a detailed statistics view visualizing the categories. This is very helpful for checking what you deleted and kept, and where you might want to come back to at a later point.
Got lost with all the duplicated and similar photos in your PC photo archive due to photo editing and HDR image import from your smartphone?
From Nero Platinum 2019 ‚Nero DuplicateManager Photo‘ comes with the new mode ‘Find similar images’. Now it will find folders and files with similar images fast and reliable. For your convenience, similar images will be automatically categorized into places, series, motives, resized, format, and others and you can remove images based on your personal preferences.
Tip!
For further information on categories in Nero DuplicateManager Photo, please check Nero KnowHow 00133
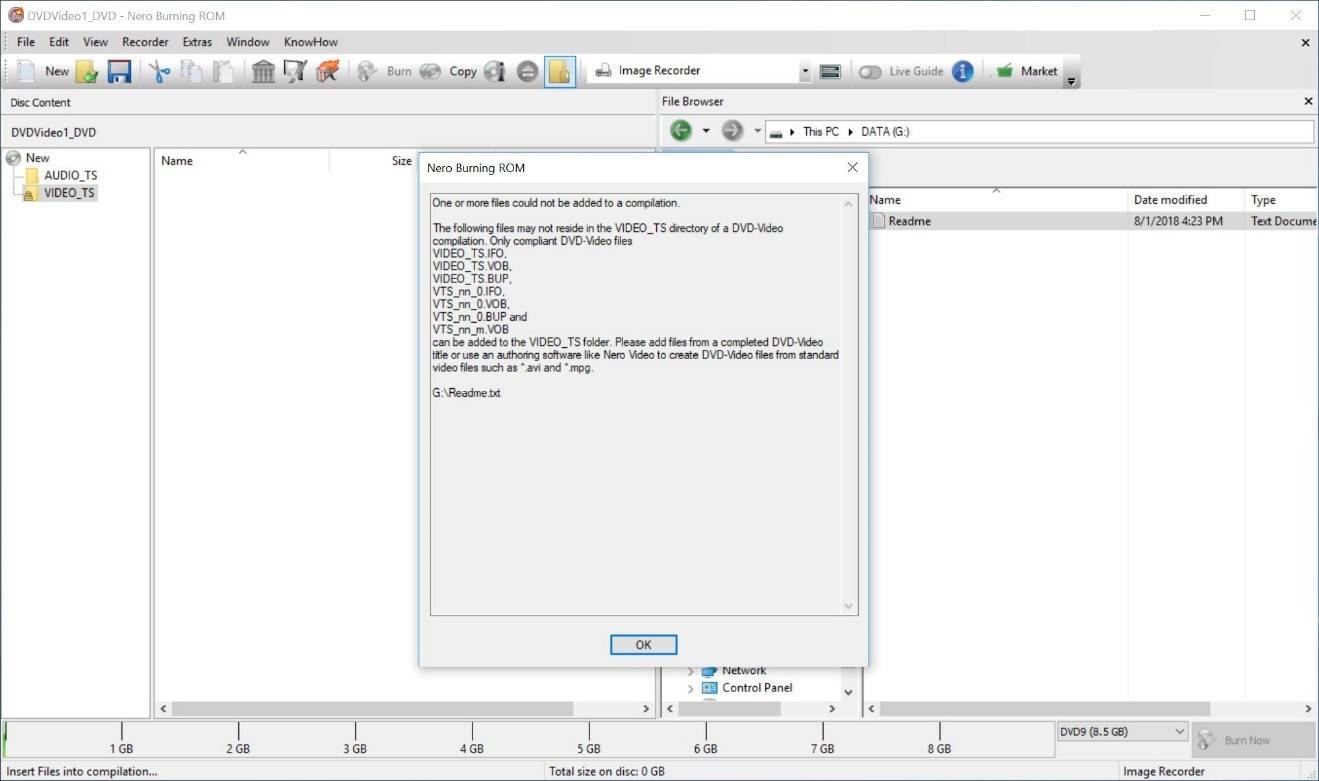
When editing disc compilations, Nero Burning ROM checks if files added to the disc compilation are available and comply with the given disc compilation type. If the files are not compliant with the selected disc compilation, they cannot be added. For example, if you add a .txt file into the DVD Video Disc folder “VIDEO_TS”, the below message dialog will pop up, and only the compliant files will be added to the disc.
The below typical types of compilations will check for compatible files:
Audio CD
CD EXTRA
DVD-Video
AVCHD(TM)-VIDEO for DVD Disc
BDMV-Video
AVCHD(TM)-VIDEO for Blu-Ray Disc
What can I do if such message dialog pops up?
Check the information in the message box. It will show details about the compliant files or folders for the disc
In the bottom of the message dialog you will see the file path list for non-compliant files and folders
Save and exit the compilation editing. This can help you continuing the compilation editing next time
Create disc compliant files, first by using other Nero applications like Nero Video, Nero Recode, etc.
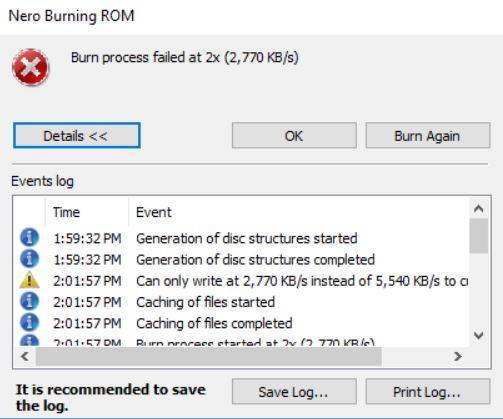
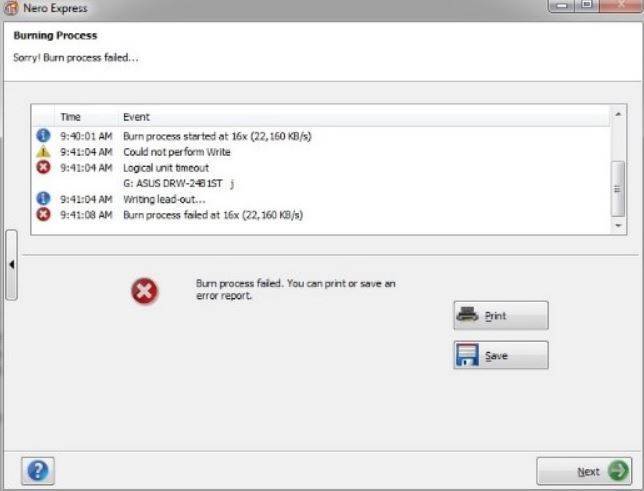
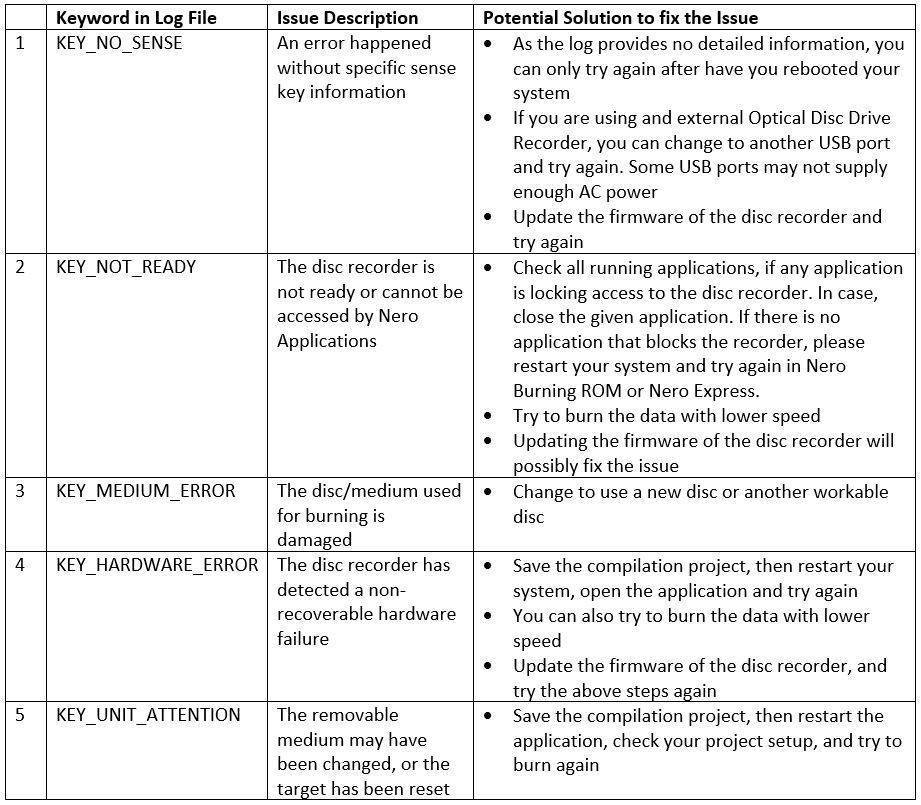
While using Nero Burning ROM or Nero Express for burning content to a disc, you may come across the error message ‘Burn process failed …’.
So, what does these errors mean and how to fix the related issues?
In the whole burning process of Nero Burning ROM or Nero Express, the given application will do different checks to make sure that the burning related operations do not fail. These will be:
checking device(s)
checking the medium
checking disc erase or similar operations
If any critical error happens (like the disc/medium is broken, the disc recorder cannot be accessed, etc.) and the application cannot fix or recover the given issue, such an error dialog will pop up in the application.
As the dialog will indicate and show in detail within the message box, most of the typical cases are related to the fact that the disc/medium is broken or the disc speed for burning is not working correctly. So, in many cases putting a new disc into your disc recorder and clicking the button “Burn Again” will solve your issues. The disc speed issue can probably be solved by updating your firmware.
Still there are some situations when the above mentioned solutions cannot resolve your issue. For such cases it is meaningful to do a deeper check via the application log file.
For creating a log file, in Nero Burning ROM please click the button ‘Save Log…’ or ‘Save’ in Nero Express, within the respective message box .
In the exported log files, you can find some keywords.
Below table lists some of the most important keywords that you can check based on the provided solutions, here. This may help fixing your issue.