The recommended way to restore a backup done with a previous version of Nero BackItUp is to install this particular version again and to use it for the restore. This approach ensures maximum compatibility and highest success rates. Older versions of the software can be downloaded here: https://www.nero.com/eng/downloads/previous-versions/
Additionally you will need your serial key to enable the software. You might still have it on your PC, in your emails or on the CD/DVD cover of a previous purchase.
If the above doesn’t work in your case, there are another two options.
To differentiate between the two, please make sure to have enabled file name extensions in your Windows Explorer.
Go to “Windows Explorer”
Click “View”.
Make sure the checkbox beside “File name extensions” is checked.
Now your backup files will have a dot and a three letter extension at the end. e.g. MyBackup.nco.
For files with the extension .nco you can try to open them with the latest version of the free tool 7-Zip https://www.7-zip.org/download.html
For files with the extension .nba and .nda please install the trial version of the latest Nero BackItUp product from here: https://www.nero.com/eng/downloads/
Go to “Nero BackItUp”.
Click on “Restore”.
Go to “Browse”.
Click on “Local Sources”
Select your backup files.
If no error is shown after selecting the files, it is highly likely that Nero BackItUp will be able to restore the files after purchase.
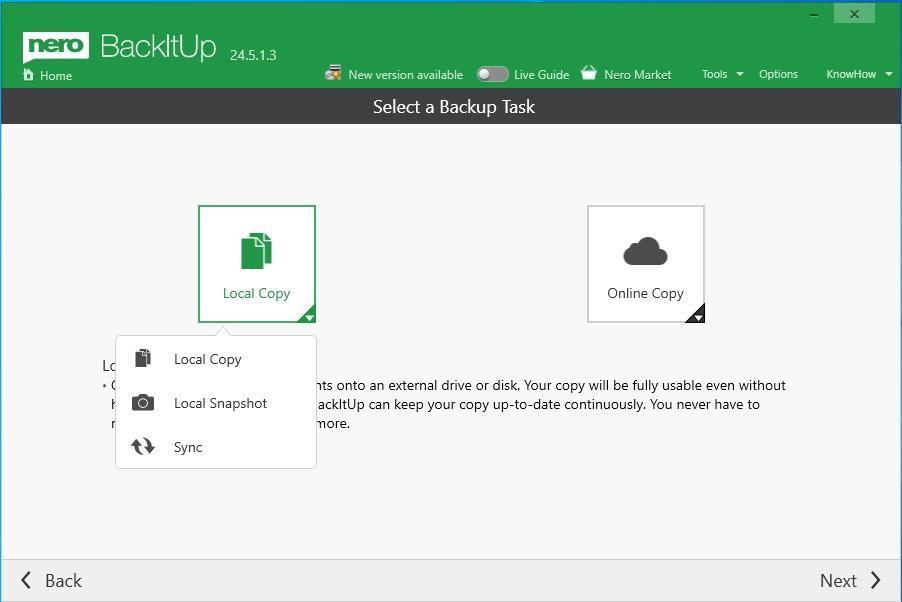
Q: "I have a dedicated external hard drive to keep all my photos as a backup, because they are precious to me. Please recommend me a USB auto backup software which supports automatically backing up new files to my external backup hard drive when I plug it in. Every time when I want to copy the new photos from my computer to the backup drive, I have to find them out first and then copy them down, which is very troublesome."
Are you willing to automatically backup, sync or copy files when the USB external backup drive plugged in? With a simple setup, Nero BackItUp can help you do just that!
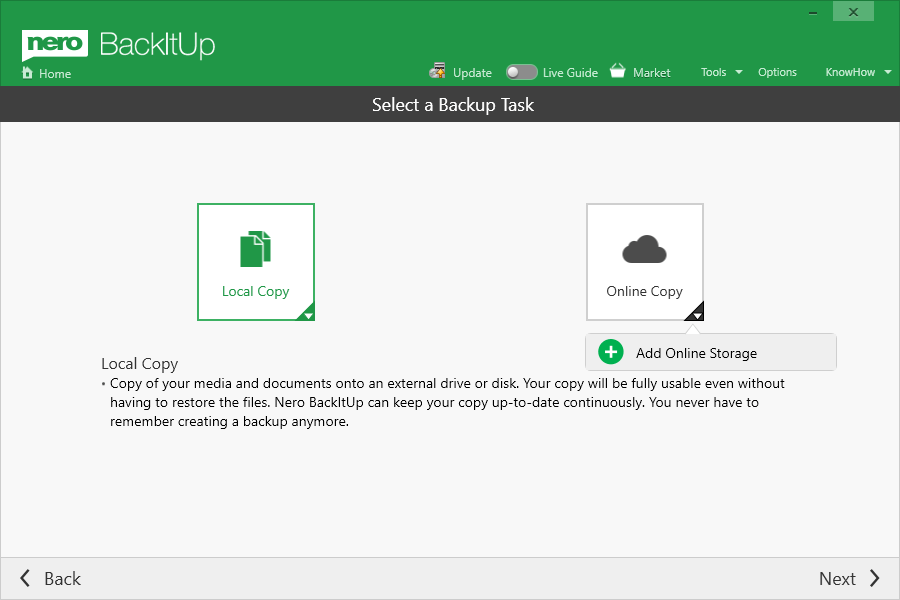
Step 1: Select a backup task
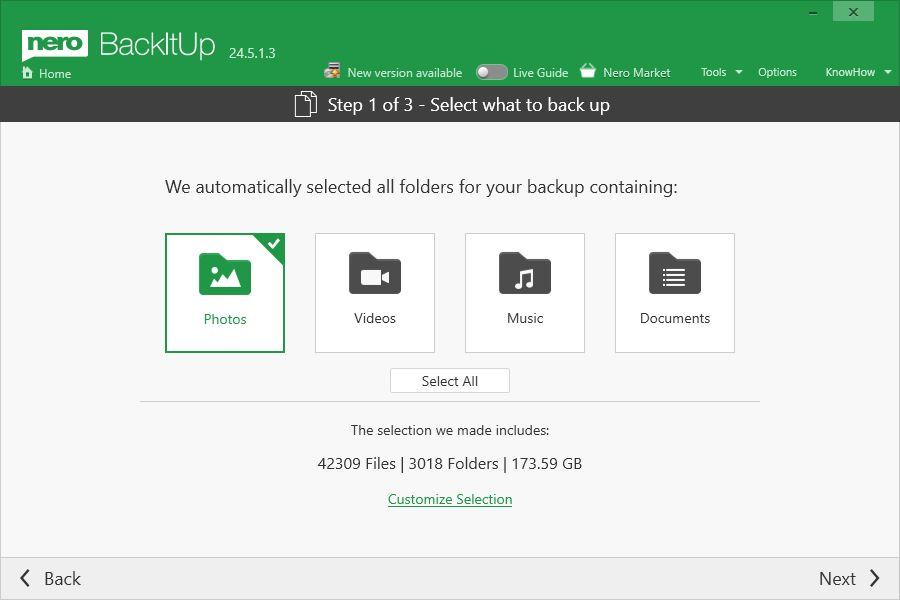
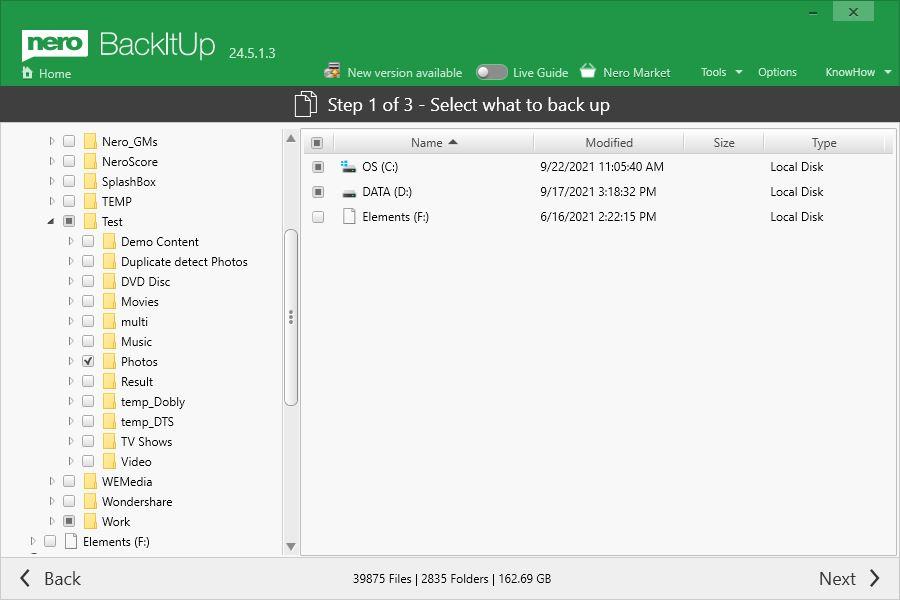
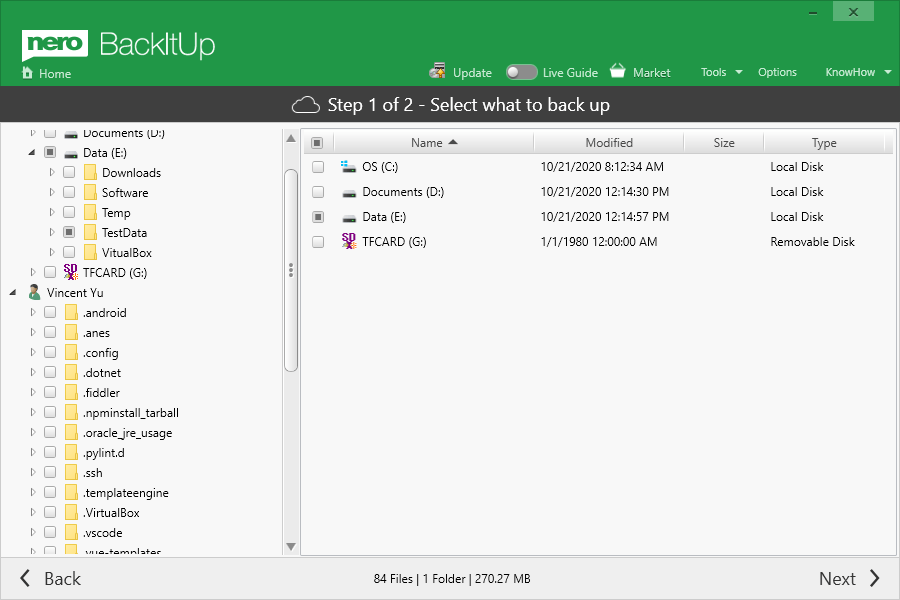
Step 2: select what to backup
If you only want to backup all photos, you can select the ‘Photos’ as the media type. You also can customize the dedicated source folder in ‘Customize Selection’.
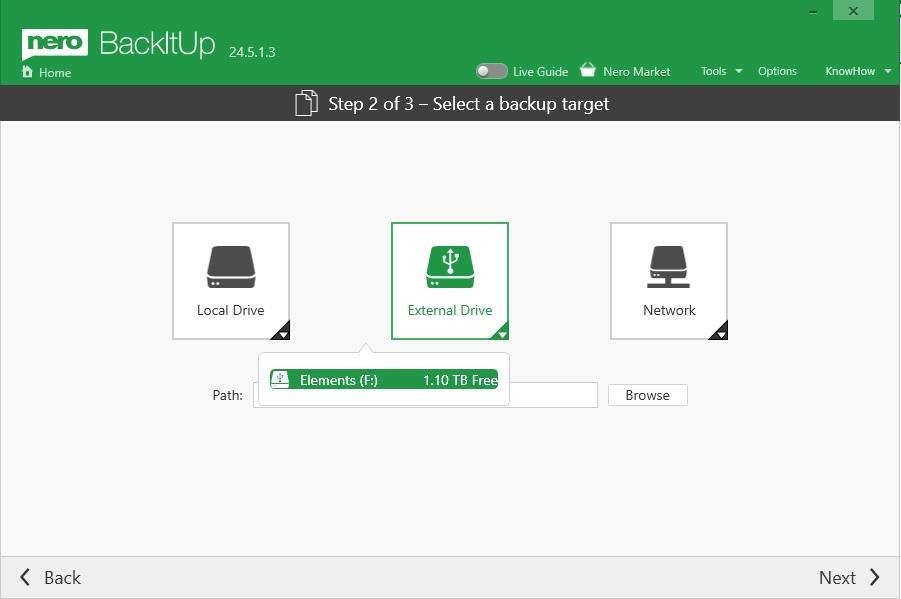
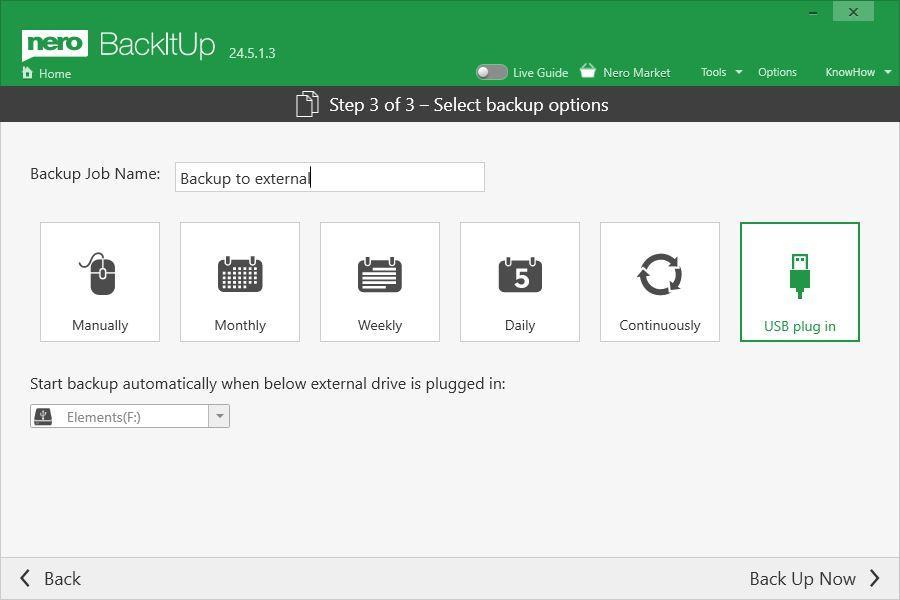
Step 3: Plug in your dedicated external backup drive to your PC and select it as the target
Step 4: From Nero BackItUp 24.x or higher version, you will find a new backup option – ‘USB plug in’. Please select it as the option.
Start back up now.
In the future, every time you plug in your external backup drive, the backup task you set up will start. You don’t need to worry about selecting files to copy or forgetting to start backups anymore. Enjoy!
Of course, you also have the flexibility to set backup task types, file types, etc. according to your actual situation.
In the earlier stages of Web development, users were only able to read or view content on the web. Obviously, somebody had to create or write the content offline before uploading it. But it was not possible back them for users to connect to Web servers, open documents, and then edit them online like the way we do now.
Noticing the potential of the internet for remote collaboration applications like distributed content authoring, where multiple authors could work together on the same document type even while writing from different parts of the globe, an IETF team was formed to create extensions to Hypertext Transfer Protocol (HTTP) that could allow such applications.
What is WebDAV? WebDAV (Web Distributed Authoring and Versioning) is an extension of the Hypertext Transfer Protocol (HTTP) that allows clients to perform remote Web content authoring operations. (https://en.wikipedia.org/wiki/WebDAV) Since it was an HTTP extension, WebDAV is normally served via port 80 for the HTTP connections and port 443 for the HTTPS connections. Secure Sockets Layer (SSL) is used to encrypt the WebDAV HTTPS connections, which makes them ideal for confidential documents.
And a Web Distributed Server or a WebDAV server that allows remote content editing and reading. It runs on the WebDAV protocol that enables users to change, create or move files on the server. If you are using a WebDAV server for file storage on your local network, you can be able to continue working on your documents before uploading them into the webserver.
WebDAV Directories
WebDAV directories are analogous to the file system directory. An index is necessary to view the documents on the server. Every file in the directory bears a URI with the directory URI as the prefix. The documents also have the WebDAV root as the prefix.
WebDAV Server URIs
Directories are usually stored as property documents in a server database. The directory will have a URI ending in a forward slash (/) sign.
What is a WebDAV Server Root Directory?
WebDAV servers often have a concept of a root. This is the highest-level directory that can be accessed from the server. The root functions as a prefix for the documents and directory URIs in the WebDAV server. The root could be any URI always ending with a forward slash (/). All the files accessible via the WebDAV server need to have URIs beginning with the root. In the same case, documents created via a WebDAV client must have URIs starting with the WebDAV root.
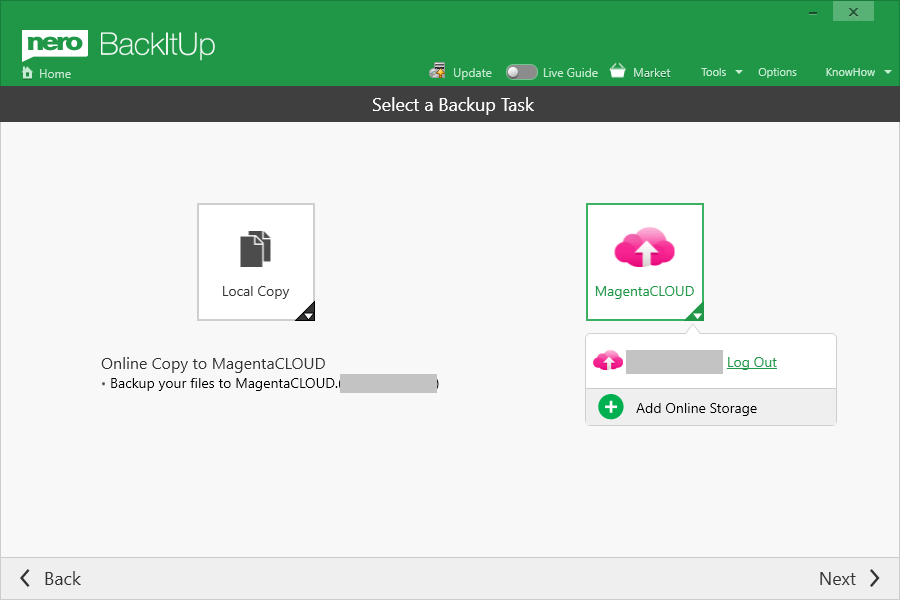
How to backup content to WebDAV storage
Create a new Backup task, select the Online Storage as the backup target.
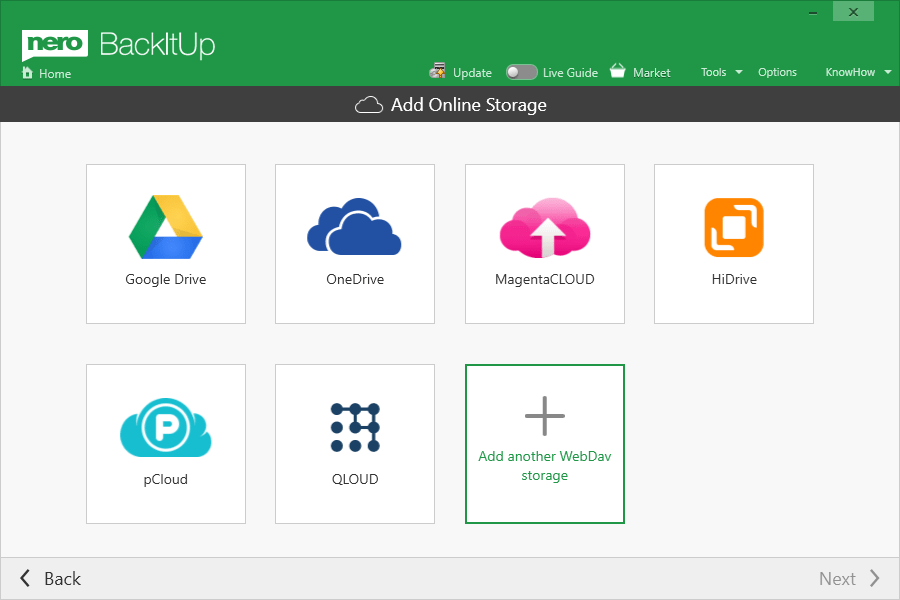
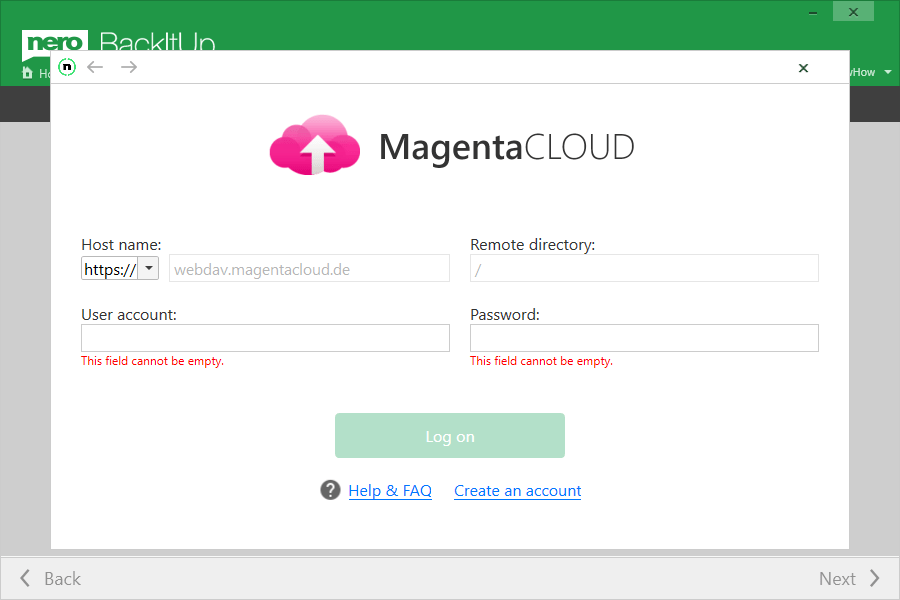
4 new pre-configured WebDAV storage providers are added to the Online Storage list: Meinkonto Cloud, HiDrive, pCloud, and QCloud. Click on any WebDAV storage provider. In the pop-up window, the host name and the Remote directory (means WebDAV Server Root Directory) are disabled to edit. You only need to input the user account and the password.
Info. For some WebDAV storage providers, you need to create an additional access token or access account and password.
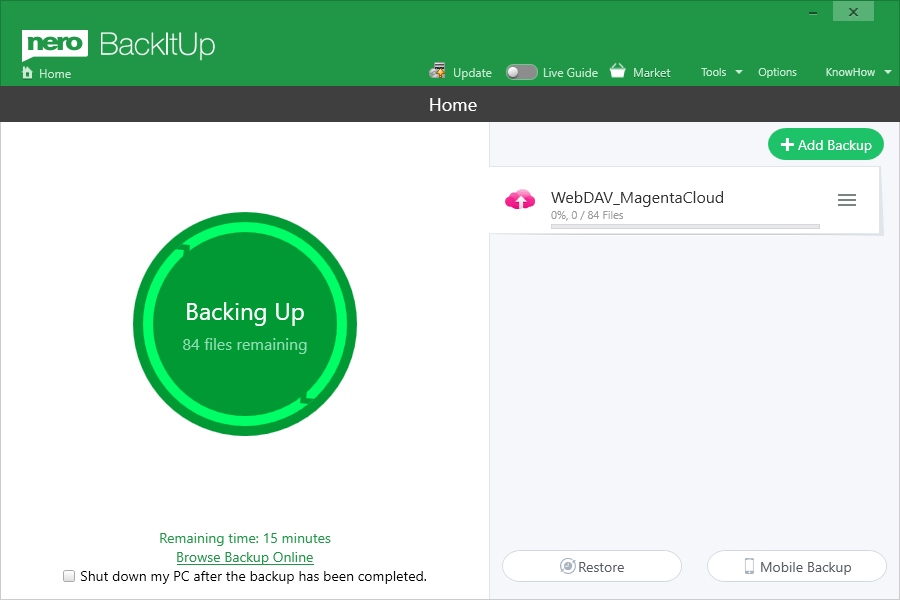
After signing in successfully, Nero BackItUp will guide you back to the previous screen. From there it is the same process as in previous Online Copy Backups: Select the backup source, rename the backup and select the backup schedule type.
After everything is done, the newly created backup job will appear in the Home screen, and the job will auto start.
Backup content to customize WebDAV storage
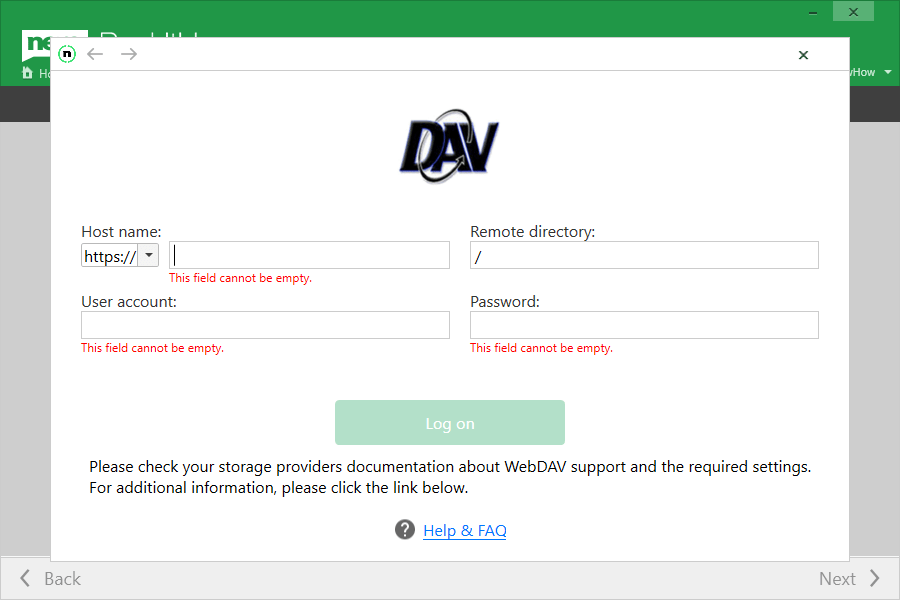
It is also possible to add other WebDAV storage providers which are not pre-configured in Nero BackItUp.
Select “Add another WebDAV storage” and put in the correct host name, remote root directory, account and password. Nero BackItUp also can access the given WebDAV storage provider.
Info: For the host name and remote root directory, it may have different configurations for different WebDAV providers. Please check the help sections from the WebDAV providers.
How to restore content from WebDAV storage
Restoring the content from WebDAV storage is simple. In the restore screen, find the job, find the content you want to restore, set restore path and conflict policy, and start the restore.
The new 2020 Q1 online update for Nero Platinum Suite – Subscription also supplied a new version of Nero BackItUp to improve and fix backup or restore failures.
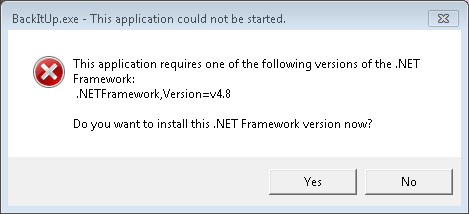
Some PCs, however, may show the following after the update to the new version: “missing Microsoft .NET Framework 4.8”. This is usually caused by Microsoft .Net Framework 4.8 not being installed on the PCs.
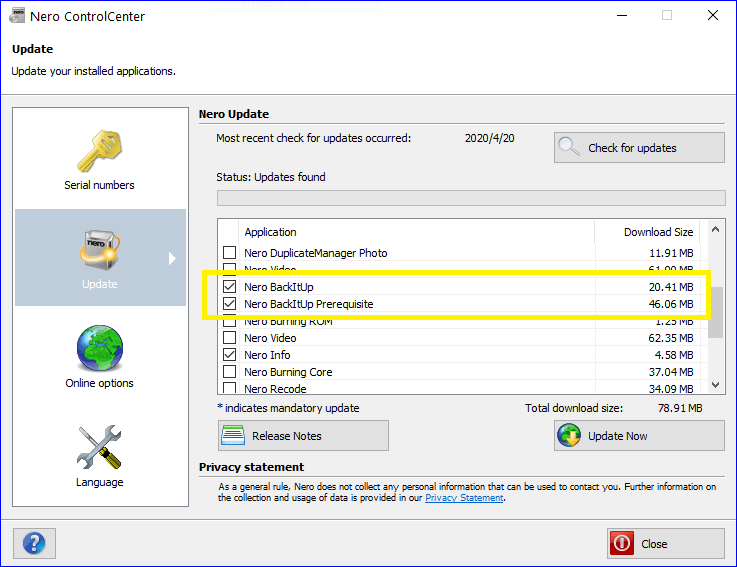
To prevent the issue from happening, please make sure the components “Nero BackItUp” and “Nero BackItUp Prerequisite” are both checked in the Nero ControlCenter online update.
If your system is Windows 10, the latest Windows Updates already includes .Net Framework 4.8. So if your Windows 10 has updated to the latest version, the .Net Framework is already installed on your system.
Check the below page to understand if your Operating System support .Net Framework 4.8 before Updating.
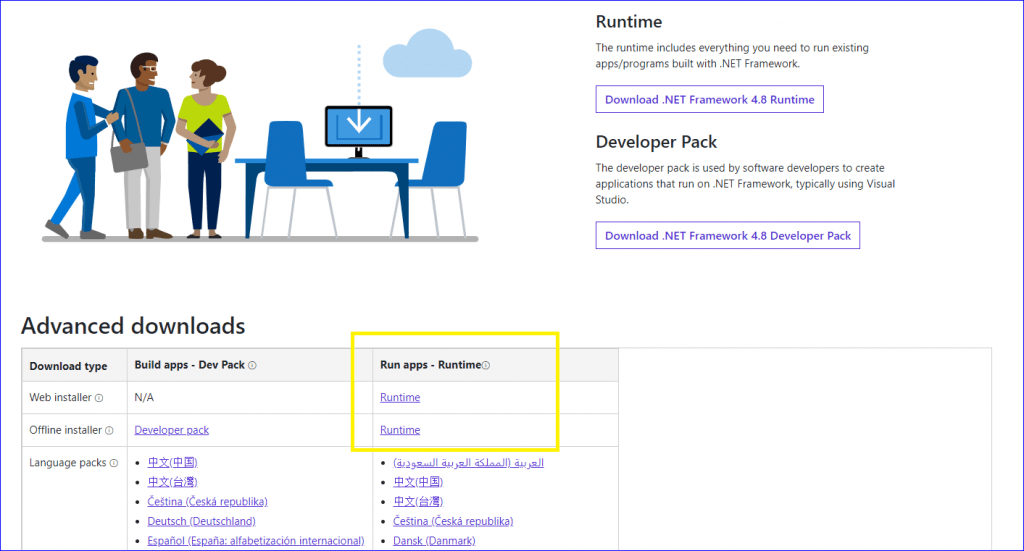
If the issue still exists, please click the button “Yes” in the pop up dialog to install the Microsoft .Net Framework 4.8 on your PC. You are also able to access the below link to find the same information:
In the page, click the button to download the installer from the Microsoft website. After the download is finished just click to install the .Net Framework 4.8.
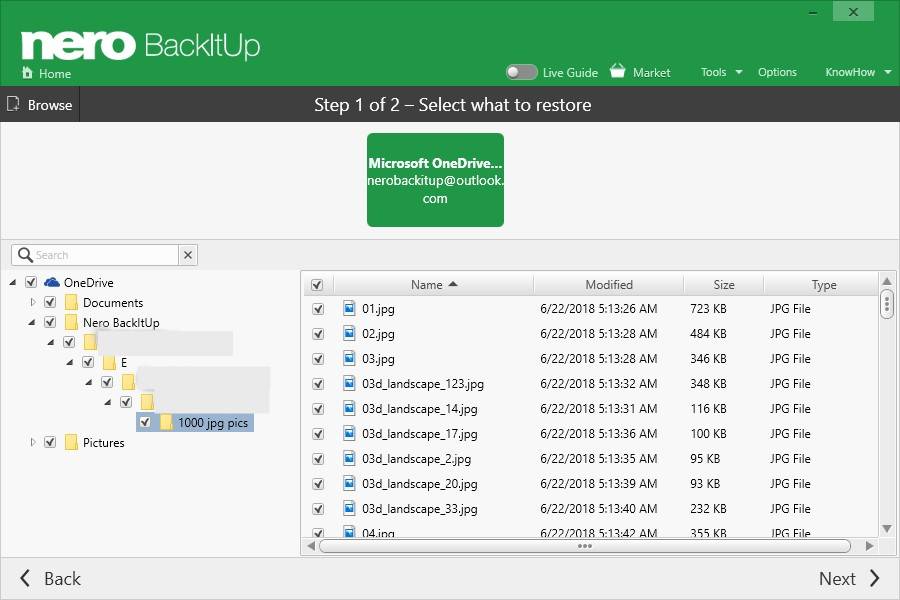
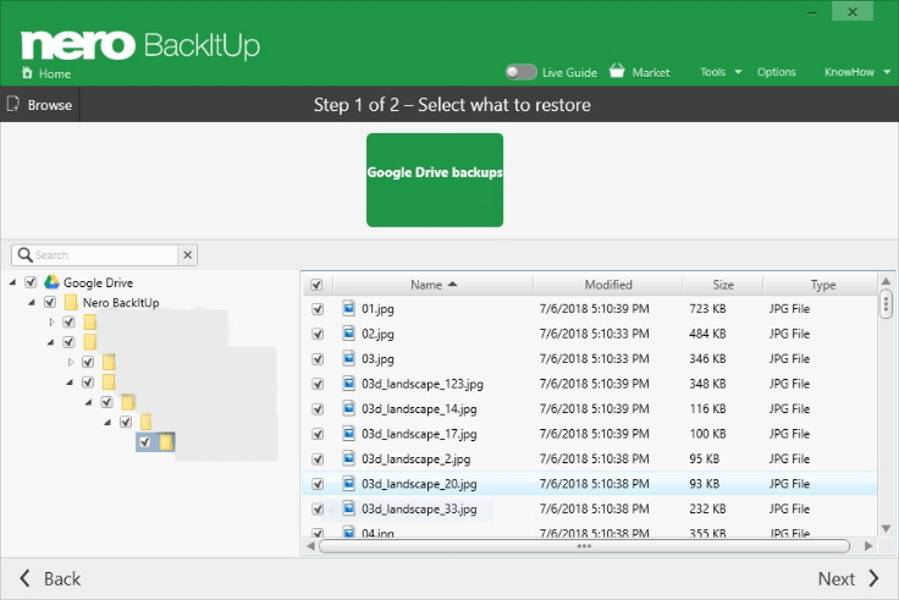
Nero BackItUp does not only support backing up to Microsoft OneDrive or Google Drive but can also restore your data from OneDrive and Google Drive. Nero BackItUp also supports restoring data that you uploaded via other applications, or via the web browser of OneDrive and Google Drive.
The following steps show the process when logged in to your account. For more details on how to login check Nero KnowHow 00127 / Nero KnowHow 00128.
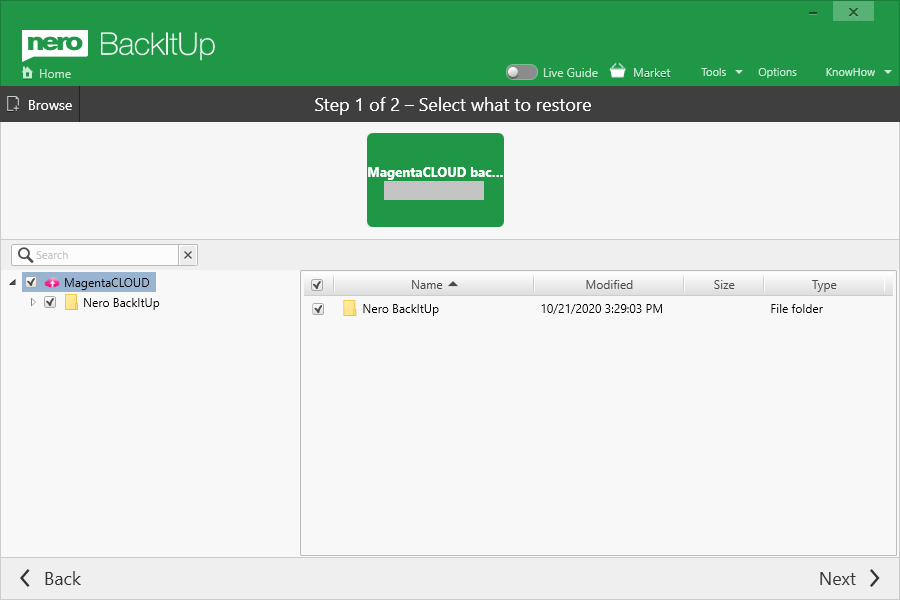
Click the button “Restore” in the Home screen. Nero BackItUp will open the selection screen for the restore job.
Click on your Microsoft OneDrive backup job, or Google drive backup job. In the left panel you can see the folder structure of your BackItUp OneDrive/Google Drive backup. Click on a folder in the left panel to see the file content in the browser on the right hand side. You can select/unselect the folders in the left folder tree and select/unselect the files in the right browser.
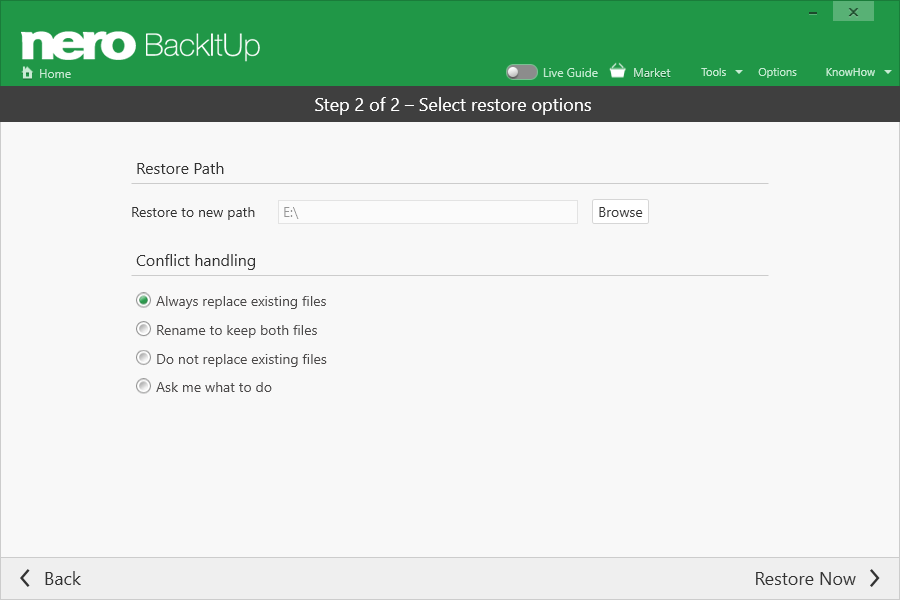
After you selected the folders and files, that you want to have restored, click “Next” to select the restore path and the conflict handling options
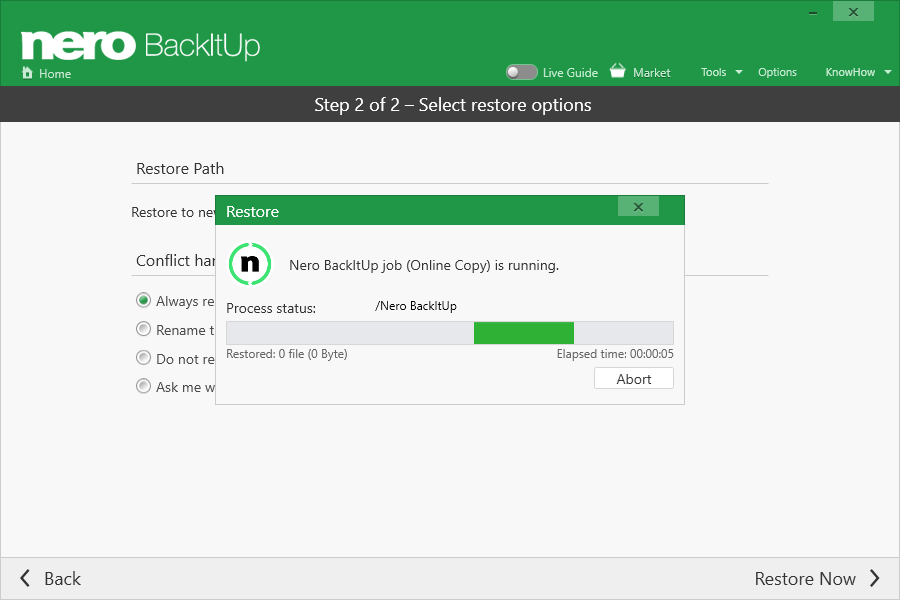
When you have done that, click “Restore Now”. Nero BackItUp will restore the data from Microsoft OneDrive or Google Drive, respectively