From WiFi+Transfer iOS v.1.2.5/Android v.1.3.6, when you turn on WiFi+Transfer, whether you’re using an Android or an Apple device, you are able to map it as network drive on your Windows system.
WiFi+Transfer 2.0 allows you transfer files across platforms through a variety of connection methods.
Transfer in same WiFi network
If you are in a place has WiFi network, then ‘WiFi’ is the stable and secure way to create the connection.
Please make sure your mobile phone and your friend’s mobile phone are connected in the same WiFi network.
Please start WiFi+Transfer at both of mobile phones and keep it active.
After a while, your phone will be listed in your friend’s WiFi+Transfer app, and you will see your friend’s phone in your WiFi+Transfer.
Then, the one who want to send or share the file can click “Send Files” to select the files to send.
If you want to share some files with your friends, but currently there is no Wi-Fi or Internet available, or the signal is very poor, it doesn’t matter, WiFi+Transfer makes offline transfer possible!
Transfer offline
Let’s explain this according to different mobile platforms:
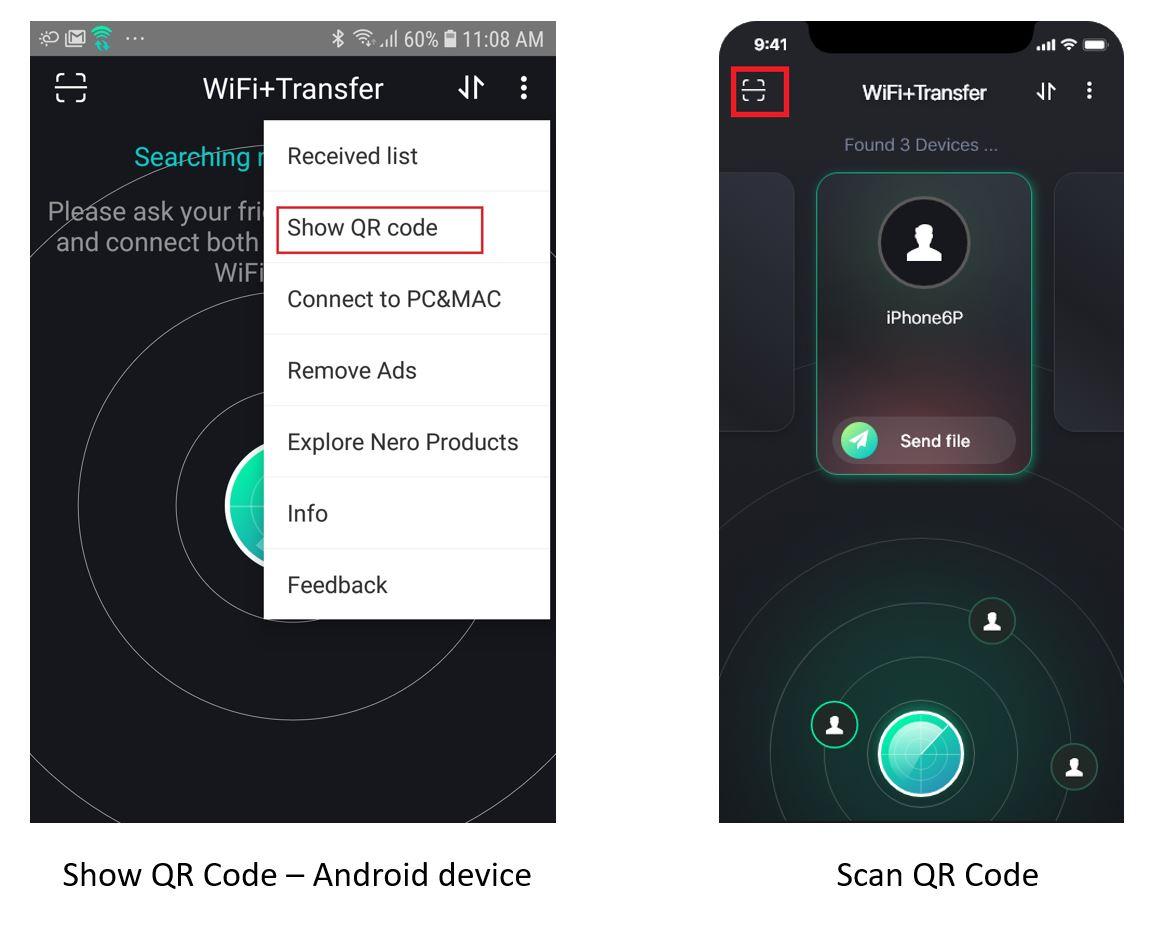
If you and your friend are both using Android devices
On Android devices, you can quickly setup a connection by scanning the QR code. You or your friend, any one shows the QR code and the other scans the QR code.
After a while, your mobile phone will be listed in the other one’s WiFi+Transfer. The transfer channel is created.
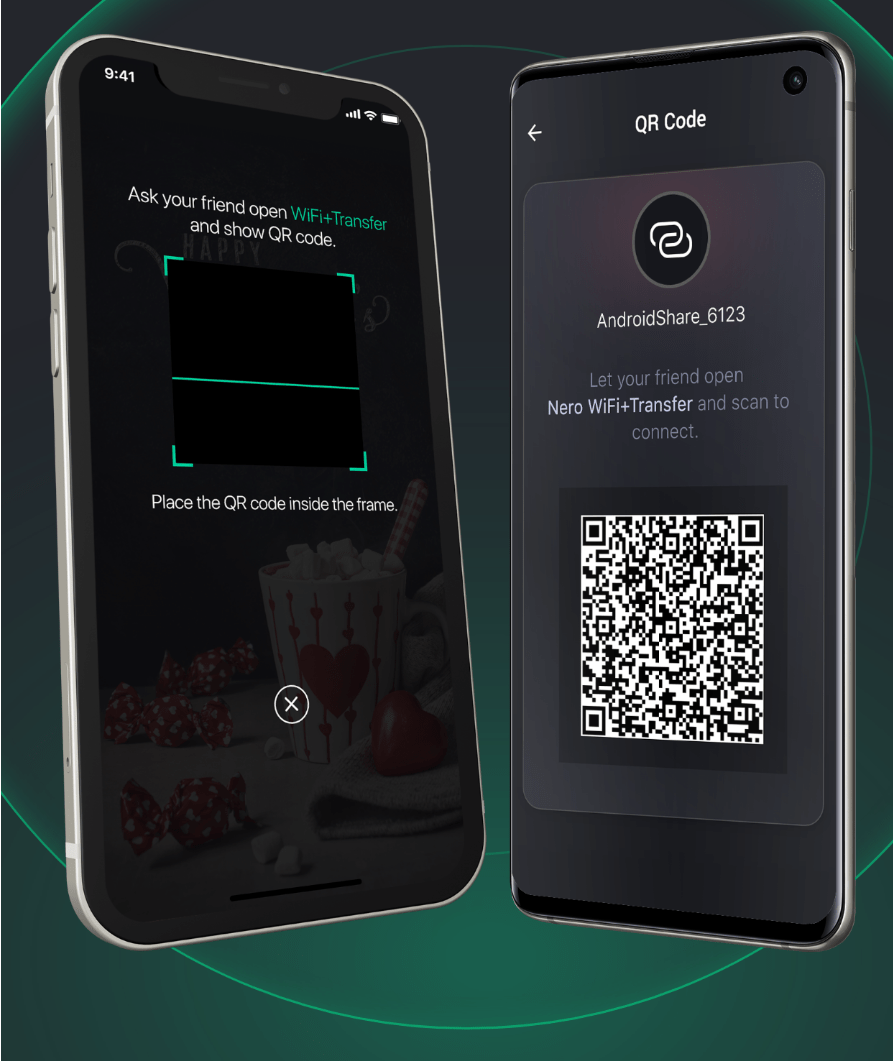
If you and your friend, one uses Android device and the other uses Apple device
Please ask the one using Android device to show the QR code, and the one using Apple device to scan the QR code. After a while, your mobile phone will be listed in the other one’s WiFi+Transfer. The transfer channel is created.
As a short summary, Android device is the one to show QR code to prepare for the connection.
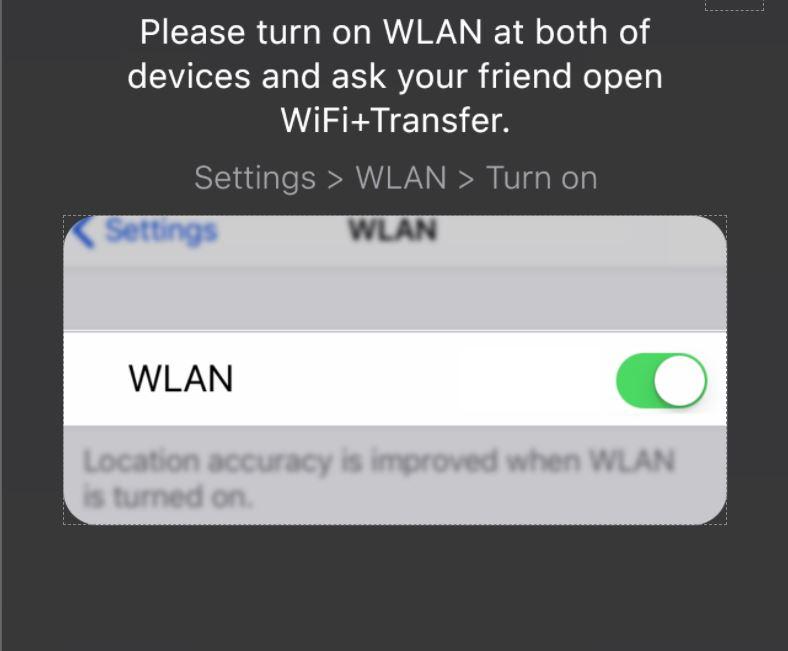
How about the case if you and your friend are both using Apple device
It is even easier. Please turn on WLAN on both devices – that’s all, no need to connect to any WiFi networks. Just wait for a while and your Apple device will be listed in the other one’s WiFi+Transfer. Of course, two iOS devices are best to be closer, not too far away.
Now you can share files with your friends anytime, anywhere.
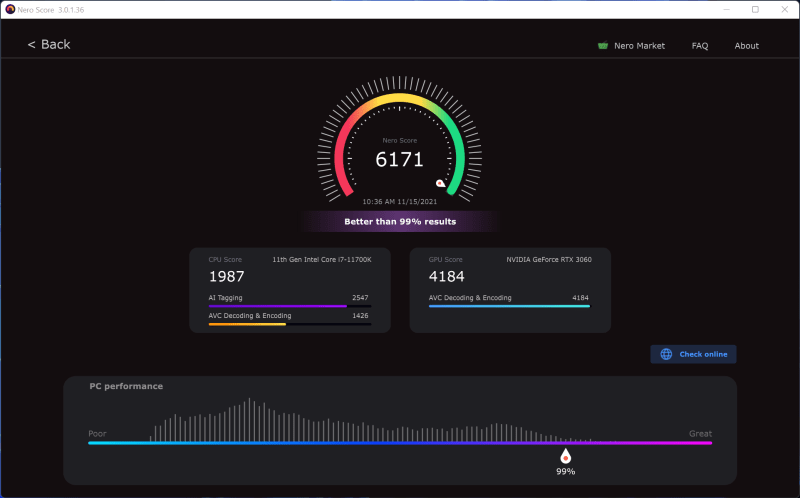
Nero Score is a free tool which measures your processor’s (CPU) multi-core power and is pushing your graphics card (GPU) to it’s maximum limit with real world multimedia use cases.
Nero Score is used by journalists to review hardware, hardware manufacturers to optimize their latest products, as well as computer owners to evaluate their individual system to make purchase decisions.
WHAT KIND OF BENCHMARKS ARE INCLUDED IN NERO SCORE?
The initial version of Nero Score includes an CPU AI benchmark and measures how many pictures per second can be processed with artificial intelligence on the given CPU. So this in not about training an model, but actually applying a trained model on data (called inference). The outcome of this test will let you compare how different CPUs score in this domain. The result can be 1:1 matched with CPU-based AI inference solution, like e.g. Nero AI Photo Tagger. The data set for this test includes 50 pictures that will be inferred 3 times each. The format and size of the pictures doesn’t matter for this test as the AI inference only needs an input of 299×299 pixels in size anyway.
WHAT KIND OF TESTS WILL BE NEXT IN NERO SCORE?
The roadmap for Nero Score foresees an extension into further multi-media related use cases utilizing CPU and multiple GPUs e.g. video encoding, 3D rendering.
HOW IS THE SCORE CALCULATED?
Nero is fully transparency on the calculation of the actual score. Each of the tests executed within Nero Score will generate a score of it’s own. For example: The CPU AI benchmark measures how many pictures are processed per second. This number is multiplied by a factor of 25 to generate the score for this specific test. So there is a 1:1 relation between the score and the performance of the CPU for the given task. A PC with twice the score will be twice as fast.
As soon as there are more tests a total score will be calculated from the single results and the simple formula for this calculation will be made transparent, too. Over time there might be changes on how the score is calculated, those will be called out and documented with revisions to ensure that results are always reproducible and comparable.
HOW CAN I CHECK MORE REAL-WORLD PERFORMANCE DATA?
score.nero.com will list all performance data which submitted by customers. Try Nero Score on your PC now, to see how your PC performs.
WHAT SHOULD BE CONSIDERED BEFORE/WHILE RUNNING A TEST?
Laptops should be connected to a power supply.
The high performance power plan should be selected on any device.
All open applications should be closed.
No user activity should be done in the foreground.
Background activity should be avoided e.g. no virus scans, software update downloads, cloud uploads.
WHICH KIND OF PLATFORMS ARE SUPPORTED BY NERO SCORE?
At the moment Nero Score is supporting Windows 10 64-Bit exclusively.
ARE THERE COMMAND LINE OPTIONS AVAILABLE?
Yes, for example “C:\Program Files (x86)\Nero\Nero Apps\Nero Score\NeroScore.exe” runtimes:50 stoptime:3 logfile:1 will executed the current test 50 times with a pause of 3 seconds in between and create a log file in %temp%\NeroScore (so inside he current users system temp folder).
runtimes: number of times the test should be run
stoptime: time between the runs in seconds
logfile: defines if a log file should be generated 1 = yes / 0 = no
logfilepath: alternative path for the log file e.g. “E:” or “D:\Score”
autoexit: defines if the application should exit after all tests are done 1 =yes / 0 = no
language: use any of the above 4 letter codes to define the application language manually (e.g. es-ES)
exepath: runs a specific application on exit (e.g. “C:\WINDOWS\system32\notepad.exe”)